Health O Meter 402KL User Instructions
Physician beam scale
Hide thumbs
Also See for 402KL:
- User instructions (59 pages) ,
- Assembly & operating instructions (4 pages) ,
- Assembly & operating instructions (4 pages)

Related Manuals for Health O Meter 402KL


Summary of Contents for Health O Meter 402KL
-
Page 1: User Instructions
Model 402KL Physician Beam Scale User Instructions PELSTAR, LLC 9500 West 55 Street, McCoo , IL 60525 P/N UM402KL Rev20150526... -
Page 2: Table Of Contents
Model 402KL ® Thank you for your purchase of this Health o meter Professional product. Please read this manual carefully, and keep it for easy reference or training. TABLE OF CONTENTS Caution and Warning....................3 Specifications for This Scale ..................3 Certifications / Disposal / Service ................4 Assembly Instructions 402KL Scale .................5... -
Page 3: Caution And Warning
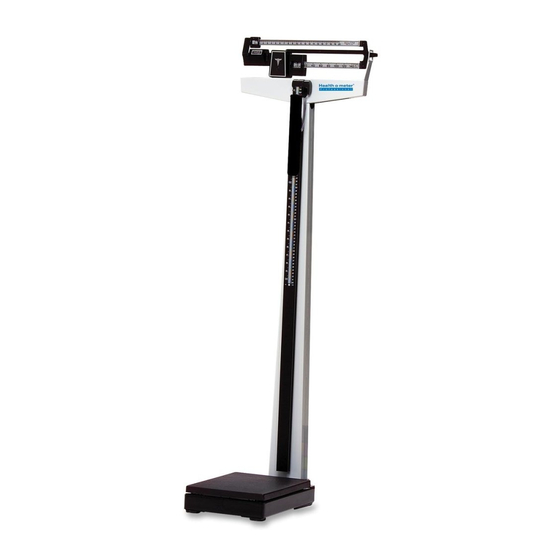
SPECIFICATIONS FOR THIS SCALE General The Model 402KL physician beam scale employs a proven and rugged mechanical design to measure patient weight and height. Each precision scale is designed to provide accurate, reliable, and repeatable weight measurements. In addition, each scale is designed to provide the user with features that make the weighing process simple, fast, and convenient. -
Page 4: Certifications / Disposal / Service
CUSTOMER SERVICE INFORMATION The 402KL physician beam scale is shipped disassembled in one carton. Carefully inspect the carton for shipping damage before unpacking. If damage is found, contact Customer Service. - Page 5 402KL ASSEMBLY INSTRUCTIONS Before Assembly Each 402KL physician beam scale is shipped disassembled in one carton. Carefully inspect the carton for shipping damage before unpacking. If damage is found, contact your shipper or a ® Health o meter Professional representative immediately. Claims must be filed with the shipper as soon as possible after receipt of the package.
- Page 6 1. Carefully remove the scale platform and pillar from the carton. Place the scale platform and pillar on a flat, level, and dry surface. Using a table can be helpful for assembly of 402KL scale (see Figures 1 & 5 on pages 7 & 9).
- Page 7 402KL ASSEMBLY INSTRUCTIONS (CONTINUED) 402KL Assembly Figure 1 Figure 2...
- Page 8 402KL ASSEMBLY INSTRUCTIONS (CONTINUED) Tie wrap Finger pull loop Studs Figure 3 Finger pull loop Pillar nuts Figure 4...
- Page 9 402KL ASSEMBLY INSTRUCTIONS (CONTINUED) Figure 5 Pillar nuts Finger pull loop Steel rod Lever extension Figure 6...
-
Page 10: Transportation
TRANSPORTATION Preparing a 402KL Scale for Transportation (see Figures 7-10 on pages 11 & 12) This scale can be easily assembled with a wheel bracket (Part Number 55000, see Figure 7 on page 11) for storage, or for transport from one room to another. This scale does not include 55000 Wheel Bracket, and must be acquired separately. - Page 11 TRANSPORTATION (CONTINUED) 55000 Wheel bracket Figure 7 Figure 8...
- Page 12 TRANSPORTATION (CONTINUED) Clamping plate Figure 9 Wheel Bracket Mounting screws Base Figure 10...
-
Page 13: Operating Instructions
OPERATING INSTRUCTIONS Zero Balance Adjustment (see Figures 11 – 12 on page 14) The scale should be checked periodically, particularly when moved, by following the instructions below: Note: A flat head screwdriver is required. 1. Ensure that the scale is located on a hard, flat, and level surface. Step on and off scale several times in order to align all internal parts. - Page 14 OPERATING INSTRUCTIONS (CONT) Pointer Upper poise bar Upper poise weight Lower poise weight Balance ball screw Lower poise bar Pillar head Pillar Figure 11 Pounds (lb) Kilograms (kg) Balance ball Trig loop Figure 12...
- Page 15 OPERATING INSTRUCTIONS (CONT) Indicator Value reads 29.75 lb Value reads 13.5 kg Combined value: 100 lb + 29.75 lb = 129.75 lb - or - Combined value: 45.4 kg Indicator 13.5 kg = 58.9 kg Value reads 100 lb Value reads 45.4 kg Figure 13...
-
Page 16: Counterweight Instructions
COUNTERWEIGHT INSTRUCTIONS Counterweight Instruction (see Figures 14 – 20 on page 18 - 20) In order to increase the scale’s capacity to a maximum value of 490 lb / 210 kg, the counterweight set (55090, see Figure 14 on page 18) must be acquired. The scale can be easily assembled with a counterweight set (Part Number 55090 for whole set, 55080 for counterweight in pounds, and 55085 for counterweight in kilograms). -
Page 17: Figure
COUNTERWEIGHT INSTRUCTIONS (CONT) Counterweight Instructions for Weighing in Kilograms (kg) Note: The 30 kg counterweight is required when weighing a patient who is over 170 kg. Counterweight Instructions for Weighing a Patient 171 - 190 (kg) 1. When a patient weighs between 171 - 190 kg, place the lower poise weight at 140 kg.(See Figure 19 on page 20) 2. -
Page 18: Figure
COUNTERWEIGHT INSTRUCTIONS (CONT) Counterweight Set (55090) Figure 14 Notch from the left Figure 15... - Page 19 COUNTERWEIGHT INSTRUCTIONS (CONT) 391 - 400 lb Assembly Figure 16 401 - 440 lb Assembly Figure 17 441 - 490 lb Assembly Figure 18...
- Page 20 COUNTERWEIGHT INSTRUCTIONS (CONT) 171 - 190 kg Assembly Figure 19 191 - 210 kg Assembly Figure 20...
-
Page 21: Height Measurement Instructions
HEIGHT MEASUREMENT INSTRUCTIONS Note: Use caution when sliding height rod up and down. The rod should move smoothly, do not move the rod in a jerking motion. Note: Fold headpiece down when not in use. Height Measurements (Refer to Figures 21-27) Note: A patient needs to be a minimum of 23-5/8”... - Page 22 HEIGHT MEASUREMENT INSTRUCTIONS Height Rod Below 46 3 ” Height Rod Extended Above 46 3 ” Indicator Inches read: 69” + Cm read: 105 cm + Cm read: 176 cm + Inches read: 41” + 3/8” = 69 3/8” 0.2 cm = 176.2 cm 0.2 cm = 105.2 cm 3/8”...
-
Page 23: Troubleshooting
The accuracy of the 402KL scale when calibrated at the factory is within +/- 0.1kg or ¼ pound. For the most accurate weight measurement, use the scale on a hard level surface and stand in the center of the platform. -
Page 24: Maintenance
MAINTENANCE The following provide instructions for maintenance and cleaning for the 402KL. Maintenance operations other than those described in this manual should be performed by qualified service personnel. MAINTENANCE Before first use and after periods of non-use, check the scale for proper operation and function. -
Page 25: Warranty
® ® Health o meter is a registered trademark of Sunbeam Products, Inc. used under license. Health o meter Professional products are manufactured, designed, and owned by Pelstar, LLC. We reserve the right to improve, ® enhance, or modify Health o meter Professional product features or specifications without notice. - Page 27 Balanza Médica con Estadímetro Modelo 402KL Instrucciones de Uso PELSTAR, LLC 9500 West 55 Street, McCoo , IL 60525 P/N UM402KL Rev20150526...
- Page 28 Modelo 402KL ® Gracias por comprar este producto Health o meter Professional. Lea con detenimiento este manual, y guárdelo para consulta rápida o capacitación. ÍNDICE Precauciones ......................3 Especificaciones de la balanza .................3 Certificaciones / conectividad / servicio..............4 Instrucciones de ensamblaje 402KL Balanza ............5 Transporte ........................10...
-
Page 29: Precauciones
ESPECIFICACIONES DE LA BALANZA General La balanza médica con estadímetro modelo 402KL emplea un diseño mecánico garantizado y resistente para medir el peso y la altura del paciente. Cada balanza de precisión está diseñada para mostrar medidas de peso exactas, confiables y repetibles. Además, cada balanza está... -
Page 30: Certificaciones / Conectividad / Servicio
INFORMACIÓN DE SERVICIO AL CLIENTE La balanza médica con estadímetro 402KL se envía desarmada dentro de una sola caja. Revise la caja con detenimiento para localizar daños causados durante el envío antes de desempacar la balanza. Si encuentra algún daño, contacte a Servicio al Cliente. -
Page 31: Instrucciones De Ensamblaje 402Kl Balanza
402KL INSTRUCCIONES DE ENSAMBLAJE Antes de ensamblar Cada balanza haz médico 402KL se suministra desmontado en un cartón. Revise la caja con detenimiento para localizar daños causados durante el envío antes de desempacar la balanza. Si encuentra algún daño, contacte de inmediato al transportista o a un representante de Health o meter®... - Page 32 1. Retire cuidadosamente de la caja la plataforma de la balanza y la columna. Coloque la plataforma de la balanza y la columna en una superficie plana, nivelada y seca. Para ensamblar la balanza 402KL puede ayudarse con una mesa (ver las figuras 1 y 5 en las páginas 7 y 9).
- Page 33 INSTRUCCIONES DE ENSAMBLAJE DEL MODELO 402KL (CONTINUACIÓN) Ensamblaje del modelo 402KL Figura 1 Columna Plataforma Tuercas Base Figura 2...
- Page 34 INSTRUCCIONES DE ENSAMBLAJE DEL MODELO 402KL (CONTINUACIÓN) Cincho metálico Tuercas Figura 3 metálico Tuercas de la columna Figura 4...
- Page 35 INSTRUCCIONES DE ENSAMBLAJE DEL MODELO 402KL (CONTINUACIÓN) Varilla Aro metálico Llave con extensión de palanca Llave con extensión de palanca Figura 5 Tuercas de la Aro metálico columna Varilla Extensión de la palanca Figura 6...
-
Page 36: Transporte
TRANSPORTE Preparación de la balanza 402KL para su transporte (ver las figuras 7-10 en las páginas 11-12) La balanza puede ensamblarse fácilmente a un soporte con ruedas (Parte número #55000, ver Figura 7 en la página 11) para guardarla o para desplazarla de una habitación a otra. Esta balanza no incluye el soporte con ruedas 55000, que debe adquirirse por separado. - Page 37 TRANSPORTE (CONTINUACIÓN) Soporte con ruedas 55000 Figura 7 Columna Plataforma Placa de sujeción Base Soporte con ruedas Tornillos de montaje Figura 8...
- Page 38 TRANSPORTE (CONTINUACIÓN) Placa de sujeción Figura 9 Soporte con ruedas Tornillos de montaje Base Figura 10...
-
Page 39: Instrucciones De Operación
INSTRUCCIONES DE OPERACIÓN Cero Ajuste del balance (Ver Figuras 11 – 12 en la página 14) La balanza debe ser revisado periódicamente, sobre todo cuando se mueve, siguiendo las instrucciones a continuación: Nota: Se requiere un destornillador de cabeza plana. 1. - Page 40 INSTRUCCIONES DE OPERACIÓN (CONTINUACIÓN) Barra de peso Indicador Peso superior superior Peso inferior Perno de la balanza Barra de peso inferior Cabecera de la Columna columna Figura 11 Libras (lb) Kilogramos (kg) Bola de balance Boquilla Figura 12...
- Page 41 INSTRUCCIONES DE OPERACIÓN (CONTINUACIÓN) Indicador La lectura indica 29.75 lb La lectura indica 13.5 kg Valor combinado: 100 lb + 29.75 lb = 129.75 lb - o - Valor combinado: 45.4 kg Indicador 13.5 kg = 58.9 kg La lectura indica 100 lb La lectura indica 45.4 kg Figura 13...
-
Page 42: Instrucciones Del Contrapeso
INSTRUCCIONES DEL CONTRAPESO Instrucciones del contrapeso (ver las Figuras 14 – 20 en las páginas 18-20) Para incrementar la capacidad de la balanza hasta alcanzar un valor máximo de 490 lb / 210 kg, debe adquirir el juego de contrapesos (55090, ver Figura 14 en la página 18). La balanza puede ensamblarse con facilidad con el juego de contrapesos (Parte número 55090 para el juego completo, 55080 para adquirir los contrapesos en libras y 55085 para los contrapesos en kilogramos). - Page 43 INSTRUCCIONES DE LOS CONTRAPESOS (CONTINUACIÓN) Instrucciones de los contrapesos para pesar en kilogramos (kg) Nota: Se necesita el contrapeso de 30 kilos cuando pese a un paciente que supere los 170 kg. Instrucciones de los contrapesos para pesar a un paciente de 171 - 190 (kilogramos) 1.
- Page 44 INSTRUCCIONES DE LOS CONTRAPESOS (CONTINUACIÓN) Juego de contrapesos (55090) Figura 14 Tercer muesca de la izquierda Figura 15...
- Page 45 INSTRUCCIONES DE LOS CONTRAPESOS (CONTINUACIÓN) Ensamblaje de 391 - 400 lb Figura 16 Ensamblaje de 401 - 440 lb Figura 17 Ensamblaje de 441 - 490 lb Figura 18...
- Page 46 INSTRUCCIONES DE LOS CONTRAPESOS (CONTINUACIÓN) Ensamblaje de 171 - 190 kg Figura 19 Ensamblaje de 191 - 210 kg Figura 20...
-
Page 47: Instrucciones De Medición De Altura
INSTRUCCIONES DE MEDICIÓN DE ALTURA Nota : Tenga cuidado al deslizamiento tallímetro arriba y abajo. El vástago debe moverse suavemente , no mueva la varilla en un movimiento espasmódico. Nota : Doble cabezal hacia abajo cuando no esté en uso. Mediciones De Altura (ver las Figuras 21-27) Nota: Un paciente tiene que ser un mínimo de 23-5 / 8 "... - Page 48 INSTRUCCIONES DE MEDICIÓN DE ALTURA allímetro Abajo 46 3 ” Tallímetro extendido por encima de 46 3 ” indicador Pulgadas leídas: 69” Cm leídas: 105 cm + Cm leídas: 176 cm + Pulgadas leídas: 41” + + 3/8” = 69 3/8” 0.2 cm = 176.2 cm 0.2 cm = 105.2 cm 3/8”...
-
Page 49: Solución De Problemas
La exactitud de la balanza 402KL cuando se calibra en la fábrica es de más o menos 0,1 kg o ¼ libra. Esto significa que dos balanzas correctamente calibradas podrán variar 0,1 kg o ¼ libra entre sí... -
Page 50: Mantenimiento
MANTENIMIENTO La siguiente proporciona instrucciones para el mantenimiento y limpieza para el 402KL. Las operaciones de mantenimiento que no sean los descritos en este manual deben ser realizadas por personal cualificado. MANTENIMIENTO Antes de utilizar la balanza por primera vez, y después de largos periodos sin utilizarla, asegúrese que esta funcione correctamente. -
Page 51: Garantia
Pelstar, LLC., fabrica, diseña, y es dueño de los productos Health o meter Professional. ® Nos reservamos el derecho de mejorar o modificar las características o especificaciones de los productos Health o meter Professional sin previo aviso. © Pelstar, LLC 2015... - Page 53 Modèle 402KL Balance à fléau pour médecins Notice d'utilisation PELSTAR, LLC 9500 West 55 Street, McCoo , IL 60525 P/N UM402KL Rév20150526...
- Page 54 Model 402KL ® Merci d'avoir acheté ce produit Health o meter Professional. Veuillez lire ce manuel attentivement, et le garder comme référence ou comme formation. TABLE DES MATIÈRES Précaution et Avertissement ..................3 Caractéristiques pour cette balance ................3 Certifications / Connectivité / Disposition ..............4 Instructions d'Assemblage Balance 402KL .............5...
-
Page 55: Précaution Et Avertissement
CARACTÉRISTIQUES POUR CETTE BALANCE Informations générales La balance à fléau pour médecins de modèle 402KL emploie une conception mécanique éprouvée et robuste pour mesurer le poids et la hauteur du patient. Chaque balance de précision est conçue pour fournir des mesures précises, fiables et reproductibles de poids. En outre, chaque balance est conçue pour fournir à... -
Page 56: Certifications / Connectivité / Disposition
INFORMATIONS SUR LE SERVICE À LA CLIENTÈLE La balance à fléau pour médecins de modèle 402KL est livrée démontée dans un seul carton. Inspectez soigneusement le carton pour des dommages pendant le transport avant de le déballer. - Page 57 402KL INSTRUCTIONS D'ASSEMBLAGE Avant Assemblage Chaque balance numérique à faisceau au niveau des yeux 402KL est livrée dans une seule ’ boîte. Inspectez attentivement l extérieur de la boîte pour tout dommage de livraison avant de ’ ’ ouvrir. S il y a du dommage, contactez votre livreur ou un représentant Health o meter®...
- Page 58 L'utilisation d'une table peut être utile pour l'assemblage de la balance 402KL (voir les figures 1 et 5 aux pages 7 et 9). 13. Retirez les quatre écrous du pilier et la clé du carton.
- Page 59 402KL INSTRUCTIONS D'ASSEMBLAGE (SUITE) 402KL Assemblage Figure 1 Pilier Plateforme de la Montants balance Base Figure 2...
- Page 60 402KL INSTRUCTIONS D'ASSEMBLAGE (SUITE) Attache autobloqu ante Boucle de tirage par Montants Figure 3 Boucle de tirage par Écrous de pilier Figure 4...
- Page 61 402KL INSTRUCTIONS D'ASSEMBLAGE (SUITE) Tige en acier Boucle de tirage Vis d'extension de levier par doigt Vis d'extension de levier Figure 5 Écrous de pilier Boucle de tirage par Tige en acier Extension de Levier Figure 6...
- Page 62 TRANSPORTS Préparation d'une balance 402KL pour le transport (voir les figures 7-10 aux pages 11 et 12) Cette balance peut être facilement assemblée avec un support de roue (numéro de pièce 55000, voir la figure 7 à la page 11) pour le stockage, ou pour le transport d'une pièce à une autre.
-
Page 63: Transport
TRANSPORT (SUITE) 55000 Support de roue Figure 7 Plateforme de la balance Pilier Plaquette de serrage Base Support de roue Vis de montage Figure 8... - Page 64 TRANSPORT (SUITE) Plaquette de serrage Figure 9 Support de roue Vis de fixation Base Figure 10...
-
Page 65: Consignes D'utilisation
CONSIGNES D'UTILISATION Zéro Réglage de la Balance Balance doit être vérifiée périodiquement, en particulier quand il est déplace, en suivant les instructions ci-dessous : Remarque: Un tournevis à tête plate est nécessaire. 1. Assurez-vous que l'balance se trouve sur une surface plane et dure, et le niveau. Montez sur et hors balance à... - Page 66 CONSIGNES D'UTILISATION (SUITE) Pointeur Barre de poise Poids de poise supérieure supérieur Poids de poise inférieur Vis à bille de la Barre de poise balance inférieure Tête de Pilier pilier Figure 11 Livres (lb) Kilogrammes (kg) Bille de la Lunette balance Figure 12...
- Page 67 CONSIGNES D'UTILISATION (SUITE) Indicateur Valeur lit 29,75 lb Valeur lit 13,5 kg Valeur combinée : 100 lb + 29,75 lb = 129,75 lb - ou - Valeur combinée : 45,4 kg Indicateur 13,5 kg = 58,9 kg Valeur lit 100 lb Valeur lit 45.4 kg Figure 13...
-
Page 68: Instructions Pour Le Contrepoids
INSTRUCTIONS POUR LE CONTREPOIDS Instruction pour le contrepoids (voir les figures 14-20 aux les pages 18-20) Afin d'augmenter la capacité de la balance à une valeur maximale de 490 lb/210 kg, l'ensemble de contrepoids (55090, voir la figure 14 à la page 18) doit être acheté. La balance peut être facilement assemblée avec un ensemble de contrepoids (pièce numéro 55090 pour ensemble, 55080 pour le contrepoids en livres et 55085 pour le contrepoids en kilogrammes). - Page 69 INSTRUCTIONS POUR LE CONTREPOIDS (SUITE) Instructions pour le contrepoids pour le pesage en kilogrammes (kg) Remarque : Le contrepoids de 30 kg est requis lorsqu'un patient pèse plus de 170 kilogrammes. Instructions pour le contrepoids pour le pesage d'un patient de 171-190 (kg) 5.
- Page 70 INSTRUCTIONS POUR LE CONTREPOIDS (SUITE) Ensemble de contrepoids (55090) Figure 14 encoche de la gauche Figure 15...
- Page 71 INSTRUCTIONS POUR LE CONTREPOIDS (SUITE) Ensemble 391-400 lb Figure 16 Ensemble 401-440 lb Figure 17 Ensemble 441-490 lb Figure 18...
- Page 72 INSTRUCTIONS POUR LE CONTREPOIDS (SUITE) Ensemble 171-190 kg Figure 19 Ensemble 191-210 kg Figure 20...
-
Page 73: Mesure De Hauteur D' Instructions
MESURE DE HAUTEUR D' INSTRUCTIONS Remarque : Faites preuve de prudence lorsque vous faites glisser toise de haut en bas. La tige doit se déplacer en douceur, ne pas déplacer la tige dans un mouvement saccadé. Remarque : Plier casque lorsqu'ils ne sont pas en cours d'utilisation. Les mesures de hauteur (voir les Figures 21-27 aux pages 21 et 22) Remarque: Un patient doit être un minimum de 23-5 / 8 "... - Page 74 MESURE DE HAUTEUR D' INSTRUCTIONS Hauteur Rod ci dessous 46 3 ” Hauteur Rod étendue au dessus 46 3 ” Indicateur Pouces lus: 69” + Cm lire: 105 cm + 0.2 Cm lire: 176 cm + 0.2 Pouces lus: 41” + 3/8” 3/8”...
-
Page 75: Dépannage
La précision de la balance 402KL lorsque calibré en usine est de +/- 0,1 kg ou un quart de livre. Pour la mesure de poids la plus précise, utiliser la balance sur une surface dure et se tenir dans le centre de la plate-forme. -
Page 76: Entretien
Les pages suivantes fournissent des instructions pour la maintenance, le nettoyage, la calibration et le dépannage de la balance 402KL. Les opérations de maintenance autres que celles décrites dans ce manuel devraient être effectuées par du personnel de service qualifié. -
Page 77: Garantie
VEUILLEZ ENREGISTRER VOTRE BALANCE POUR LA COUVERTURE DE GARANTIE AU: www.homscales.com Health o meter® est une marque de commerce enregistré de Sunbeam Products, Inc. Utilisée sous licence. Les produits Health o meter® Professional sont manufacturés, conçus, et possédés par Pelstar, LLC.