Table of Contents
Advertisement
Available languages
Available languages
Quick Links
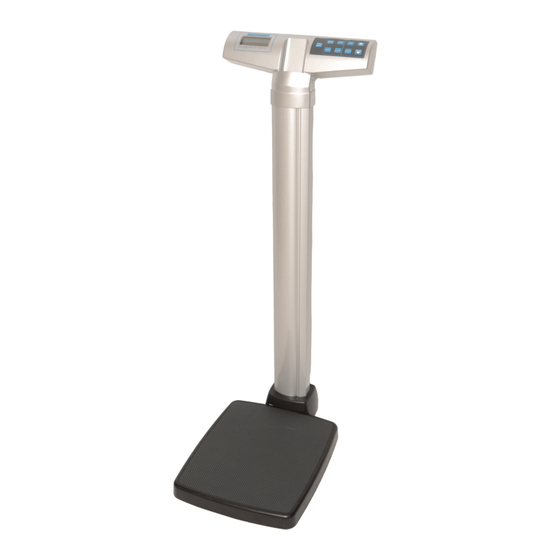
499KL / 499KG
Waist-High Digital Beam Scale
E112697
UL 60601-1
CSA C22.2 No. 601.1-M90
User Instructions
Para ver las instrucciones de uso en español visita www.homscales.com
Pour les instructions de l'utilisateur dans la visite française www.homscales.com
PELSTAR, LLC
9500 West 55th St. McCook, IL 60525-7110 USA
www.homscales.com
®
Health o meter
Professional 499KL
®
Health o meter
Professional 499KG
© Pelstar, LLC 2019
P/N UM499KL 499KG Rev 20190430_Web
1
Advertisement
Chapters
Table of Contents

Related Manuals for Health O Meter Professional 499KG


Summary of Contents for Health O Meter Professional 499KG
- Page 1 Para ver las instrucciones de uso en español visita www.homscales.com Pour les instructions de l'utilisateur dans la visite française www.homscales.com PELSTAR, LLC 9500 West 55th St. McCook, IL 60525-7110 USA www.homscales.com ® Health o meter Professional 499KL ® Health o meter Professional 499KG © Pelstar, LLC 2019...
-
Page 2: Table Of Contents
Professional 499KL ® Health o meter Professional 499KG ® Thank you for purchasing this Health o meter Professional product. Please read this manual carefully, and keep it for easy reference or training. TABLE OF CONTENTS Cautions and Warnings ..................... 3 Specifications for This Scale .................. -
Page 3: Cautions And Warnings
When operating the scale with the AC adapter: Operate this scale exclusively with the AC adapter provided by Health o meter Professional. Use of an unspecified adapter will void the warranty, and can pose a serious safety hazard. -
Page 4: Specifications For This Scale
499KG: 220 kg x 0.1 kg Power Requirements Adapter Model No. UE15WCP1-090050SPA, Part No. UE160714HKKK1-P ® Health o meter Professional Model (ADPT30) (Not Included) Input: 100-240V – 50/60Hz, 500mA Output: 9.0V - - - 0.5A Or 6 AA Batteries (included) Environmental Operating temperatures: 50°F to 104°F (10°C to 40°C) -
Page 5: Certifications / Connectivity / Disposal
Scale Disposal This Health o meter® Professional scale must be disposed of properly as electronic waste. Follow the national, regional or local regulations that apply to you for disposal of electronic waste or batteries. Do not dispose of this device in the domestic waste stream. -
Page 6: Assembly Instructions
Carefully inspect the carton for shipping damage before unpacking. If damage is found, contact your shipper or a Health o meter® Professional representative immediately at 1-800-815-6615. Claims must be filed with the shipper as soon as possible after receipt of the package. The following information details what you will find inside the main carton as you unpack the parts for assembly. - Page 7 ASSEMBLY INSTRUCTIONS (CONTINUED) 1. Carefully remove the scale platform and columns A and B Screws and washers from the carton. Place the scale platform and columns on a flat, level, and dry surface Remove the 4 column mounting screws and washers from the bottom of column B and set aside for assembly Column B...
- Page 8 ASSEMBLY INSTRUCTIONS (CONTINUED) 3. Locate the load cell connector cable inside column A. While Column B Column A (top) holding column B, slide the (bottom) cable through the center opening at the top of column B. Push the cable all the way through Column B until the plug reaches the bottom of the column.
- Page 9 ASSEMBLY INSTRUCTIONS (CONTINUED) 5. Place scale platform C on its Column B side and place Column B on its side, perpendicular to the platform. The front of the display head on Column A should be facing forward and above scale platform C. Column A 6.
- Page 10 ASSEMBLY INSTRUCTIONS (CONTINUED) 7. Position and secure the connected columns A and B to scale platform C. Locate the 4 column mounting screws previously removed in step 2. Ensure that washers are located between the screw heads and the scale platform C screw holes.
-
Page 11: Powering The Scale
1. Connect the AC adapter (not included) into the adapter jack on the scale platform C. Warning: To avoid a safety hazard, use only a Health o meter® Professional AC adapter. 2. Plug the scale’s AC adapter into the power source. -
Page 12: Set-Up Instructions
SET UP INSTRUCTIONS Auto-Off Function As an energy saving feature, the scale will automatically turn off after 2 minutes of inactivity. By default, this function is enabled. Note: The scale will not auto-off if a weight is held on the display. -
Page 13: Operating Instructions
OPERATING INSTRUCTIONS Keypad (Note: there is no LB/KG button on the 499KG) Function Description ON/OFF Turns scale on and off. ZERO Zeroes or tares the scale prior to a weighing. Holds the weight value of the patient on the display until the button is HOLD/RELEASE pressed again to clear the value. - Page 14 OPERATING INSTRUCTIONS (CONTINUED) Weighing a Patient Note: When this scale is turned on, it will always default to the settings and units last used (LB or KG). 1. With all weight off the scale, press the ON/OFF button to turn on the scale. 2.
- Page 15 OPERATING INSTRUCTIONS (CONTINUED) BMI Function Body Mass Index (BMI) is a ratio between a person’s weight and height and interpreted as a BMI score. This BMI score is then used as a tool to categorize a patient as underweight, normal, overweight, obese or morbidly obese.
-
Page 16: Assembly Instructions For Optional Height Rod (499Klrod)
ASSEMBLY INSTRUCTIONS FOR OPTIONAL HEIGHT ROD (499KLROD) Note: These instructions are for mounting the optional height rod (499KLROD) to the 499KL / 499KG scale. A height rod is not included with the 499KL / 499KG scale and can be purchased separately as item # 499KLROD. Mounting 499KLROD 1. -
Page 17: Height Measurement Instructions
HEIGHT MEASUREMENT INSTRUCTIONS Note: These instructions are for measuring height using the optional height rod. A height rod is not included with the scale and can be purchased separately as item # 499KLROD. WARNING: Use caution when sliding height rod up and down. The rod should move smoothly. - Page 18 HEIGHT MEASUREMENT INSTRUCTIONS Below 46 3/8” Height Rod Extended Above 46 3/8” Height Rod Indicator Inches read: 69” + Inches read: 41” + Cm read: 105 cm + Cm read: 176 cm + 3/8” = 69 3/8” 3/8” = 41 3/8” 0.2 cm = 105.2 cm 0.2 cm = 176.2 cm Headpiece...
-
Page 19: Calibration
CALIBRATION This scale has been factory calibrated, and does not require calibration prior to use. If required, the scale can be calibrated. Calibration of your scale is performed using kilograms (KG) or pounds (LB), according to the units of measure used upon entering into the calibration path. -
Page 20: Troubleshooting
TROUBLESHOOTING Troubleshooting Before contacting service personnel, refer to the following instructions to check and correct any failures. Symptom Possible Cause Corrective Action Scale does not turn on 1. Dead battery 1. Replace batteries 2. Faulty electrical outlet 2. Use a different outlet 3. -
Page 21: Maintenance
Cleaning and Disinfecting Proper care and cleaning is essential to ensure a long life of accurate and effective weighing. ® 1. Health o meter Professional recommends using one of the following solutions on a soft cloth or disposable wipe: ● mild soap and water solution ●... -
Page 22: Warranty
What does the Warranty Cover? Health o meter® Professional scales are warranted from date of purchase against defects of materials or in workmanship for a period of two (2) years. If product fails to function properly, return the product, freight prepaid and properly packed to Pelstar, LLC (see “To Get Warranty Service”, below, for instructions). - Page 23 UL 60601-1 CSA C22.2 No. 601.1-M90 Instrucciones de Uso PELSTAR, LLC 9500 West 55th St. McCook, IL 60525-7110 USA www.homscales.com ® Health o meter Professional 499KL ® Health o meter Professional 499KG © Pelstar, LLC 2019 P/N UM499KL 499KG Rev 20190430_Web...
- Page 24 Health o meter Professional 499KL ® Health o meter Professional 499KG ® Gracias por comprar este producto Health o meter Professional. Lea con detenimiento este manual, y guárdelo para consulta rápida o capacitación. ÍNDICE Precauciones ......................3 Especificaciones ....................... 4 Certificaciones / Conectividad / Eliminación...
-
Page 25: Precauciones
Utilizar la balanza con el adaptador de corriente eléctrica opcional: Utilice la balanza únicamente con el adaptador de corriente eléctrica proporcionado por Health o meter ® Professional. Si utiliza un adaptador diferente anulará la garantía, y puede presentar un serio peligro de seguridad. -
Page 26: Especificaciones
499KG: 220 kg x 0.1 kg Adaptador modelo no UE15WCP1-090050SPA, parte no Requisitos de energía UE160714HKKK1-P Health o meter® Professional Modelo (ADPT30) (No incluido) Entrada: 100-240V – 50/60Hz, 500mA Salida : 9.0V - - - 0.5A o 6 baterías AA (incluido) Entorno Temperaturas operacionales: 50°F hasta 104°F (10°C hasta 40°C) -
Page 27: Certificaciones / Conectividad / Eliminación
Para obtener más información sobre cómo conectar esta balanza a otros dispositivos electrónicos, comuníquese con el Soporte técnico de Health o meter® Professional Scales al 800-638-3722 o visite www.homscales.com/innovations/connectivity. Eliminación de la balanza ®... -
Page 28: Instrucciones De Ensamblaje
Si encuentra algún daño, contacte de inmediato al transportista o a ® un representante de Health o meter Professional al teléfono 1-800-815-6615. Debe presentar cualquier queja ante el transportista al momento de recibir el paquete. La siguiente información menciona a detalle lo que encontrará... - Page 29 INSTRUCCIONES DE ENSAMBLAJE DEL MODELO (CONTINUACIÓN) Retire con cuidado el contenido del embalaje y Tornillos y rondanas coloque todas las piezas sobre una superficie plana, nivelada y seca. Retire los 4 Columna B tornillos de montaje de la columna, las rondanas de la parte inferior de la columna B y colóquelas a un lado para proceder a ensamblar...
- Page 30 INSTRUCCIONES DE ENSAMBLAJE DEL MODELO (CONTINUACIÓN) Localice el cable de la celda Columna B Columna A de carga dentro de la (Parte (Parte columna A. Mientras superior) inferior) sostiene la columna B, deslice el cable por la apertura central de la parte superior de la columnas B.
- Page 31 INSTRUCCIONES DE ENSAMBLAJE DEL MODELO (CONTINUACIÓN) Coloque la plataforma C sobre uno de sus lados y Columna B coloque la columna B en uno de sus lados en posición perpendicular a la plataforma. La parte frontal del módulo de la pantalla que se encuentra en la columna A debe encarar el frente y estar sobre la...
- Page 32 INSTRUCCIONES DE ENSAMBLAJE DEL MODELO (CONTINUACIÓN) Coloque y asegure el ensamblaje de las columnas A y B a la plataforma C. Localice los 4 tornillos de montaje de la columna que retiro con anterioridad en el paso 2. Verifique que las rondanas estén colocadas entre las cabezas de los tornillos y los agujeros de la...
-
Page 33: Alimentando La Balanza
Si el problema no se soluciona, póngase en contacto con el servicio de atención al cliente de Health o meter Professional Scales al Health o meter Professional Scales. Nota: Si la pantalla muestra el mensaje “Lo”, esto indica que la energía de las baterías es baja. -
Page 34: Instrucciones De Configuracion
INSTRUCCIONES DE CONFIGURACION Función de apagado automático Como una función para ahorrar energía, la balanza se apagará automáticamente después de 2 minutos de inactividad. Está función está activa por defecto. Desactivar el apagado automático 1. Mientras que la balanza esté apagada, mantenga presionado el botón HOLD/RELEASE. 2. -
Page 35: Instrucciones De Operación
INSTRUCCIONES DE OPERACIÓN Teclado (Nota: no hay un botón LB / KG en los 499KG) Función Descripción ON/OFF Enciende y apaga la balanza. (Encender/Apagar) ZERO (Cero) Programa la balanza en ceros antes de utilizarla. HOLD/RELEASE Mantiene en la pantalla el peso del paciente hasta volver a presionar el (Mantener/Borrar) botón para borrar el valor. - Page 36 INSTRUCCIONES DE OPERACIÓN (CONTINUACIÓN) Pesar un paciente Nota: Cuando la balanza está encendida, siempre aparecerá la última configuración de unidad de medida (Libras o Kilogramos). 1. Asegúrese que ningún objeto se encuentre sobre la plataforma. Presione el botón ON/OFF para encender el la pantalla.
- Page 37 INSTRUCCIONES DE OPERACIÓN (CONTINUACIÓN) Función BMI (Índice de Masa Corporal) El índice de masa corporal (IMC) es una relación entre el peso y la altura del paciente que se interpreta como índice de masa corporal. El IMC se utiliza como herramienta para categorizar al paciente dentro de un peso insuficiente, normal, sobrepeso, obesidad u obesidad mórbida.
-
Page 38: Instrucciones De Ensamblaje Para 499Klrod Opcional
INSTRUCCIONES DE ENSAMBLAJE PARA 499KLROD OPCIONAL Nota: Estas instrucciones son para instalar el tallimetro opcional (499KLROD) a la balanza 499KL / 499KG. El tallimetro (499KLROD) no está incluido en la balanza y debe adquirirse por separado. Montaje del 499KLROD 1. Retire las 2 cubiertas plásticas para los tornillos en la columna de la balanza. -
Page 39: Instrucciones Para La Medición De La Altura
INSTRUCCIONES PARA LA MEDICIÓN DE LA ALTURA Nota: Estas instrucciones son para medir la altura usando la barra de altura opcional. Una varilla de altura no está incluida en la escala 499KL/499KG y se puede comprar por separado como artículo # 499KLROD. ADVERTENCIAS: Tenga cuidado al deslizar la barra de altura hacia arriba y hacia abajo. - Page 40 INSTRUCCIONES PARA LA MEDICIÓN DE LA ALTURA Estadímetro menor a 46 3/8" Estadímetro extendido mayor a 46 3/8" Indicador Lectura en pulgadas: Lectura en centímetros: 176 Lectura en pulgadas: Lectura en centímetros: 105 69” + 3/8” = 69 3/8” cm + 0.2 cm = 176.2 cm cm + 0.2 cm = 105.2 cm 41”...
-
Page 41: Calibración
CALIBRACIÓN La balanza se calibró desde fábrica y no necesita calibrarse antes de utilizarse. De ser necesario, la balanza puede calibrarse. La calibración de la balanza se efectúa utilizando kilogramos (KG) o libras (LB) de acuerdo con las unidades de medida utilizadas al momento de ingresar el procedimiento de calibración. -
Page 42: Solución De Problemas
SOLUCIÓN DE PROBLEMAS Solución de Problemas Antes de solicitar asistencia técnica, consulte las siguientes instrucciones para revisar y corregir cualquier falla. Problema Posible causa Acción correctiva La balanza no enciende 1. Batería descargada 1. Reemplace las baterías 2. Enchufe eléctrico 2. -
Page 43: Mantenimiento
Partes de reemplazo Las piezas pueden estar disponibles si una pieza de la balanza necesita ser reemplazada.Póngase en contacto con el servicio de atención al cliente de Health o meter Professional Scales al 1-800-815-6615 para preguntar si existen partes de reemplazo disponibles. -
Page 44: Garantía
Pelstar, LLC., fabrica, diseña, y es dueño de los productos Health o meter Professional. ® Nos reservamos el derecho de mejorar o modificar las características o especificaciones de los productos Health o meter Professional sin previo aviso. © Pelstar, LLC 2019... - Page 45 P/N UM499KL 499KG Rev 20190430_Web...
- Page 47 UL 60601-1 CSA C22.2 No. 601.1-M90 Instructions de l'Utilisateur PELSTAR, LLC 9500 West 55th St. McCook, IL 60525-7110 USA www.homscales.com ® Health o meter Professional 499KL ® Health o meter Professional 499KG © Pelstar, LLC 2019 P/N UM499KL 499KG Rev 20190430_Web...
- Page 48 Professional 499KL ® Health o meter Professional 499KG ® Merci d'avoir acheté ce produit Health o meter Professional. Veuillez lire ce manuel attentivement, et le garder comme référence ou comme formation. TABLE DES MATIÈRES Précaution et Avertissement ..................3 Spécifications ......................4 Certifications / Connectivité...
-
Page 49: Précaution Et Avertissement
PRÉCAUTION ET AVERTISSEMENT UTILISATION PRÉVUE Cette balance professionnelle Health o meter® est destinée à être utilisée dans un environnement médical professionnel par un personnel médical formé. Ce produit a été conçu pour peser les patients qui sont positionnés en toute sécurité et debout sur la plate-forme. Ne modifiez pas le produit et ne l'utilisez pas à d'autres fins que celles pour lesquelles il a été... -
Page 50: Spécifications
499KG: 220 kg x 0.1 kg Adaptateur Model No UE15WCP1-090050SPA, Pièces No Exigences d'Alimentation UE160714HKKK1-P (Non-inclus) ® Health o meter Professional Model (ADPT30) (non-inclus) Entrée: 100-240V – 50/60Hz, 500mA Sortie: 9.0V - - - 0.5A ou 6 - batteries AA Températures:... -
Page 51: Certifications / Connectivité / Disposition
Disposition Balance Cette balance Health o meter® Professional doit être jetée de façon appropriée, comme déchet électronique. Suivez les régulations nationales, régionales ou locales s’appliquant à vous pour disposer de vos déchets électroniques ou batteries. Ne jetez pas cet appareil dans les ordures domestiques. -
Page 52: Instructions D'assemblage Balance
INSTRUCTIONS D'ASSEMBLAGE Avant Assemblage Chaque balance numérique à faisceau au niveau des yeux 499KL / 499KG est livrée dans une seule boîte. Inspectez attentivement l’extérieur de la boîte pour tout dommage de livraison avant de l’ouvrir. S’il y a du dommage, contactez votre livreur ou un représentant Health o meter®... - Page 53 INSTRUCTIONS D'ASSEMBLAGE (SUITE) Enlevez soigneusement le contenu de la boîte et Vis et rondelles placez chaque pièce sur une surface plane, nivelée et sèche. Enlevez les 4 vis de montage et les rondelles du bas de la colonne B et mettez-les de côté...
- Page 54 INSTRUCTIONS D'ASSEMBLAGE (SUITE) Situez le câble de Colonne B connexion de la cellule de Colonne A (sommet) charge à l'intérieur de la (bas) colonne A. Pendant que vous tenez la colonne B, glissez le câble à travers l'ouverture du centre au sommet de la colonne B.
- Page 55 INSTRUCTIONS D'ASSEMBLAGE (SUITE) Placez la plateforme C de la balance sur le côté et Colonne B placez la colonne B sur le côté, perpendiculaire à la plateforme. Le devant de la tête de l'écran de la colonne A devrait faire face vers l'avant et au-dessus de la plateforme C de la balance.
- Page 56 INSTRUCTIONS D'ASSEMBLAGE (SUITE) Positionnez et fixes les colonnes reliées A et B à la plateforme de la balance C. Situez les 4 vis de fixation qui avaient été retirées dans l'étape 2. Assurez-vous que les rondelles sont situées entre les têtes de vis et les trous de vis de la plateforme de la balance C.Insérez les 4 petites vis par les trous de...
-
Page 57: Alimentation De La Balance
Note : Si la procédure de configuration échoue, référez-vous aux instructions de dépannage. Si le problème n'est pas réglé, contactez le service à la clientèle des balances Health o meter Professional au 1-800-815-6615. -
Page 58: Instructions De Montage
INSTRUCTIONS DE MONTAGE Fonction d'arrêt automatique En tant que fonctionnalité d'économie d'énergie, la balance s'éteindra automatiquement après 2 minutes d'inactivité. Par défaut cette fonction est activée. Désactiver l'arrêt automatique 1. Pendant que la balance est éteinte, appuyez et maintenez enfoncé le bouton HOLD/RELEASE. 2. -
Page 59: Instructions D'utilisation
INSTRUCTIONS D'UTILISATION Clavier (Remarque: il n'y a pas de bouton LB / KG sur le 499KG) Fonction Description ON/OFF Allume et éteint la balance. ZERO Remise à zéro avant une pesée. Retient une valeur de poids du patient sur l’écran jusqu’à ce que le HOLD/RELEASE bouton soit appuyé... - Page 60 INSTRUCTIONS D'UTILISATION (SUITE) Peser un Patient Note: Lorsque cette balance est allumée, elle retournera toujours aux réglages et unités utilisés en dernier (LB ou KG). 1. Assurez-vous qu'aucun objet n'est sur la plate-forme. Appuyez sur le bouton ON / OFF pour allumer l'écran.
- Page 61 INSTRUCTIONS D'UTILISATION (SUITE) Fonction IMC L'indice de masse corporelle (IMC) est un ratio entre le poids d'une personne et sa hauteur et interprété comme un score IMC. Ce score IMC est ensuite utilisé comme outil pour catégoriser un patient comme poids insuffisant, normal, surplus de poids, obèse ou obèse morbide. Note: La balance ne calculera pas l’IMC pour un patient qui pèse 24 livres (11 kg) ou moins.
-
Page 62: Instructions De Montage Pour Toise Optionnelle
INSTRUCTIONS DE MONTAGE POUR TOISE OPTIONNELLE (499KLROD) Remarque: Ces instructions sont pour le montage de toise optionnelle à la balance 499KL / 499KG. Une barre de hauteur n'est pas incluse avec la balance 499KL/499KG et peut être achetée séparément comme article 499KLROD. 499KLROD Montage 1. -
Page 63: Instructions Pour La Mesure De Hauteur
INSTRUCTIONS POUR LA MESURE DE HAUTEUR Remarque: Ces instructions concernent la mesure de la hauteur à l'aide de la tige de hauteur optionnelle. Une barre de hauteur n'est pas incluse avec la balance 499KL/499KG et peut être achetée séparément comme article 499KLROD. AVERTISSEMENTS: Soyez prudent lorsque vous faites coulisser la tige de haut en bas. - Page 64 INSTRUCTIONS POUR LA MESURE DE HAUTEUR Hauteur de la tige inférieure à 46 3/8 po Hauteur de la tige étendue au-dessus de 46 3/8 po Indicateur Pouces lus : 69 po + CM lu : 176 cm + Pouces lus : 41 po + CM lu : 105 cm + 3/8 po = 69 3/8 po 0,2 cm = 176,2 cm...
-
Page 65: Calibration
CALIBRATION Cette balance a été calibrée en usine, et n'a pas besoin d'être calibrée avant l'utilisation. Si requis, la balance peut être calibrée. La calibration de votre balance est effectuée en utilisant des kilogrammes (KG) ou livres (LB) en conformité avec les unités de mesure utilisées lors du processus de calibration. -
Page 66: Dépannage
DÉPANNAGE Avant de contacter du personnel de service, référez-vous aux instructions suivantes pour vérifier ou corriger tout problème. Symptômes Causes Possibles Action Corrective La balance ne s'allume pas 1. Batterie déchargée 1. Remplacer la batterie 2. Prise électrique défectueuse 2. Utiliser une prise différente 3. -
Page 67: Entretien
Pièces de remplacement Des pièces de remplacement sont disponibles si la tige de hauteur doit être réparée. Communiquez avec le service à la clientèle des balances Health o meter Professional au 1- 800-815-6615 pour demander la disponibilité de ces pièces de remplacement. -
Page 68: Garantie
Qu'est-ce que la Garantie Couvre? Les balances Health o meter® Professional sont garanties à partir de la date d’achat contre les défauts matériels ou de main-d’œuvre pour une période de deux (2) ans. Si le produit ne fonctionne pas correctement, retournez le produit, livraison prépayée et emballé...