Hitachi PC-ART Installation Manual
Hide thumbs
Also See for PC-ART:
- Operation manual (13 pages) ,
- Installation manual (186 pages) ,
- Technical catalogue (774 pages)
Advertisement
Quick Links
Download this manual
See also:
Operating Manual
INSTALLATION MANUAL
MANUAL DE INSTALACIÓN
INSTALLATIONSHANDBUCH
MANUEL D'INSTALLATION
MANUALE D'INSTALLAZIONE
Read and understand this manual before using this air conditioner. Keep this manual for future reference.
Lea cuidadosamente este manual antes de poner en marcha el equipo de aire acondicionado. Guarde este manual en un lugar seguro por si
necesita consultarlo en el futuro.
Diese Bedienungsanleitung muB vor der inbetriebnahme der Klimaan lage gelesen und verstanden werden. Das Handbuch für spätere
Rückfragen aufbewahren.
Lire attentivement ce manuel avant taute utilization du climatiseur, et le conserver pour référence ultérieure
Leggere attentamente il presente manuale prima di utilizzare questo condizionatore d'aria. Conservarlo da parte per future consultazioni.
Leia e compreenda este manual antes de operar este ar condicionado. Guarde este manual para futura referencia
De bor laese og forsta denne vejledning, for de tager dette dlimaanlaeg i brug. Opbervar vejledningen til senere reference.
Lees deze hadleiding aandachtig door alvorens de airconditioning in gebruik te nemen.
Läs och första denna manual innan Du sätter igang luftkonditioneraren. Förvara denna manual förvara denna manual för framtida behow.
ιαβάστε προσεκτικά αυτό το εγχειρίδιο πριν τη χρή ση του κλι ατιστικού. Κρατήστε το εγχειρίδιο για ελλοντική αναφορά.
PC-ART
REMOTE CONTROLLER
MANUAL DE INSTALAÇÄO
MONTERINGSVEJLEDNING
INSTALLATIEHANDLEIDING
HANDBOK FÖR INSTALLATION
ΕΓΧΕΙΡΙ ΙΟΕΓΚΑΤΑΣΤΑΣΗΣ
Advertisement

Related Manuals for Hitachi PC-ART


Summary of Contents for Hitachi PC-ART
-
Page 1: Remote Controller
PC-ART REMOTE CONTROLLER INSTALLATION MANUAL MANUAL DE INSTALAÇÄO MANUAL DE INSTALACIÓN MONTERINGSVEJLEDNING INSTALLATIONSHANDBUCH INSTALLATIEHANDLEIDING MANUEL D’INSTALLATION HANDBOK FÖR INSTALLATION MANUALE D’INSTALLAZIONE ΕΓΧΕΙΡΙ ΙΟΕΓΚΑΤΑΣΤΑΣΗΣ Read and understand this manual before using this air conditioner. Keep this manual for future reference. Lea cuidadosamente este manual antes de poner en marcha el equipo de aire acondicionado. Guarde este manual en un lugar seguro por si necesita consultarlo en el futuro. -
Page 2: Remote Controller Operation
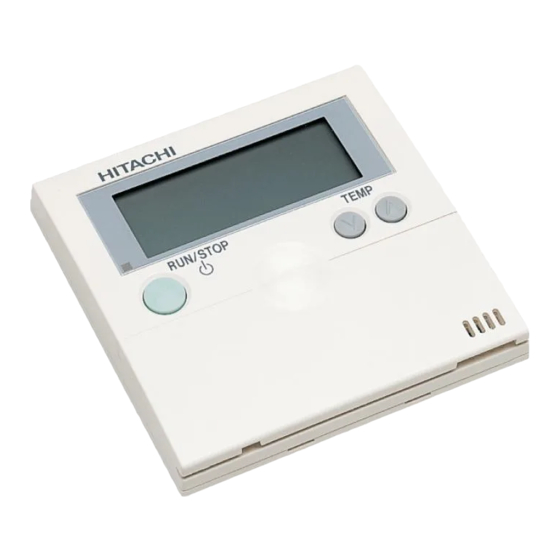
INSTALLATION MANUAL 4 REMOTE CONTROLLER OPERATION 4.1. OPTIONAL LIQUID CRYSTAL REMOTE CONTROL PC-ART Liquid crystal display (LCD) T.RUN (test run indication) Check (check indication) These tests appear when TEST RUN or CHECK are being performed. ABNML (alarm) indicator SET TEMP (set temperature) indicator €... - Page 3 (The ¿ gure shows the A/C + VENTI setting). NOTE: Contact your distributor or HITACHI dealer for detailed information. If the mode is changed to VENTI during individual operation of the air conditioner, the air conditioner will stop. If the mode is...
- Page 4 4.1.4. OPERATION PROCEDURE FOR AUTOMATIC COOLING/HEATING OPERATION The automatic cooling/heating operation must be set using the optional function. Contact your distributor or HITACHI dealer for more detailed information. This function enables the operation mode (cooling or heating) to be changed automatically according to the temperature difference between the set temperature and the suction air temperature.
- Page 5 INSTALLATION MANUAL Do not turn the air louver by hand. The louver mechanism may be damaged « if moved (in all units). CAUTION Wall-mounted type (RPK): ” Adjust the vertical louvers by hand to discharge air in the required direction. Do not swing blade 1 to the left and blade 2 to the right of the vertical louvering.
- Page 6 INSTALLATION MANUAL ÅÆ NEXT SCHEDULE 7. By pressing the ( ) DAY / SCHEDULE switches, the SET and SCHEDULE indicators go out and the mode returns to normal. De¿ ning the schedule to be applied ” ÅÆ 1. Hold down the ( ) DAY/SCHEDULE switches for more than 3 seconds and the SET indicator appears.
- Page 7 INSTALLATION MANUAL Automatic operation with heating (anti-freeze protection) ” 1. In normal mode, hold down the switch for more than 3 seconds to change the operation mode. The automatic NEXT SCHEDULE heating setting is activated and the ON indicator appears to the right of the current time. The ON indication blinks during the automatic heating operation.
-
Page 8: Checking Procedure
The indoor unit number, the alarm code and the model code are indicated on the liquid crystal display. If several indoor units are connected, the above items are indicated one by one for each of them. Make a note of the indications and contact your HITACHI service provider. Power failure ”... - Page 9 INSTALLATION MANUAL 6. OPTIONAL SETTING AND INPUT/OUTPUT SETTING OF INDOOR UNIT 3. Selection of Indoor Unit for Optional Setting Normal Mode (When unit is not operating) “ 01” or “02” À ashes. 1. Change to the optional setting mode Select the indoor unit to set by pressing the “...
- Page 10 INSTALLATION MANUAL 7. INITIALIZATION OF OPTIONAL SETTING AND INPUT/OUTPUT The procedure for initialization of optional settings and input / output settings are as follows. Normal mode (when unit is not operating) 3. Selection of Indoor Unit “07” À ashes. Select the address of the indoor unit to be 1.
- Page 11 INSTALLATION MANUAL 7.1. TABLE A OPTIONAL SETTING ITEMS No. Items Optional Function Individual Setting No. Items Optional Function Individual Setting Contents Contents Setting Condition Setting Condition Not Used Standard (Set Temp. Not Prepared 00~07 Removal of Heating (Use as 00 conditions) +4ºC) Temperature Removal (Set Temp.)
- Page 12 Check the Indoor Unit for which the address to be changed. Address of Indoor Unit to be Changed is not known (check) . . . Proceed to (2) control switch (PC-ART). Address Check Mode. Address of Indoor Unit to be Changed is known . . . Proceed to (3) Address NOTES: Change Mode.
- Page 13 INSTALLATION MANUAL c. Address Change Mode Change the address (unit number) of the indoor unit. 3. Selection of Indoor Unit Normal Mode (when unit is not operating) “04” indicated. Select the address of the indoor unit to 1. Change to the optional setting mode be changed.
- Page 14 INSTALLATION MANUAL 4. Address Initialization This is used to initialize an address that has been changed in the address change mode or to initialize an indoor unit address that has been set with the automatic address function. When set this function, the address of the indoor unit is returned to the dip switch setting. (Recon¿ guration automatic address setting if the dip switch setting to the automatic address setting.) Normal mode (when unit is not operating) 1.