Table of Contents
Advertisement
Quick Links
Advertisement
Table of Contents
Troubleshooting

Related Manuals for ABB RIO600


Summary of Contents for ABB RIO600
- Page 1 Remote I/O RIO600 Configuration Manual...
- Page 3 Document ID: 1MRS757489 Issued: 2011-12-23 Revision: A Product version: 1.0 © Copyright 2011 ABB. All rights reserved...
- Page 4 Copyright This document and parts thereof must not be reproduced or copied without written permission from ABB, and the contents thereof must not be imparted to a third party, nor used for any unauthorized purpose. The software or hardware described in this document is furnished under a license and may be used, copied, or disclosed only in accordance with the terms of such license.
- Page 5 In case any errors are detected, the reader is kindly requested to notify the manufacturer. Other than under explicit contractual commitments, in no event shall ABB be responsible or liable for any loss or damage resulting from the use of this manual or the application of the equipment.
- Page 6 (EMC Directive 2004/108/EC) and concerning electrical equipment for use within specified voltage limits (Low-voltage directive 2006/95/EC). This conformity is the result of tests conducted by ABB in accordance with the product standards EN 50263 and EN 60255-26 for the EMC directive, and with the product standards EN 60255-1 and EN 60255-27 for the low voltage directive.
-
Page 7: Table Of Contents
Symbols and conventions..............4 Symbols..................4 Document conventions..............4 Section 2 RIO600 overview..............7 Overview.....................7 Module configuration..............8 Configuration and engineering tool for RIO600........9 PCM600 and RIO600 connectivity package version.....9 Hardware and software requirements..........9 RIO600 engineering flow..............10 Section 3 Setting up a project............11 Handling connectivity packages............11 Uninstalling connectivity packages ..........11... - Page 8 Defining data attributes..............70 Configuring GOOSE control blocks..........70 Configuring a GOOSE Subscriber ...........72 Exporting SCD files in IET600............72 Section 9 Troubleshooting..............75 Troubleshooting the technical key in online mode......75 Troubleshooting the reading and writing of parameters....76 Section 10 Glossary.................79 RIO600 Configuration Manual...
-
Page 9: Section 1 Introduction
61850 engineering with PCM600 and IET600. For more details on tool usage, see the PCM600 documentation. The user manual (online help) contains instructions on how to use the RIO600 Configuration Wizard. The Configuration Wizard helps configure RIO600 for different system products and tools with the help of the connectivity package. See the product documentation for more information on handling the connectivity packages in different system products and tools. -
Page 10: Related Documentation
RIO600 Installation and Commissioning Manual 1MRS757488 Specific Communication Service Mapping (SCSM) – Mappings to IEC 61850-8-1 MMS (ISO 9506-1 and ISO 9506-2) and to ISO/IEC 8802-3 Download the latest documents from the ABB Web site http://www.abb.com/substationautomation. Symbols and conventions 1.4.1 Symbols The caution icon indicates important information or warning related to the concept discussed in the text. - Page 11 Click Information in the WHMI menu structure. • Parameter names are shown in italics. The function can be enabled and disabled with the Operation setting. • Parameter values are indicated with quotation marks. The corresponding parameter values are "On" and "Off". RIO600 Configuration Manual...
-
Page 13: Section 2 Rio600 Overview
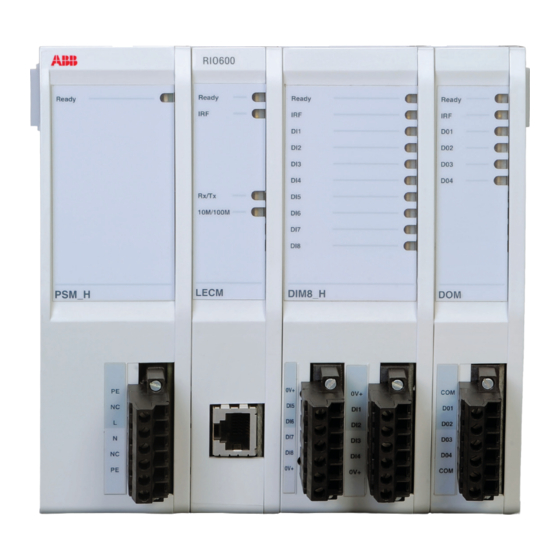
RIO600 overview Overview ® RIO600 is a modular I/O designed to expand the digital I/O of ABB’s Relion product family IEDs and to provide I/O for Station Automation device COM600 used in power generation plants, utility substations and industrial power systems. -
Page 14: Module Configuration
Digital Input Module (DIM8_H) • Digital Output Module (DOM) RIO600 can be configured to operate a maximum of 20 binary I/O signals using one PSM_H module and up to 40 binary I/O signals using two PSM _H modules. RIO600 Configuration Manual... -
Page 15: Configuration And Engineering Tool For Rio600
Section 2 1MRS757489 A RIO600 overview Configuration and engineering tool for RIO600 PCM600 with the RIO600 connectivity package is used for configuring RIO600. • Configuring RIO600 in online and offline mode • Setting the operating parameters for the modules using PST •... -
Page 16: Rio600 Engineering Flow
Section 2 1MRS757489 A RIO600 overview RIO600 engineering flow Create the RIO600 in PCM600, use the RIO600 Connpack and select online or offline configuration Select and assign Online mode the HW slot RIO600 ConnPack scans the ‘powered up’ RIO600 and ascertains the hardware... -
Page 17: Section 3 Setting Up A Project
Setting up a project Section 3 Setting up a project Handling connectivity packages Uninstall the old RIO600 connectivity package before installing a new version. The product code has changed in the latest release. 3.1.1 Uninstalling connectivity packages To uninstall a connectivity package version, click Start, click Control Panel. - Page 18 1MRS757489 A Setting up a project GUID-77C5FCFB-F605-4904-9605-E8B0F7170B00 V1 EN Figure 5: Running RIO600 installation wizard 2.1. Click Cancel to exit the installation. 2.2. Click Resume to revert back to the installation or Exit Setup to confirm the cancellation. Select I accept the license agreement and click Next.
- Page 19 Setting up a project GUID-9A3AF6D3-8133-424A-A7AF-BC48E868A65E V1 EN Figure 7: Selecting the folder for installation Click Next to start the installation. GUID-AF3833E9-54FB-41C1-B70B-98CE07D1AA9F V1 EN Figure 8: Installation progress After the installation is complete, click Finish to exit the setup program. RIO600 Configuration Manual...
-
Page 20: Activating Connectivity Packages
The Update Manager shows the connectivity packages that are compatible with the installed PCM600 version. Select the ABB RIO600 Connectivity Package Ver. n (n = version number). Always use the latest version of the connectivity package. RIO600... -
Page 21: Creating A New Project
The Open/Manage Project window is displayed. GUID-6A3174B2-48C1-4D34-B01B-2AA21841FE3E V1 EN Figure 11: Managing projects Select Projects on my computer. • If there are currently any projects or object tools open, close them. Click New Project. The Create New Project dialog box opens. RIO600 Configuration Manual... -
Page 22: Building The Plant Structure
PCM600 sets up a new project that is listed under Projects on my computer. Building the plant structure Create a new plant structure in PCM600. 1.1. In the Plant Structure view, right-click and select New/ General. 1.2. Select the element like Substation, Voltage level and Bay. RIO600 Configuration Manual... -
Page 23: Inserting Ieds
GUID-D847EFFD-27AE-4530-9EF2-F64CA19553B7 V1 EN Figure 15: Creating a RIO600 IED RIO600 is available only if the connectivity package has been installed successfully. Rename each level in the structure by the names/identifications used in the grid. 2.1. Right-click the level and select Rename. -
Page 24: Inserting An Ied In Offline Mode
3.4.1 Inserting an IED in offline mode In the Plant Structure view, right-click the bay and select New/Remote I/O IEDs/RIO600. The Configuration mode selection page dialog box opens. Under Configuration mode, select Offline Configuration and click Next. GUID-C9A317A6-0D51-4745-B3BA-48F0E125FF2B V1 EN... - Page 25 Section 3 1MRS757489 A Setting up a project GUID-E282F5FE-5A08-4F0A-880F-91E305615A05 V1 EN Figure 17: Selecting IED protocol in offline mode Under PCM600 communication, define the communication parameters and click Next. RIO600 Configuration Manual...
- Page 26 Defining communication parameters in offline mode 4.1. In the Port list, select the port to be used. 4.2. In the IP Address box, enter the correct IP address. In the Communication configuration complete dialog box, click Next. RIO600 Configuration Manual...
- Page 27 Setting up a project GUID-2812171F-2C7D-459D-BB0D-67E453929C92 V1 EN Figure 19: Completing communication parameter configuration in offline mode In the Composition selection page dialog box, configure the channels and generate the order code. As a default, the channels are not configured. RIO600 Configuration Manual...
- Page 28 6.2. Click Generate to generate an order code based on the selected composition. In the Generating functions dialog box, wait until the function generation is ready and click Close. In the Composition selection page dialog box, click Next. In the Setup complete dialog box, click Finish. RIO600 Configuration Manual...
- Page 29 10. In the Set technical key dialog box, click OK to close the configuration setup wizard. The plant structure is updated according to the hardware configuration. The module types and the related positions are visible under the HW Configuration. For example, DIM8GGIO1 represents Position 1 and module type DIM8. RIO600 Configuration Manual...
-
Page 30: Inserting An Ied In Online Mode
In the plant structure, the Application configuration does not contain any data. Click Cancel anytime during the configuration setup to remove the created RIO600 device from the plant structure. Use Back and Next to navigate between the pages in the setup wizard. 3.4.2... - Page 31 Section 3 1MRS757489 A Setting up a project GUID-BC49C294-E6BF-4CE4-B436-49FE8E6CA8B1 V1 EN Figure 23: Selecting online configuration mode In the IED protocol list, select for example IEC 61850 and click Next. RIO600 Configuration Manual...
- Page 32 Selecting IED protocol in online mode Under PCM600 communication, define the communication parameters and click Next. 4.1. In the Port list, select the port to be used. 4.2. In the IP Address box, enter the correct IP address. RIO600 Configuration Manual...
- Page 33 Section 3 1MRS757489 A Setting up a project GUID-B6DF68A8-4E0B-49CB-A447-F735D12B9CEB V1 EN Figure 25: Defining communication parameters in online mode In the Communication configuration complete dialog box, click Next. RIO600 Configuration Manual...
- Page 34 Section 3 1MRS757489 A Setting up a project GUID-7A4274F5-68C4-4197-89F0-DE07687285BE V1 EN Figure 26: Completing communication parameter configuration in offline mode In the Composition selection page dialog box, click Scan to read the hardware configuration from the device. RIO600 Configuration Manual...
- Page 35 In the Generating functions dialog box, wait until the function generation is ready and click Close. In the Composition selection page dialog box, click Next. In online mode, the composition selection data is read-only and cannot be edited. RIO600 Configuration Manual...
- Page 36 Section 3 1MRS757489 A Setting up a project GUID-667B1763-33CA-4191-B1B4-BE990AC975F2 V1 EN Figure 28: Viewing device configuration in online mode In the Setup complete dialog box, click Finish. The plant structure is updated according to the hardware configuration. RIO600 Configuration Manual...
- Page 37 Setting up a project GUID-8541E357-5AC7-4E7A-BC84-3BFA04F7C586 V1 EN Figure 29: Viewing summary page in online mode GUID-500C7771-596F-41B1-BA4B-EDEEF7F6AA3A V1 EN Figure 30: Updating the plant structure in online mode In the plant structure, the Application configuration does not contain any data. RIO600 Configuration Manual...
-
Page 38: Setting The Technical Key
Setting the technical key The technical key is used for the unique identification of each device and can be modified to create a new device. In the Plant Structure, right-click on RIO600 and select Set Technical Key in IED. RIO600... - Page 39 Section 3 1MRS757489 A Setting up a project GUID-C2D6CA5E-4B6A-418C-B667-2044B98F17F6 V1 EN Figure 31: Setting technical key In the Technical Key Information dialog box, click OK. • Click Cancel or close the dialog box to cancel the setup. RIO600 Configuration Manual...
- Page 40 Select Technical Key in PCM600 to set PCM600 technical key to IED. • Select User-defined Technical Key to provide technical key to IED as well as to PCM600. Wait until the configuration is complete and click OK. The technical key can be modified using the Object Properties. RIO600 Configuration Manual...
-
Page 41: Editing Object Properties
On the View menu, click Object Properties. The Object Properties window opens. Type in the value like a new IP address to the IP Address row. Some object properties like Configuration Version and IED Type are not editable. RIO600 Configuration Manual... - Page 42 Setting up a project GUID-AC0614E4-951A-476B-9DA2-38F305A4E00B V1 EN Figure 36: Viewing Object properties The changes in the IP Address and Technical Key do not reflect in the device but are used to establish a connection between PCM600 and the device. RIO600 Configuration Manual...
-
Page 43: Section 4 Using The Parameter Setting Tool
In the Plant Structure view, right-click a device and select the Parameter Setting to view the configured parameters for the selected device. GUID-9B08B99B-5367-4007-8D4A-FBD71EB8A10B V1 EN Figure 37: Select Parameter Setting • The Parameter Setting window shows the parameters of all modules. RIO600 Configuration Manual... -
Page 44: Reading Parameters From The Device
Viewing Parameter Setting tool Reading parameters from the device Click to read parameters from the device. The Read parameters from RIO600 dialog box opens. GUID-C0262BF3-B922-4FCD-B178-267B4964A053 V1 EN Figure 39: Reading parameters Under Parameter range, select which parameters are read from the device. -
Page 45: Setting Communication And Synchronization Parameters
Click OK to read the parameters from the device. Setting communication and synchronization parameters In the Plant Structure view, go to RIO600/IED Configuration/HW Configuration/LECM to set the communication parameters. GUID-93006CF0-AED8-4CE8-B67F-C3019156CA0C V1 EN Figure 40: Selecting LECM to set communication parameters Right-click LECM and select Parameter Setting to display the general, communication and synchronization parameters in the Parameter Setting tool. -
Page 46: Writing Parameters To The Device
Writing parameters to the device Click to write parameters to the device. The Write parameters to RIO600 dialog box opens. Under Parameter range, select which parameters are written to the device. • All parameters of a device like RIO600 •... - Page 47 Wait until the parameters are written to the device and the device reboots. The Output window message indicates if the parameters are successfully written to the device. If the parameters are written successfully but the configuration is rejected by the device, a dialog box opens indicating an error. RIO600 Configuration Manual...
- Page 48 Section 4 1MRS757489 A Using the Parameter Setting tool GUID-ACC63F51-D685-4A98-A841-7CBAA2DB0688 V1 EN Figure 44: Failing to update parameter value RIO600 Configuration Manual...
-
Page 49: Section 5 Using The Signal Matrix Tool
Using the Signal Matrix tool Starting the Signal Matrix tool The purpose of SMT with RIO600 is to map signals from other IEDs to the RIO600 binary outputs and thus connect the two devices over the IEC 61850 communication link. -
Page 50: Exporting Scd Files
GUID-F8F63830-25C1-4B94-BF4F-9433C6EC18E6 V1 EN Figure 46: Selecting Signal Matrix Exporting SCD files After the RIO600 parameters are set, export the System Configuration Description from PCM600 for the system configurations tool. In the Plant Structure view, right-click the substation and select Export. RIO600... - Page 51 In the Export dialog box, select the file destination and click Save. GUID-AB744550-5769-47BE-87A5-BDC20B146A5D V1 EN Figure 48: Selecting file destination In the SCL Export Options dialog box, click Export to export the private sections to the SCD file. RIO600 Configuration Manual...
-
Page 52: Importing Scd Files
Figure 49: Exporting SCD file Importing SCD files After GOOSE engineering in the system configuration tool, the SCD file can be imported at the substation level. In the Plant Structure view, right-click the substation and select Import. RIO600 Configuration Manual... - Page 53 In the Import dialog box, locate an SCD file and click Open. In the SCL Import Options dialog box, select how to handle the file during the import and click Import. GUID-CE14F387-5652-478F-A010-A3D57FE84ED4 V1 EN Figure 51: Selecting SCD file RIO600 Configuration Manual...
- Page 54 (subscriber) with the Signal Matrix tool. The GOOSE connection can have only one output for any of the hardware modules. The PCM600 level validation is done for a duplicate connection. A DOM to DOM connection is not provided in the current version. RIO600 Configuration Manual...
- Page 55 Section 5 1MRS757489 A Using the Signal Matrix tool GUID-1A8A7742-D028-4AA9-8274-67DE6A12CE54 V1 EN Figure 53: Detecting duplicate connection In the Plant Structure view, select the device, right-click and select Write to IED. RIO600 Configuration Manual...
-
Page 57: Section 6 Common Read/Write (Crw)
In the Plant Structure view, right-click the device and select Write to IED or Read from IED. GUID-991A90CE-EEE1-48B0-BBD1-85DAA0E59E21 V1 EN Figure 54: Reading configuration from IED The Common Read/Write window is added to the tool. In the Read/Write dialog box, click Yes to proceed. RIO600 Configuration Manual... - Page 58 The status progress bar and the comment fields show the progress • If there is no GOOSE engineering in the IED (there may be no configuration in the IED), the IED Write dialog box appears. RIO600 Configuration Manual...
- Page 59 Failing to check IED's GOOSE settings The IED reboots after all the required data is written to the IED. The procedure is the same when reading data from the IED, except that the IED should not be restarted in between operation. RIO600 Configuration Manual...
-
Page 61: Section 7 Using The Composition Update Tool
Using the Composition Update tool Section 7 Using the Composition Update tool The RIO600 composition is defined with the configuration wizard at the time the device is inserted to the project. Later the composition for an existing IED can be modified with CUT. - Page 62 Section 7 1MRS757489 A Using the Composition Update tool The RIO600 - Composition update mode selection page dialog box opens. Under Composition update mode selection, select Offline update to configure the IED in offline mode and click Next. GUID-A6041BA0-1ABE-4BF2-B6CE-3758426DBE0E V1 EN...
- Page 63 Detecting change in composition configuration In the Composition Update Tool dialog box, click OK to generate the functions. • Click No to abort the operation. In the Generating functions dialog box, wait until the function generation is ready and click Close. RIO600 Configuration Manual...
- Page 64 In the Composition selection page dialog box, click Next. In the Setup complete dialog box, click Finish. In the Set Technical Key dialog box, click OK to close the configuration update wizard. The plant structure is updated according to the hardware configuration. RIO600 Configuration Manual...
-
Page 65: Configuring The Device Online
Using the Composition Update tool GUID-1271BA06-0F21-4156-81DF-780B6892ED6C V1 EN Figure 64: Updating plant structure Configuring the device online In the Plant Structure view, right-click RIO600 and select Composition Update Tool. The RIO600 - Composition update mode selection page dialog box opens. RIO600 Configuration Manual... - Page 66 Under Composition update mode selection, select Online update to configure the IED in online mode and click Next. The Composition selection page dialog box opens. In the Composition detection page dialog box, click Scan to read the configuration from the IED. RIO600 Configuration Manual...
- Page 67 In the Composition Update Tool dialog box, click OK to generate the functions. • Click No to abort the operation. In Generating functions dialog box, wait until the function generation is ready and click Close. In the Composition detection page dialog box, click Next. RIO600 Configuration Manual...
- Page 68 Section 7 1MRS757489 A Using the Composition Update tool GUID-D04062DC-F627-4C48-AEDC-8C83231B1EE0 V1 EN Figure 67: Viewing the current configuration in online mode In the Setup complete dialog box, click Finish. RIO600 Configuration Manual...
- Page 69 The plant structure is updated according to the hardware configuration. The summary of the configuration wizard selections is displayed. Click Finish to close the configuration wizard setup and Plant Structure is updated for the selected IED. GUID-3F92EFC9-CCBE-46C6-BFF9-7A57CB81D2C9 V1 EN Figure 69: Viewing updated plant structure RIO600 Configuration Manual...
-
Page 71: Section 8 Goose Engineering
In the Projects dialog box, click New to create new project. GUID-33B167B9-D8D8-4182-BFEB-1F5AF216D89D V1 EN Figure 71: Viewing projects • Click Open to open an existing project. In the Create New Project dialog box, enter a project name and click OK. RIO600 Configuration Manual... -
Page 72: Importing An Scl File In Iet600
Importing an SCL file in IET600 On the Home menu, click Import. GUID-D07E0914-E729-4EE0-9D3E-4ADFB3E50CFD V1 EN Figure 73: Selecting Import In the Import SCL File dialog box, locate the SCD file to be imported in IET600 and click Open. RIO600 Configuration Manual... - Page 73 Section 8 1MRS757489 A GOOSE engineering GUID-D0A28C9C-A92C-42FC-8961-51EA3DE31B27 V1 EN Figure 74: Importing SCL file GUID-AEFF005E-92FB-4451-8C5E-8765E8F01298 V1 EN Figure 75: Viewing imported SCD file RIO600 Configuration Manual...
-
Page 74: Creating Goose Datasets
RIO600 supports maximum of two datasets in the application. If the RIO stack contains more than five binary I/O modules, there are two default datasets instead of only one dataset. - Page 75 GUID-97078B14-E3E9-49BE-8416-F1512F100614 V1 EN Figure 77: Creating New Dataset GUID-2CF4FF2E-E871-4422-B292-10C5DD25916D V1 EN Figure 78: Creating new row under Datasets tab RIO600 supports only unstructured datasets in GOOSE. A single dataset in RIO600 contains at maximum 150 data attributes. RIO600 Configuration Manual...
-
Page 76: Defining Data Attributes
To add a new GOOSE control block, right-click the area containing the existing GOOSE control blocks and select Insert new row. GUID-0BC01B59-FC92-458F-A351-779EC6114DAC V1 EN Figure 80: Creating new row under GCB Data tab In the Create New GCB dialog box, define a GCB name and click OK. RIO600 Configuration Manual... - Page 77 GUID-2EBD367F-0157-46CA-8512-1D7FDA73B33B V1 EN Figure 81: Creating New GCB In the Attached Dataset drop-down list, select the previously created data set. GUID-A86776E0-205A-4DA6-A832-953F2C021D3A V1 EN Figure 82: Attaching GCB to defined dataset Use a unique Multicast MAC address and APP ID. RIO600 Configuration Manual...
-
Page 78: Configuring A Goose Subscriber
Making the connection between publisher and subscriber under GCB Clients tab Exporting SCD files in IET600 On the Home menu, click Export. GUID-3DE8A07A-85D0-4FCF-97A2-7AFC24A1873A V1 EN Figure 84: Selecting Export In the Export SCL File dialog box, select the file destination and click Save. RIO600 Configuration Manual... - Page 79 Section 8 1MRS757489 A GOOSE engineering GUID-80E4555D-B78E-4F9B-BA1E-F1B0304F67C5 V1 EN Figure 85: Exporting SCL file After a successful export, PCM600 can be used for further operations. RIO600 Configuration Manual...
-
Page 81: Section 9 Troubleshooting
Figure 87: Failing to set technical key Define the device type and communication parameters correctly. If the device is not responding or is connected to other IED type, an error message appears when the Scan button is clicked. RIO600 Configuration Manual... -
Page 82: Troubleshooting The Reading And Writing Of Parameters
Detecting unresponsive IED or incorrect IED type Accept the technical keys suggested by PCM600. If the device’s technical key is, for example, “RIO600” or “BAY1” and a new device instance is created in online mode, an error message appears. Click Yes to change the technical key or No to abort the scan. - Page 83 Check that both the IRF module number and channel number are either zero or non- zero. GUID-8D0C19D4-538B-4FB4-B845-F5DB1BC3423D V1 EN Figure 91: Detecting IRF module and channel numbers • Check that the physical MAC Address is given in XX-XX-XX-XX-XX format where X can be [0-9], [a-f] or [A-F]. RIO600 Configuration Manual...
- Page 84 GUID-1BEF704E-2D5F-466A-88F8-479468427BE3 V1 EN Figure 92: Checking physical MAC Address format • Check that the Oscillation Suppression Hysteresis of the Digital input module is lower than the Oscillation Upper limit. GUID-B68CE3DA-6815-4F60-99B5-FB85F1AD2E9E V1 EN Figure 93: Checking Oscillation Suppression Hysteresis RIO600 Configuration Manual...
-
Page 85: Section 10 Glossary
Integrated Engineering Toolbox in PCM600 LECM Communication module PCM600 Protection and Control IED Manager PSM_H Power supply module Parameter Setting tool in PCM600 RIO600 Remote I/O unit Substation configuration description Signal Matrix tool in PCM600 WHMI Web human-machine interface RIO600... - Page 88 Distribution Automation Maneja Vadodara 390013, India Phone +91 265 2604032 +91 265 2638922 Transmission and Distribution Automation Equipment (Xiamen) Co. Ltd. ABB Industrial Park, Torch Hi-tech Development Zone 361006 Xiamen, Fujian, China Phone +86 592 5702288 +86 592 5718598 www.abb.com/substationautomation...