Huawei AR550 Series Quick Start Manual
Industrial switching routers
Hide thumbs
Also See for AR550 Series:
- Hardware description (768 pages) ,
- Manual (505 pages) ,
- Configuration manual (409 pages)

Related Manuals for Huawei AR550 Series


Summary of Contents for Huawei AR550 Series
- Page 1 Quick Start Guide AR530&AR550 Series Industrial Switching Routers Issue: 07 (2015-12-01) Part number: 31505671 HUAWEI TECHNOLOGIES CO., LTD...
-
Page 2: Packing List
Follow all the safety precautions and instructions provided by Huawei. The safety precautions outlined in this document are only those that Huawei can predict. Huawei is not liable for any consequence that results from violation of regulations pertaining to safe operations or safety codes pertaining to design, production, and equipment use. -
Page 3: Installing The Router
The installation site must be well ventilated, and the air vents of the router must not be blocked. Do not place the router in a dusty environment. 100mm Leave more than 100 mm clearance at two sides and rear of the router for heat dissipation. Installing the Router 4.1 Installing the AR530 Series Industrial Switching Router Scenario 1: Mounting the Router on a DIN Rail... - Page 4 AR 53 Se rie INFR ARE AR53 1-F2C /ALM RS4 85-0 RS4 85-1 Scenario 2: Mounting the Router on a Wall CAUTION The panel with interfaces must face down to protect the interfaces from water. Ensure that there are no flammable or explosive materials near the router and no sundries within 100 mm around the router.
- Page 5 Loosen the screws on the front top cover with the Phillips screwdriver, remove the front top cover, and keep it in an appropriate place for later use. Hang the router onto the topmost screw on the mounting bracket and adjust position of the router to align the mounting holes on the router with those on the mounting bracket.
- Page 6 Install two floating nuts on each front mounting rail of the cabinet. Leave four mounting holes between the two floating nuts on the same mounting rail. The length of six adjacent mounting holes may not be 2 U. Observe the scale ticks on the mounting rails when NOTE installing floating nuts.
- Page 7 Screw lock nuts on the hex bolts and fix the hex bolts on the mounting bracket. Hang the mounting bracket on the DIN rail. Use a combination wrench to screw the hex bolts on the mounting bracket. When the DIN rail is fixed with the raised hex bolts, tighten the lock nuts by rotating the wrench counterclockwise.
- Page 8 M4x30 screws. Use M4 screws to secure the mounting kit in the cabinet. 4.2 Installing the AR550 Series Industrial Switching Router Installing the Router on a DIN Rail Place the router's real panel in front of the DIN rail and ensure that the DIN rail fits in between the fixture near the top of the router and spring latch near the bottom.
- Page 9 If the spring latch is too tight to move down, you can pull down the spring latch during the installation. NOTE 4.3 Installing a 180 W PoE Midspan Installing the 180 W PoE Midspan on the DIN Rail Place the rear panel of the 180 W PoE midspan in front of the DIN rail and ensure that the DIN rail fits in between the fixture near the top of the PoE midspan and the spring latch near the bottom.
-
Page 10: Connecting The Router
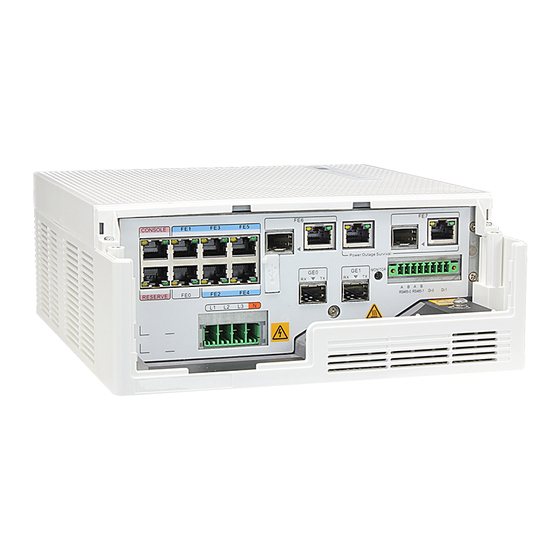
Connecting the Router 5.1 Connecting the AR530 Series Industrial Switching Router WARNING Do not connect cables while the power is on. Do not power on the router before you finish connecting and routing cables. Invisible laser beams will cause eye damage. Do not look into bores of optical modules or connectors of optical fibers without eye protection. - Page 11 5.2 Connecting the AR550 Series Industrial Switching Router WARNING Do not connect cables while the power is on. Do not power on the router before you finish connecting and routing cables. Invisible laser beams will cause eye damage. Do not look into bores of optical modules or connectors of optical fibers without eye protection.
- Page 12 5.3 Connecting the 180 W PoE power supply WARNING Do not connect cables while the power is on. Do not power on the router before you finish connecting and routing cables. NOTE For details about pin assignments and cable connections, see the Hardware Description. OUTPUT 12 V 2.1 A ~100-240 V 50/60 Hz 3 A...
-
Page 13: Powering On The Router
Slow blinking green: The system is running properly. NOTE For more information about indicators, see the Hardware Description. 6.2 Powering On the AR550 Series Industrial Switching Router Ensure the following before powering on the router: The power cables are correctly connected. -
Page 14: Logging In To The Router
Flow control (F): None Press Enter until a message is displayed asking you to enter the username and password. (The following information is for reference only.) The default user name is admin and the default password is Admin@huawei. NOTE Login authentication... - Page 15 Enter to display the login page. Enter the user name admin and password Admin@huawei (case sensitive). Now, you can configure the router on the web page. For more information, see the Web-based...
-
Page 16: Open Source Software Notice
In V200R005C60 and later versions, you can run the display copyright command to view the open source software notice. Trademarks and Permissions and other Huawei trademarks are trademarks of Huawei Technologies Co., Ltd. All other trademarks and trade names mentioned in this document are the property of their respective holders.