Table of Contents
Advertisement
Technical Reference Guide
Product Overview
Describes features and general specifications for the product.
This chapter explains the features of the product.
Set up
This chapter explains how to connect the UB-E03 to the
Describes setup and instrallation of the product and peripherals.
TM printer and use it.
Programming Samples
This chapter explains information for programming.
Describes how to control the printer and necessary information
when you develop applications.
UB-E03 Specifications
This chapter explains the specification of the UB-E03.
Describes how to handle the product.
M00037501
Rev. A
Advertisement
Table of Contents

Related Manuals for Epson UB-E03


Summary of Contents for Epson UB-E03
- Page 1 Describes features and general specifications for the product. This chapter explains the features of the product. Set up This chapter explains how to connect the UB-E03 to the Describes setup and instrallation of the product and peripherals. TM printer and use it.
- Page 2 • Neither is any liability assumed for damages resulting from the use of the information contained herein. • Neither Seiko Epson Corporation nor its affiliates shall be liable to the purchaser of this product or third parties for damages, losses, costs, or expenses incurred by the purchaser or third parties as a result of: accident, misuse, or abuse of this product or unauthorized modifications, repairs, or alterations to this product, or (excluding the U.S.) failure to strictly comply with Seiko Epson Corporation’s operating...
-
Page 3: For Safety
For Safety Key to Symbols The symbols in this manual are identified by their level of importance, as defined below. Read the following carefully before handling the product. You must follow warnings carefully to avoid serious bodily injury. WARNING Provides information that must be observed to prevent damage to the equipment or loss of data. -
Page 4: Warnings
• Shut down your equipment immediately if it produces smoke, a strange odor, or unusual noise. Continued use may lead to fire. Immediately unplug the equipment and contact your dealer or a Seiko Epson service center for advice. • Never attempt to repair this product yourself. Improper repair work can be dangerous. -
Page 5: Cautions
• To ensure safety, unplug this product before leaving it unused for an extended period. Product Servicing This product cannot be serviced at the component level. if damage occurs, the UB-E03 should be replaced as a unit. Restriction of Use When this product is used for applications requiring high reliability/safety such as transportation devices related to aviation, rail, marine, automotive etc.;... -
Page 6: About This Manual
POS system, or to develop and design printer applications. Manual Content The manual is made up of the following sections: Chapter 1 Product Overview Chapter 2 Set up Chapter 3 Programming Samples Chapter 4 UB-E03 Specifications... -
Page 7: Table Of Contents
Set up ....................13 Flow of Setup ............................13 ■ Installing the UB-E03......................14 ■ Setting IP Address Using EPSON TMNet WinConfig............17 Setting the TCP/IP Protocol in Your Operating System ..............17 Setting the UB-E03 ..........................23 ■ Setting IP Address Using arp/ping Command ..............27 ■... - Page 8 ■ Software Specifications......................51 Supported Protocols..........................51 ■ Network Parameter of the UB-E03 ..................54 Setting of the network parameter of the UB-E03 ................55 How to check the Mac Address ......................55 ■ System Bootup Time ......................56 ■ UB-E02 and UB-E03 ......................57...
-
Page 9: Product Overview
Others • Updating the firmware is possible via the network. • Low‐power consumption mode Low-power consumption mode: The UB-E03 enters the low-power consumption mode if more than 3 seconds have passed while none of the following is performed; • Receiving Ethernet data • Printing by the printer • Receiving data from the printer •... -
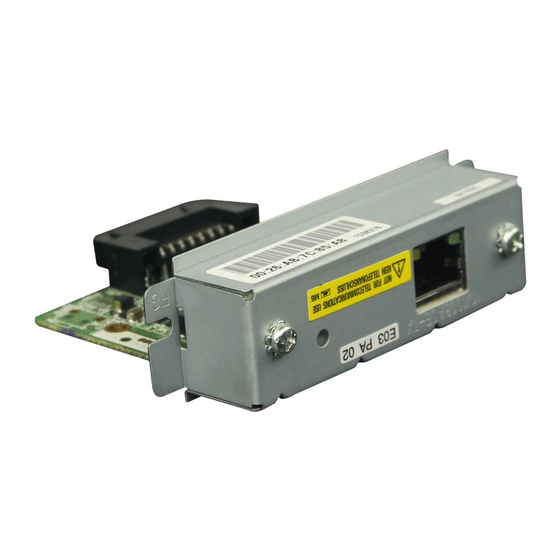
Page 10: Product Information
Product Information Parts Name and Function Ethernet interface connector Push button LED (Green) LED (Yellow) Ethernet interface connector A LAN cable (RJ45 plug) can be connected to the Ethernet connector. • 10BASE‐T, 100BASE‐TX Ethernet, full duplex, half duplex (Auto negotiation function, manual setting) • Complies with TCP/IP protocol (LP, LPR, and socket communications) The UB‐E03 has 2 LEDs. They are on in the following cases. However, they are off during the low power consumption mode. The green LED: when the Ethernet link is established. The yellow LED: when the printer is sending/receiving Ethernet data. Push button A push button is provided to perform the following functions. • Status sheet printing Push and hold the push button for three seconds or more when the TM printer is ready for printing (paper is set and the power supply is turned on); the network parameter status is printed. • Setting initialization Push and hold the push button while turning on the power supply. Keep pushing the push button (about ten seconds) until the initialization start massage (Resetting to Factory Default) is printed. All settings are reset to the factory settings. -
Page 11: Supported Tm Printers
DHCP , APIPA Protocol for automatic settings of IP address, etc. ENPC, SNMP Protocol for settings and monitoring. HTTP Protocol for using EPSON TMNet WebConfig. TFTP Protocol to update the firmware of the interface. Space Required for Installation When the UB‐E03 is installed in the back of a TM printer, it increases the depth of the printer by 20 mm (0.79ʺ). Take this into consideration for your installation. -
Page 12: Environmental Specifications
Environmental Specifications Item Specifications Temperature Operating 0 to 50°C {32 to 122°F}, 10 to 90% RH non-condensation Conditions (See the operating temperature and humidity range below.) Storage -10 to 50°C {14 to 122°F}, 10 to 90% RH non-condensation Conditions [ RH] Operating Environment Range 40 50... -
Page 13: Set Up
Install TCP/IP protocol in your operating system. Setting the UB-E03 Set IP address for the UB-E03 using EPSON TMNet WinConfig. Various Settings for the UB-E03 Configure various settings for the UB-E03 using either one of the following methods. (page (page Web Browser EPSON TMNet WinConfig... -
Page 14: Installing The Ub-E03
DIP SW 2-8: ON TM-T90 MSW 2-8: ON TM-H5000/H5000II DIP SW 2-8: ON TM-H6000 Series DIP SW 2-8: ON TM-J2000/J2100 MSW 2-8: ON TM-L90 MSW 2-8: ON The display module connector on the TM printer cannot be used when the UB-E03 is installed. - Page 15 Connect the power supply unit with the printer. Turn on the printer. When initializing the UB-E03 by turning off the power and then turning it back on or by resetting the printer, there is a waiting time until the network starts operating. During this time, all the communicating functions of the network do not work.
- Page 16 Hold the push button for more than 3 seconds when the printer is ready for printing. When the UB-E03 is installed correctly, the printer prints a status sheet. Push button...
-
Page 17: Setting Ip Address Using Epson Tmnet Winconfig
Chapter 2 Set up Setting IP Address Using EPSON TMNet WinConfig This section describes how to set the IP address using EPSON TMNet WinConfig. Setting the TCP/IP Protocol in Your Operating System To set the IP address using EPSON TMNet WinConfig, you need to install the TCP/IP protocol in your operating system. To install TCP/IP protocol in Windows 7, Windows Vista, and Windows XP, follow the instructions below. Windows 7 Click [Local Area Connection] in the Control Panel. - Page 18 Click the [Properties] button. Confirm whether the [Internet Protocol Version4 (TCP/IPv4)] check box is checked. If not, check it. Click the [OK] button. If you install the TCP/IP protocol, restart your computer after installing.
- Page 19 Chapter 2 Set up Windows Vista Click [View status] in the Control Panel. Click the [Properties] button.
- Page 20 Confirm whether the [Internet Protocol Version4 (TCP/IPv4)] check box is checked. If not, check it. Click the [OK] button. If you install the TCP/IP protocol, restart your computer after installing. Windows XP Click [Network and Internet Connections] in the Control Panel.
- Page 21 Chapter 2 Set up Click [Network Connections]. Double-click [Local Area Connection].
- Page 22 Click the [Properties] button. Confirm whether the [Internet Protocol (TCP/IP)] check box is checked. If not, check it. Click the [OK] button. If you install the TCP/IP protocol, restart your computer after installing.
-
Page 23: Setting The Ub-E03
Setting procedure Follow the steps below to set the IP address. • Because the same IP address is set for all UB-E03 units in the factory, do not connect more than one UB-E03 whose IP address is not changed from the factory setting. When you set the IP address, connect the UB-E03 to the network and set the IP address one by one. - Page 24 If you have connected more than one printer to the network and do not know for which printer you want to set the IP address, you can check the printer by finding out the MAC address of the UB-E03. The MAC address can be found on the status sheet or a label on the UB-E03.
- Page 25 Chapter 2 Set up Select [Manual] or [Auto]. • Manual: Input for [IP Address], [Subnet Mask], and [Default Gateway]. • Auto: The IP address, subnet mask, and default gate way are acquired form DHCP server. • Do not use the auto setting without a DHCP server. See the manual of the server for setting. • Be sure that the [Set using PING] check box is checked if a setting by ping or arp command is permitted.
- Page 26 Click the [OK] button. The contents of the setting are transmitted to the UB‐E03. After a while, when following message is displayed, the IP address setting is completed.
-
Page 27: Setting Ip Address Using Arp/Ping Command
Connect the printer to the network and turn on the printer. Execute the arp command to clear the relation of the MAC address and IP address. <Example> Format: arp -d [IP address to be set for the UB-E03] Input: arp -d 192.168.192.168... - Page 28 To print the status sheet, turn on the printer power, and hold the push button for more than 3 seconds. When you cannot check the MAC address on the label on the UB-E03 that is installed on the printer, be sure to turn off the printer and remove the UB-E03 to check it.
-
Page 29: Checking/Changing The Settings
• Setting utility (EPSON TMNet WinConfig) • Web browser (EPSON TMNet WebConfig) Checking/Changing with EPSON TMNet WinConfig EPSON TMNet WinConfig installed on a computer in the network enables you to configure detailed settings as well as to check/change the settings for the UB‐E03. See EPSON TMNet WinConfig User’s Guide for detailed information on EPSON TMNet WinConfig. Turn on the printer. Start up the computer in the network. Start up EPSON TMNet WinConfig. - Page 30 Click the [Configuration] button. Change the setting if necessary, and click the [OK] button.
-
Page 31: Checking/Changing With Epson Tmnet Webconfig
EPSON TMNet WebConfig. Turn on the printer. Start up the computer in the network. Start up the web browser and input the IP address set for the UB-E03 in the address bar. <Example> Format: http://[IP address set for the UB-E03]/ Input: http://192.168.192.168... - Page 32 Change the setting if necessary, and click the [SUBMIT] button. The set content should be reflected in the UB-E03 when you click the [SUBMIT] button of each screen. If the screen is switched without clicking the [SUBMIT] button, the input contents are cleared.
-
Page 33: Initializing
Chapter 2 Set up Initializing The UB‐E03 setting can be reset to the default, such as when communication with the UB‐E03 is not possible. Follow the steps below to initialize the UB‐E03. Turn off the printer. While holding down the Push button, turn on the printer. Use an extended paper clip or a pen point to push the push button. Push button Keep holding down the Push button until the following message is printed (about 10 seconds). -
Page 34: Epson Tmnet Webconfig
This section is explained using screenshots of Internet Explorer. Starting EPSON TMNet WebConfig Start up the computer connected to the network. Start up the web browser, and enter the IP address of the UB-E03 in the address bar. address: http://[IP address of the UB-E03]/ EPSON TMNet WebConfig starts. -
Page 35: General Information Screen
Location/Person Shows the user name. Model Name Shows the model name. MAC Address Shows the MAC address of the UB-E03. Interface card Hardware Version Shows the hardware version of the UB-E03. Software Version Shows the software version of the UB-E03. -
Page 36: Tcp/Ip Information Screen
TCP/IP Information Screen You can check the settings for the UB‐E03, such as the IP address. Item Description Get IP Address Shows the method of setting the IP address. Set using Automatic Private IP Shows the APIPA setting. Addressing (APIPA) Set using PING Shows the IP Address using the PING command. IP Address Shows the IP address. -
Page 37: Snmp Information Screen
Chapter 2 Set up SNMP Information Screen You can check the SNMP settings for the UB‐E03. Item Description Read Only Shows the Read Community information. Community Read/Write Shows the Read/Write Community information. Trap 1 Shows the Trap 1 information. Address Shows the Trap 1 Address. Community Name Shows the Trap 1 Community Name. IP Trap Trap 2 Shows the Trap 2 information. -
Page 38: Tcp/Ip Setting Screen
TCP/IP Setting Screen You can change the settings for the UB‐E03, such as the IP address. Item Description Get IP Address Select the method of acquiring the IP address. Set using Automatic Private IP Set APIPA enable/disable. Addressing (APIPA) Set using PING Set the IP Address using the PING command. IP Address Set the IP address. -
Page 39: Snmp Communication Setting Screen
Chapter 2 Set up SNMP Communication Setting Screen You can change the SNMP community name for the UB‐E03. Item Description Read Only The setting is fixed to “Public.” Community S e t t h e R e a d / W r i t e C o m mu n i t y N a m e ( u p t o 1 6 Read/Write characters). -
Page 40: Snmp Ip Trap 1 Setting Screen
SNMP IP Trap 1 Setting Screen You can change the settings of SNMP IP Trap 1 for the UB‐E03. Item Description Trap 1 Set the Trap 1. Address Set the Trap 1 Address. Community Name Set the Trap 1 Community Name. -
Page 41: Snmp Ip Trap 2 Setting Screen
Chapter 2 Set up SNMP IP Trap 2 Setting Screen You can change the settings of SNMP IP Trap 2 for the UB‐E03. Item Description Trap 2 Set the Trap 2. Address Set the Trap 2 Address. Community Name Set the Trap 2 Community Name. -
Page 42: Administrator Setting Screen
Administrator Setting Screen You can change the settings for the UB‐E03, such as the administrator name. Item Description Administrator name Set the administrator name. Location/Person Set the location or user name. -
Page 43: Password Setting Screen
Chapter 2 Set up Password Setting Screen You can change the password for the UB‐E03. Item Description Old Password Input the old password. New Password Input the new password. Re-input Password Re-input the new password. -
Page 44: Reset Screen
Reset Screen You can reset the UB‐E03 to reflect the contents of the setting or reset it to the factory settings. Item Description RESET Reset the UB-E03. FACTORY DEFAULT The setting of the UB-E03 is changed to the factory default settings. -
Page 45: Advanced Screen
Chapter 2 Set up Advanced Screen You can change the communication method for the UB‐E03. Item Description Physical Layer Setting Set the communication method. -
Page 47: Programming Samples
Commands sent to a TM printer when the power is on (page Monitoring of the ASB status (page The rights of printing (page Time-out for connection (page Method of Printing to a TM Printer The UB‐E03 is equipped with lpr protocols as general print protocols. It is easy to print by using lpr because the printing is also supported by the operating system. However, the command statuses sent by the printer are ignored because the printing by protocols applies only to output of the printer. The UB‐E03 supports direct printing by TCP PORT9100. It is possible to control the printer directly by an application with the ESC/POS commands through writing and reading to the TCP PORT9100. UB-E03 TM printer Host TCP Port 9100... -
Page 48: Direct Printing By Port9100
(connect(sock, (struct sockaddr*)&addr, sizeof(addr)) < 0) { fprintf(stderr, "Error connect(): %d\n", WSAGetLastError()); exit(1); printf("connected\n"); /* send data */ send(sock, "EPSON|n", 6, 0); /* gracefully close */ shutdown(sock, 1);/* SD_SEND*/ while(1){ char buf[64]; int n = recv(sock, buf, 64, 0);... -
Page 49: For Linux
/* initialize the parameter */ memset(&addr, 0, sizeof(addr)); addr.sin_family = AF_INET; addr.sin_port = htons(9100); addr.sin_addr.s_addr = inet_addr(argv[1]); /* connect */ if (connect(sock, (struct sockaddr*)&addr, sizeof(addr)) < 0){ perror("connect()"); printf("connected\n"); /* send data */ send(sock, "EPSON\n", 6, 0); /* close socket */ close(sock); return 0;... -
Page 50: Commands Sent To A Tm Printer When The Power Is On
Monitoring of the ASB Status The ASB status function of the printer is used for the UB‐E03 to check the state of the printer. Therefore, when the transmission data from the application includes the command to nullify the ASB status function, the UB‐E03 cannot control the state of the printer. Take care not to transmit the command to nullify the ASB status function to check the state of the printer correctly by the UB‐E03. Or retransmit the command that makes the ASB status function effective again. The Rights of Printing The UB‐E03 permits up to 3 requests of connecting regardless of the lpr/port9100 protocol. The TM printer can print only the first accepted connection. Data transmission is blocked for other requests until the first connection is closed (explicit close or close by time‐out). Time-out for Connection If there is no data transmitted from the host for 5 minutes, regardless of the protocol, lpr/ port9100, the UB‐E03 closes the connection. The time-out of connection can be set with EPSON TMNet WebConfig. The default value is 5 minutes (300 seconds). -
Page 51: Ub-E03 Specifications
Number of connections that can 1 (Other users must wait until the printing has completed.) print Timeout Default: 300 seconds Can be set with EPSON TMNet WebConfig. (0 ~ 300 seconds) Set to 0: No timeout Job cancellation Not supported Banner printing... - Page 52 1 (Other users must wait until the printing has completed.) print Timeout Default: 300 seconds Can be set with EPSON TMNet WebConfig. (0 ~ 300 seconds) Set to 0: No timeout Job cancellation Not supported Automatic IP Address Assignment Protocols The UB‐E03 supports DHCP and APIPA, the protocols that assign an IP Address automatically.
- Page 53 3289 Compatible packet types Probe, Initialize, Query, Setup, Notify • TFTP: TFTP is used to update the firmware of the UB-E03. The following methods are available for the update. ∗ Using the dedicated update utility ∗ Using the TFTP command Protection with a password You can set a password for protecting the set content.
-
Page 54: Network Parameter Of The Ub-E03
Network Parameter of the UB-E03 The following table shows whether Initial value and Refer/Setting are printed by printing of the Status Sheet. TMNet TMNet Status WinConfig WebConfig Articles Parameters Initial Value Sheet Refer Setting Refer Setting IP address 192.168.192.168 Subnet mask 255.255.255.0 Gateway address 0.0.0.0 DHCP Enable/Disable Disable APIPA Enable/Disable Disable arp+ping IP setting Enable/Disable... -
Page 55: Setting Of The Network Parameter Of The Ub-E03
Chapter 4 UB-E03 Specifications Setting of the network parameter of the UB-E03 The network parameter of the UB‐E03 can be set by the following methods: • EPSON TMNet WinConfig • Setting using a Web browser (EPSON TMNet WebConfig function) • Using the ARP command (Only the IP Address) How to check the Mac Address The Mac address of the UB‐E03 can be checked with the following method: •... -
Page 56: System Bootup Time
System Bootup Time The UB‐E03 requires some bootup time for initializing the system after power‐on or system reset. The required bootup time is as follows. The network communication functions are unavailable during system bootup. When setting the IP address in the Manual mode : Approximately 15 seconds When setting the IP address automatically : Approximately 20 seconds (The value may vary, depending on the response time of the DHCP server.) -
Page 57: Ub-E02 And Ub-E03
Status inquiry and setting HTTP , SNMP , ENPC, TFTP protocols Network setting utility EPSON TMNet WinConfig, EPSON TMNet WebConfig Auto-MDIX Not available Available 70 mm × 58 mm E x t e r n a l /...