Logitech RALLY PLUS Setup Manual
Hide thumbs
Also See for RALLY PLUS:
- Installation manual ,
- Setup manual (206 pages) ,
- Wiring diagrams (42 pages)
Table of Contents
Advertisement
Available languages
Available languages
Advertisement
Table of Contents

Related Manuals for Logitech RALLY PLUS


Summary of Contents for Logitech RALLY PLUS
- Page 1 RALLY PLUS Setup Guide | Guide d’installation...
- Page 2 English Français Español Português...
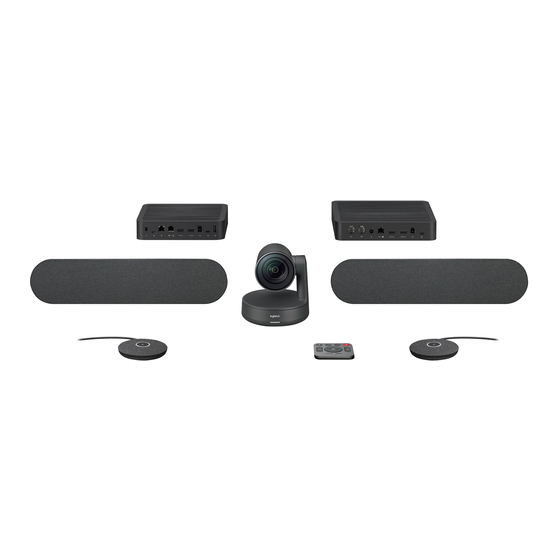
- Page 3 WHAT’S WHAT TABLE HUB 1. Power 7. Meeting Room Computer USB 2. Mic Pod 8. Future Expansion 3. Future Expansion 9. Security Slot 4. Connection To Display Hub 10. Power LED 5. HDMI 1 In 6. HDMI 2 In English...
- Page 4 DISPLAY HUB 1. Speaker 7. Camera 2. Power 8. Security Slot 3. Connection To Table Hub 9. Remote Control Pairing 4. HDMI 1 Out 10. Power LED 5. HDMI 2 Out 6. Meeting Room Computer USB English...
- Page 5 CAMERA 1. Remote control pairing button 4. Security slot 2. USB 5. MIPI 3. Status LED 6. Tripod Thread 7. Expansion Slot English...
- Page 6 6. Volume up/down 2. Call answer 7. Home 3. Call end 8. Camera pan/tilt 4. Microphone mute 9. Camera presets 5. Zoom in/out After completing the installation, the system can be checked by running the diagnostic application available at Logitech com/support/Rally English...
- Page 7 “Logitech Rally” conferencing application, simply start the application in the normal manner 3. You are now ready to use RALLY PLUS and enjoy the benefits of improved audio for audio calls and video...
- Page 8 Use this program to control the camera paired at the factory You can pair up to pan, tilt, zoom, focus, and image quality 5 remote controls to RALLY PLUS to make (like brightness and contrast) from it easier to control the system in larger...
- Page 9 ENHANCING RALLY FOR MORE INFORMATION There are several optional accessories that You can find additional information ease installation and allow RALLY PLUS on RALLY PLUS including: to be used in larger rooms: - FAQs - Software to enable functions 1. Rally Mounting Kit: Mounting brackets...
- Page 10 DISPOSITIF HUB POUR TABLE 1. Alimentation 7. USB ordinateur de salle de réunion 2. Module audio 8. Extension possible 3. Extension possible 9. Emplacement de sécurité 4. Connexion au hub pour écran 10. Témoin d'alimentation 5. Entrée HDMI 1 6. Entrée HDMI 2 Français...
- Page 11 HUB POUR ÉCRAN 1. Haut-parleur 6. USB ordinateur de salle de réunion 2. Alimentation 7. Caméra 3. Connexion au hub pour table 8. Emplacement de sécurité 4. Sortie HDMI 1 9. Couplage par télécommande 5. Sortie HDMI 2 10. Témoin d'alimentation Français...
- Page 12 CAMÉRA 1. Bouton de couplage 4. Emplacement de sécurité par télécommande 5. MIPI 2. USB 6. Filetage du trépied 3. Témoin d'état 7. Fente d'extension Français...
- Page 13 3. Fin d'appel 8. Mouvement panoramique/inclinaison de la caméra 4. Sourdine du microphone 9. Préréglages de la caméra 5. Zoom avant/arrière Une fois l’installation terminée, le système peut être vérifié par le biais de l’application de diagnostic disponible sur Logitech com/support/Rally Français...
- Page 14 DÉMARRER UN APPEL VIDÉO jusqu’à ce que le témoin de la caméra et des microphones clignote en bleu Après avoir installé la caméra RALLY PLUS 2. Activez le couplage Bluetooth de et l’avoir configurée comme dispositif votre dispositif mobile et sélectionnez par défaut dans votre application de...
- Page 15 Vous pouvez coupler jusqu’à (comme la luminosité et le contraste) 5 télécommandes à la caméra depuis votre ordinateur Le logiciel est RALLY PLUS pour faciliter le contrôle téléchargeable sur www logitech com/ du système dans les grandes pièces support/Rally Sinon, si vous souhaitez coupler une autre télécommande à...
- Page 16 POUR PLUS D'INFORMATIONS Plusieurs accessoires en option facilitent Des informations supplémentaires l'installation et permettent d'utiliser sur la caméra Rally Plus sont disponibles, RALLY PLUS dans des pièces plus grandes: notamment: - Questions fréquentes 1. Kit de fixation murale: fixations pour - Logiciels permettant d'activer le hub pour table, le hub pour écran,...
- Page 17 QUÉ ES CADA COSA HUB DE SOBREMESA 1. Alimentación 7. USB de computadora de sala de reuniones 2. Base de micrófono 8. Expansión futura 3. Expansión futura 9. Conector de seguridad 4. Conexión al hub de pantalla 10. LED de alimentación 5.
- Page 18 HUB DE PANTALLA 1. Altavoz 6. USB de computadora de sala de reuniones 2. Alimentación 7. Cámara 3. Conexión a hub de sobremesa 8. Conector de seguridad 4. Salida HDMI 1 9. Emparejamiento de remoto 5. Salida HDMI 2 10. LED de alimentación Español...
- Page 19 CÁMARA 1. Botón de emparejamiento de remoto 4. Conector de seguridad 2. USB 5. MIPI 3. LED de estado 6. Adaptador para trípode 7. Ranura de expansión Español...
- Page 20 3. Finalización de llamada 8. Panorámica/inclinación de cámara 4. Silenciamiento de micrófono 9. Preajustes de cámara 5. Zoom para ampliar/reducir Después de completar la instalación, el sistema se puede verificar mediante la aplicación de diagnóstico disponible en Logitech com/support/Rally Español...
- Page 21 VIDEOCONFERENCIA y los micrófonos 2. Coloca el dispositivo móvil en modo Después de la instalación de RALLY PLUS de emparejamiento Bluetooth y de asegurarte de que sea el dispositivo y selecciona “Logitech Rally” predeterminado en la aplicación 3.
- Page 22 EMPAREJAR UN REMOTO APLICACIÓN CAMERA CON RALLY PLUS SETTINGS RALLY PLUS y el remoto vienen Usa este programa para controlar emparejados de fábrica Se pueden desde la computadora las funciones emparejar hasta 5 remotos con de panorámica, inclinación, zoom RALLY PLUS para facilitar el control y enfoque, y la calidad de imagen del sistema en salas más grandes...
- Page 23 INFORMACIÓN Hay varios accesorios opcionales que facilitan la instalación y permiten el uso Encontrarás información adicional de RALLY PLUS en salas más grandes: sobre Rally Plus, que incluye: - Preguntas más habituales 1. Kit de montaje de Rally: Soportes de...
- Page 24 O QUE É O QUÊ CONSOLE DE MESA 1. Entrada para fonte de energia 7. USB do computador da sala de reunião 2. Módulo do microfone 8. Expansão futura 3. Expansão futura 9. Slot de segurança 4. Conexão para console de visualização 10.
- Page 25 CONSOLE DE VISUALIZAÇÃO 1. Entrada para alto-falantes 6. USB do computador da sala de reunião 2. Entrada para fonte de energia 7. Câmera 3. Conexão do console de mesa 8. Slot de segurança 4. Saída HDMI 1 9. Pareamento do controle remoto 5.
- Page 26 CÂMERA 1. Botão de pareamento 4. Slot de segurança do controle remoto 5. MIPI 2. USB 6. Rosca do tripé 3. LED de status 7. Slot de expansão Português...
- Page 27 3. Encerrar chamada 8. Panorâmica e inclinação da câmera 4. Microfone sem áudio 9. Pré-configurações da câmera 5. Mais/Menos zoom Depois de concluir a instalação, o sistema pode ser verificado executando o aplicativo de diagnóstico disponível em Logitech com/support/Rally Português...
- Page 28 PAREAMENTO DA RALLY PLUS O DISPOSITIVO PADRÃO A UM DISPOSITIVO BLUETOOTH Certifique-se de que a RALLY PLUS Você pode usar a RALLY PLUS para foi escolhida como câmera, chamadas com áudio ao parear com alto-falante e microfone em seus um dispositivo Bluetooth Para parear aplicativos de videoconferência...
- Page 29 PAREAR UM CONTROLE APLICATIVO PARA REMOTO COM A RALLY PLUS CONFIGURAÇÃO DA CÂMERA RALLY PLUS e o controle remoto estão Use este programa para controlar pareados de fábrica Você pode parear a panorâmica, a inclinação, o zoom, até 5 controles remotos para RALLY PLUS...
- Page 30 MAIS INFORMAÇÕES Existem vários acessórios opcionais que facilitam a instalação e permitem que o É possível obter mais informações sobre RALLY PLUS seja usado em salas maiores: a Rally Plus, incluindo: - Perguntas frequentes 1. Kit de Montagem Rally: Suportes de - Software para ativar funções...
- Page 31 © 2020 Logitech, Logi and the Logitech Logo are trademarks or registered trademarks of Logitech Europe S A and/or its a liates in the U S and other countries All other tradmarks are the property of their respective owners Logitech assumes no responsibility for any errors that may appear in this manual Information contained herein is subject to change without notice...