Table of Contents
Advertisement
Available languages
Available languages
SET DE ENCHUFES CON MANDO A DISTANCIA
PARA EXTERIORES / SET PRESE PER ESTERNI
SET DE ENCHUFES CON MANDO
A DISTANCIA PARA EXTERIORES
Instrucciones de utilización y de seguridad
OUTDOOR WIRELESS
SOCKET SET
Operation and Safety Notes
IAN 284705
SET PRESE PER ESTERNI
Indicazioni per l'uso e per la sicurezza
AUSSEN-
FUNKSTECKDOSEN-SET
Bedienungs- und Sicherheitshinweise
Advertisement
Chapters
Table of Contents

Related Manuals for Silvercrest RCR DP3 3711-A


Summary of Contents for Silvercrest RCR DP3 3711-A
- Page 1 SET DE ENCHUFES CON MANDO A DISTANCIA PARA EXTERIORES / SET PRESE PER ESTERNI SET DE ENCHUFES CON MANDO SET PRESE PER ESTERNI A DISTANCIA PARA EXTERIORES Indicazioni per l’uso e per la sicurezza Instrucciones de utilización y de seguridad OUTDOOR WIRELESS AUSSEN- SOCKET SET...
- Page 2 Antes de empezar a leer abra la página que contiene las imágenes y, en seguida, familiarícese con todas las funciones del dispositivo. Prima di leggere aprire la pagina con le immagini e prendere confidenza con le diverse funzioni dell’apparecchio. Before reading, unfold the page containing the illustrations and familiarise yourself with all functions of the device.
- Page 3 Master...
-
Page 4: Table Of Contents
Índice Leyenda de los pictogramas utilizados ....Página Introducción ..................Página Uso previsto .....................Página Volumen del suministro ................Página Elementos de control ................Página Datos Técnicos ..................Página Seguridad ...................Página Indicaciones de seguridad ..............Página Indicaciones de seguridad sobre las pilas / baterías ......Página Preparación ..................Página Preparar el mando a distancia ..............Página Preparar la toma de corriente accionada a distancia ......Página 14 Puesta en marcha... -
Page 5: Leyenda De Los Pictogramas Utilizados
Leyenda de los pictogramas utilizados ¡Precaución! ¡Peligro de Voltio (tensión alterna) incendio! ¡Nunca deseche aparatos eléctricos en la basura Hercio (frecuencias) doméstica! ¡Daños al medioambiente Vatio (potencia activa) por un desecho incorrecto de las pilas! Microinterruptor con una ¡Siga las indicaciones de apertura de contactos advertencia y seguridad! <... -
Page 6: Introducción
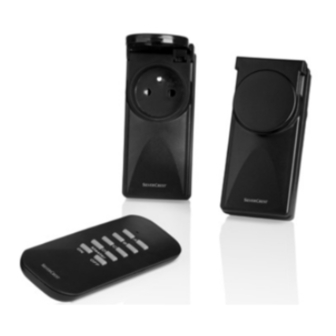
Introducción de este set. © Uso previsto 2 tomas de corriente accionadas a distancia RCR DP3 3711-A IP44 El conjunto de tomas de corriente DE 3726 accionadas a distancia es adecuado 1 mando a distancia de 4 canales para la activación y desactivación RCT DS1 CR-A 3726 a distancia de dispositivos eléctri-... -
Page 7: Datos Técnicos
Introducción Tecla de canal ON/OFF canal Banda de A, B, C, D frecuencia: 433,05 MHz - Tecla ALL ON/OFF (máster 434,79 MHz encendido/apagado) Máx. potencia Tapa del compartimento de las de transmisión: 5 dBm pilas Frecuencia de transmisión: 433,92 MHz Toma de corriente acciona- Aprobación: el sistema ha re-... -
Page 8: Seguridad
Introducción / Seguridad La toma de corriente accio- tablecer un contacto conductor nada a distancia RCR DP3 (con agujas o con otros objetos). 3711-A IP44 DE 3726 está di- Pese a ello, conserve el aparato señada para emplearla en alejado del alcance de los niños. el exterior (IP 44): Tensión nominal: 230 V ~ ,... - Page 9 Seguridad ½ tomas de corriente de 230 vol- Antes de limpiar el aparato, in- tios con toma de tierra. terrumpa siempre el paso de la ½ Evite una sobrecarga del apa- corriente. En este caso, separe rato. En caso de sobrecarga, siempre la toma de corriente puede existir riesgo de incen- accionada a distancia de la...
-
Page 10: Indicaciones De Seguridad Sobre Las Pilas / Baterías
Seguridad Indicaciones de Asegúrese de que el enchufe seguridad esté colocado cerca del pro- sobre las pilas / ducto conectado, sea de fácil baterías acceso y que no quede cubier- to durante su funcionamiento. ½ ¡PELIGRO DE MUERTE! En caso de fallos en el apara- to, desconéctelo inmediata- Mantenga las pilas / baterías mente. - Page 11 Seguridad Riesgo de sulfatación de las uso de guantes de protección pilas / baterías en estos casos. Evite condiciones y temperaturas En caso de sulfatación de las extremas que puedan influir en pilas / baterías, retírelas inme- el funcionamiento de las pilas / diatamente del producto para baterías, por ejemplo, acercar- evitar daños.
-
Page 12: Preparación
Seguridad / Preparación ¡Limpie los contactos de las mento 4 con una moneda o pilas / baterías y del comparti- con un destornillador plano en mento para pilas antes de el sentido contrario a las agu- colocarlas! jas del reloj (open). Retire inmediatamente las 2. -
Page 13: Preparar La Toma De Corriente Accionada A Distancia
Preparación © Preparar la toma de nada a distancia desde una corriente accionada distancia aprox.de 50 cm. a distancia (fig. B) 3. En el mando a distancia, pulse el botón ON del botón del 1. Conecte el enchufe por control canal ON/OFF (A, B, C o remoto a una toma de corrien-... - Page 14 Preparación conectar un aparato hasta des- quiera borrar en el mando a de seis lugares diferentes. En distancia. este caso, sincronice cada A continuación tendrá otros toma de corriente accionada a 30 segundos para borrar otras distancia con el canal del man- codificaciones o crear una nueva.
-
Page 15: Puesta En Marcha
Preparación / Puesta en marcha DE INCENDIO! No conecte control remoto sea de al me- nos 50 cm. ningún aparato cuya conexión sin vigilancia pueda provocar incendios o daños. La capaci- © Puesta en marcha dad máxima de carga de cada toma de corriente accio- ©... -
Page 16: Indicación De Errores
Puesta en marcha Pro- La luminaria de dualmente, en grupos o todas blema control del funcio- simultáneamente). namiento 2. Accione la tecla ALL ON/OFF mando a distan- para conectar simultánea- cia se ilumina, no mente todas las tomas de co- hay reacción rriente accionadas a distancia. - Page 17 Puesta en marcha Pro- La luminaria de Pro- El consumidor no blema control del fun- blema reacciona cionamiento · Compruebe si el Solu- del mando a dis- consumidor está ción tancia no se en- encendido. ciende al pulsar · Asigne un código ON u OFF nuevo al enchufe por control remoto...
- Page 18 Puesta en marcha Pro- Alcance demasia- Pro- Alcance demasia- blema do escaso blema do escaso · Si las distancias de · Cuando la distan- Solu- Solu- alcance son eleva- cia de alcance se ción ción das, asegúrese de reduce ocasional- que exista el menor mente, el motivo número de paredes...
-
Page 19: Limpieza
Limpieza / Desecho del producto © Limpieza Según las directrices europeas 2012/19/CE sobre aparatos eléc- Antes de la limpieza, desen- tricos y electrónicos usados, chufe siempre la toma de co- los aparatos eléctricos, bombillas y rriente accionada a distancia baterías usados deben almacenar- del enchufe de la pared y to- se por separado y reciclarse sin dos los enchufes del aparato. -
Page 20: Garantía Y Servicio
Desecho del producto / Garantía y servicio ¡Las pilas no deben desecharse en marco del uso previsto. La garantía la basura doméstica! Pueden con- será anulada en caso de interven- tener metales pesados venenosos y ción externa. Esta garantía no limi- requieren de un tratamiento de ba- ta sus derechos legales. -
Page 21: Declaración De Conformidad
Garantía y servicio recomendamos acceda a la zona taetserklaerung/ke_1047850706. de Servicio/Preguntas frecuentes en nuestra página web www.dvw-service.com. Fabricante Allí también encontrará este manual en formato PDF. IAN 284705 Lindenstraße 35 DE-72074 Tübingen ALEMANIA Declaración de conformidad Por la presente declaramos que el tipo de equipo de radio RC DP3 0201-A DE 3726 cumple con la directiva 2014 / 53 / UE y... - Page 22 Indice Legenda dei simboli utilizzati ..........Pagina 24 Introduzione ..................Pagina 25 Uso conforme ..................Pagina 25 Fornitura ....................Pagina 25 Elementi di comando ................Pagina 25 Dati tecnici ....................Pagina 26 Sicurezza .....................Pagina 27 Indicazioni di sicurezza .................Pagina 27 Avvertenze di sicurezza per batterie / accumulatori ......Pagina 29 Preparazione ...................Pagina Preparazione del telecomando .............Pagina...
-
Page 23: Legenda Dei Simboli Utilizzati
Legenda dei simboli utilizzati Attenzione! Pericolo Volt (tensione alternata) d’incendio! Non gettare gli apparecchi Hertz (frequenza) elettrici nei rifiuti domestici! Danni all'ambiente a Watt (potenza attiva) causa di uno smaltimento erroneo delle batterie! Microinterruttore con una Rispettare le avvertenze e apertura di contatto di le istruzioni di sicurezza! almeno 3mm... -
Page 24: Introduzione
© Uso conforme 2 prese telecomandabili Il set per presa radiocomandata è RCR DP3 3711-A IP44 DE 3726 destinato all’accensione e allo spe- 1 telecomando a 4 canali gnimento a distanza di apparecchi RCT DS1 CR-A 3726 elettrici all’esterno delle abitazioni. -
Page 25: Dati Tecnici
433,05 MHz - Copertura del vano portabatteria 434,79 MHz Frequenza radio: 433,92 MHz Presa telecomandabile Potenza max di RCR DP3 3711-A IP44 DE trasmissione.: 5 dBm 3726 (fig. B): Omologazione: Il sistema dispo- Coperchio ne di omologa- zione generale... -
Page 26: Sicurezza
Introduzione / Sicurezza Presa telecomandabile RCR Ciononostante conservare l’appa- DP3 3711-A IP44 DE 3726 recchio fuori dalla portata dei bam- idonea per ambienti esterni bini. (IP 44): Tensione nominale: 230 V ~ , © Sicurezza 50 Hz Potenza di Indicazioni di commutazione max.: 16 A, sicurezza 3.680 W... - Page 27 Sicurezza elettriche da 230 volt collegate telecomandabile dalla presa a a terra. muro e tutte le spine dall’appa- ½ Evitare un sovraccarico dell’ap- recchio. ½ parecchio. In caso di sovracca- Non collegare le prese teleco- rico può sussistere il pericolo di mandabili di seguito.
-
Page 28: Avvertenze Di Sicurezza Per Batterie / Accumulatori
Sicurezza ½ PERICOLO DI In caso di anomalie spegnere subito l’apparecchio. ESPLOSIONE! ½ Le presenti istruzioni sono par- Non ricaricare mai te integrante dell’apparecchio. batterie non ricaricabili. Non Pertanto in caso di consegna cortocircuitare e / o aprire le dell’apparecchio a terzi, forni- batterie o gli accumulatori. - Page 29 Sicurezza la vicinanza a termosifoni o gli accumulatori dello stesso l‘irraggiamento solare diretto. tipo. Non mischiare le batterie / Evitare il contatto con pelle, oc- gli accumulatori vecchi con chi e mucose! In caso di contat- quelli nuovi! to con gli acidi delle batterie Rimuovere le batterie / gli accu- sciacquare le aree interessate mulatori, quando il prodotto...
-
Page 30: Preparazione
Sicurezza / Preparazione batterie / gli accumulatori esau- attenzione alla polarità cor- sti dal prodotto. retta (+ = in alto). 3. Reinserire il coperchio del vano portabatterie 4 e serrare ruot- © Preparazione andolo in senso orario (close). 4. Premere uno dei tasti ON/OFF ©... - Page 31 Preparazione rezione indicata dall’etichetta. l’altra presa radio. In questo modo è possibile ga- Nota: Con un tasto ON/OFF rantire la protezione antispruz- canale è possibile commu- zo (la freccia deve essre ri- tare contemporaneamente più volta verso l’alto). La prese telecomandabili. Inoltre protezione antispruzzo è...
-
Page 32: Messa In Funzione
Preparazione / Messa in funzione Eliminazione di un Code: Evitare interferenze: Per eliminare un Code, ripetere Assicurarsi che la distanza tra i punti 1. e 2. le diverse prese radio sia di ca. Premere il tasto che si desidera 50 cm. eliminare (A, B, C o D) pre- sente sul tasto OFF del canle... -
Page 33: Utilizzo Del Telecomando
Messa in funzione re apparecchi la cui accensio- neamente tutte le prese teleco- ne non sorvegliata potrebbe mandabili. causare incendi o altri danni. Il carico massimo per ogni presa © Indicazioni di errore telecomandabile è di circa 3.680 W. Un sovraccarico può comportare il pericolo di incen- In caso di problemi di fun- dio o di danni all’apparecchio. - Page 34 Messa in funzione Rime- · Controllare se la Pro- Lampada di con- potenza in ampere blema trollo funziona- della batteria è an- mento del te- cora sufficiente. Se lecomando non si necessario inserire accende alla una nuova batteria. pressione di ON o OFF ·...
- Page 35 Messa in funzione / Pulizia / Smaltimento Pro- Nessuna reazio- Pro- Portata blema ne dell'utenza blema insufficiente · Controllare se l’u- · Per portate elevate Rime- Rime- tenza è accesa. assicurarsi che sia- · Assegnare alle pre- no presenti meno se radio un nuovo oggetti possibili, ad Code (vedi ”Prepa-...
-
Page 36: Pulizia
Smaltimento / Garanzia e assistenza © Pulizia di apparecchi elettrici ed elettronici usati, gli apparecchi elettrici usati, Prima della pulizia separare le lampade e le batterie usate de- sempre la presa telecomanda- vono essere raccolti in maniera dif- bile dalla presa a muro e tutte ferenziata e riciclati nel rispetto le spine dall’apparecchio. -
Page 37: Garanzia E Assistenza
Garanzia e assistenza Per questo motivo consegnare le sul prodotto da parte di terzi. I dirit- batterie scariche presso un punto ti dell’acquirente ai sensi di legge di raccolta comunale. non vengono limitati dalla presente garanzia. In caso di necessità di in- terventi di riparazione nel periodo ©... -
Page 38: Produttore
Garanzia e assistenza Produttore Per ulteriori informazioni si consi- glia di visitare il Service/FAQ’S nel nostro sito web www.dw-service.com. Vi si troverà anche queste istruzioni Lindenstraße 35 in formato PDF. DE-72074 Tübingen GERMANIA IAN 284705 Dichiarazione di conformità Con la presente si dichiara che il tipo di impianto radio RC DP3 0201-A DE 3726 è... - Page 40 Table of contents Legend of pictograms used ............Page 42 Introduction ..................Page 43 Proper handling...................Page 43 Scope of supply ..................Page 43 Control elements ..................Page 43 Technical data .....................Page 44 Safety ......................Page 45 Safety advice ....................Page 45 Safety instructions for batteries / rechargeable batteries .......Page 47 Setting up ....................Page 48 Preparing the remote control ..............Page 48...
-
Page 41: Legend Of Pictograms Used
Legend of pictograms used Volt (AC voltage) Caution! Fire hazard! Do not dispose of electric appliances in Hertz (frequency) household rubbish! Improper battery Watt (effective power) disposal harms the environment! Observe warnings and Micro-switch with contact safety instructions! opening < 3 mm Beware of electric shock! EU-compliant Danger to life! -
Page 42: Introduction
Introduction contents are complete. © Proper handling 2 Remote-controlled sockets RCR DP3 3711-A IP44 DE 3726 The radio-controlled socket set is 1 4-channel remote control suitable for switching electrical de- RCT DS1 CR-A 3726 vices outside on and off by remote 1 Button cell CR 2032, lithium 3 V control. -
Page 43: Technical Data
Max. transmitting Battery compartment lid power: 5 dBm Licensing: The system is li- Remote-controlled socket censed for gen- RCR DP3 3711-A IP44 DE eral use, is free 3726 (Fig. B): of charge and Cover does not require Child-protected socket registration. -
Page 44: Safety
Introduction / Safety Transmission yourself with all functions of the de- frequency: 433.92 MHz vice before starting it up for the first time. Advice: The radio-controlled sock- ets have a child protection socket Avoid danger to life from electric shock! , which significantly increases ½... - Page 45 Safety should only be carried out by from putting any objects into the service department or a the socket. ½ specialist electrical workshop Ensure that the outlet is in- ½ Before cleaning always discon- stalled close to the connected nect the device from the mains product, is easily accessible supply.
-
Page 46: Safety Instructions For Batteries / Rechargeable Batteries
Safety Safety to batteries / rechargeable instructions for batteries. batteries / rechargeable Risk of leakage of batteries / batteries rechargeable batteries Avoid extreme environmental DANGER TO LIFE! Keep conditions and temperatures, batteries / rechargeable batteries which could affect batteries / out of reach of children. -
Page 47: Setting Up
Safety / Setting up protective gloves at all times if Clean the contacts on the bat- such an event occurs. tery / rechargeable battery and In the event of a leakage of in the battery compartment batteries / rechargeable batteries, before inserting! immediately remove them from Remove exhausted batteries /... -
Page 48: Setting Up The Remote-Controlled Socket
Setting up © Setting up the remote- with the aid of a coin or a controlled socket screwdriver, then removing the (fig. B) lid (open). 2. Insert the round cell battery type CR 2032. Make sure you 1. Plug the wireless socket into an fit the battery with the correct earthed mains socket. - Page 49 Setting up (A, B, C or D) on the when you change the battery. remote control. You can now Note: If you disconnect the re- remotely switch a connected mote-controlled socket from the device on or off. Once assigned power supply, the codings will the process will complete.
-
Page 50: Setting-Up Operation
Setting up / Setting-up operation button 3 on the remote con- can only perform its switching trol within the 30 second time- function when the device to be frame. All previously stored controlled is switched on. codes will be deleted immedi- ATTENTION! FIRE HAZ- ately after pushing the Master ARD! Do not attach any appli-... -
Page 51: Trouble-Shooting
Setting-up operation Prob- The operating indi- the same time). cator on the re- 2. Use the ALL-ON / OFF button mote control device to switch all radio-controlled illuminates but sockets on or off at the same there is no reaction time. - Page 52 Setting-up operation Prob- No reaction from Prob- Range is too small consumer · Check that the appli- · For the greatest range Rem- Rem- ance is switched on. make sure that there · Assign a new code to are as few potential the wireless socket (see obstructions as possi- “Setting up the wireless...
-
Page 53: Cleaning
Setting-up operation / Cleaning / Disposal © Prob- Range is too small Cleaning Before cleaning, always dis- · If the range is too Rem- connect the radio-controlled small at times, the socket from the wall socket and reason could be a remove all power plugs from remote control which the device. -
Page 54: Guarantee And Service
Disposal / Guarantee and service In accordance with Council Direc- Batteries should not be disposed of tive 2012 / 19 / EC on waste electri- with domestic waste. They may cal and electronic equipment contain toxic heavy metals and are (WEEE), used electrical appliances, subject to hazardous waste treat- lighting equipment and batteries... -
Page 55: Service Address
Guarantee and service properly. The guarantee lapses in There, you will also find these cases of unauthorized tampering. instructions for use as a PDF This guarantee does not restrict document. your legal rights. If you wish to make IAN 284705 a claim under the guarantee, please telephone the service cen- tre. -
Page 56: Manufacturer
Guarantee and service © Manufacturer Lindenstraße 35 DE-72074 Tübingen GERMANY GB/MT... - Page 58 Inhaltsverzeichnis Legende der verwendeten Piktogramme ....Seite 60 Einleitung ....................Seite 61 Bestimmungsge-mäßer Gebrauch .............Seite 61 Lieferumfang ....................Seite 61 Bedienelemente ..................Seite 61 Technische Daten ..................Seite 62 Sicherheit ....................Seite 63 Sicherheitshinweise ..................Seite 63 Sicherheitshinweise für Batterien / Akkus ..........Seite 65 Vorbereitung ..................Seite 66 Fernbedienung vorbereiten ................Seite 66 Funksteckdose vorbereiten .................Seite 67 Inbetriebnahme...
-
Page 59: Legende Der Verwendeten Piktogramme
Legende der verwendeten Piktogramme Volt Vorsicht! Brandgefahr! (Wechselspannung) Elektrogeräte nicht in den Hertz (Frequenz) Hausmüll werfen! Umweltschäden durch Watt (Wirkleistung) falsche Entsorgung der Batterien! Warn- und Sicherheitshin- Mikroschalter mit einer weise beachten! Kontaktöffnung < 3 mm Vorsicht vor elektrischem Schlag! EU-konform Lebensgefahr! Geschützt gegen Spritz-... -
Page 60: Einleitung
Einleitung Inhalt. © Bestimmungsge- 2 Funksteckdosen mäßer Gebrauch RCR DP3 3711-A IP44 DE 3726 1 4-Kanal-Fernbedienung Das Funksteckdosen-Set ist zum RCT DS1 CR-A 3726 ferngesteuerten Ein- und Ausschal- 1 Knopfzelle CR 2032, Lithium 3 V ten von Elektrogeräten im Außenbe- (für Fernbedienung) -
Page 61: Technische Daten
Einleitung ALL-ON-/OFF-Taste (Master- Max. EIN/AUS) Sendeleistung: 5 dBm Batteriefachabdeckung Zulassung: Das System be- sitzt eine allge- Funksteckdose RCR DP3 meine Zulassung 3711-A IP44 DE 3726 (BZT) und ist (Abb. B): anmelde- und Abdeckung gebührenfrei. Reichweite: abhängig von Kinderschutz-Steckdose den Umgebungs- bedingungen ca. -
Page 62: Sicherheit
Einleitung / Sicherheit Übertragungs- vor der ersten Inbetriebnahme mit frequenz: 433,92 MHz allen Funktionen des Gerätes vertraut. Hinweis: Die Funksteckdose ver- fügt über eine Kinderschutz-Steck- Vermeiden Sie Lebensge- dose . Dadurch wird die häus- fahr durch elektrischen Schlag! liche Sicherheit erheblich erhöht. Die ½... - Page 63 Sicherheit Fall selbst. Lassen Sie notwen- irgendwelche Gegenstände in dige Reparaturen ausschließlich die Steckdose einbringen kön- von der Servicestelle oder einer nen. Elektro-Fachwerkstatt ausführen. Stellen Sie sicher, dass die ½ Unterbrechen Sie vor der Reini- Steckdose in der Nähe des gung des Gerätes unbedingt angeschlossenen Produktes den Stromfluss.
-
Page 64: Sicherheitshinweise Für Batterien / Akkus
Sicherheit Sicherheits- Risiko des Auslaufens von hinweise für Batterien / Akkus Batterien / Akkus Vermeiden Sie extreme Bedin- gungen und Temperaturen, die LEBENSGEFAHR! Halten Sie auf Batterien / Akkus einwirken Batterien / Akkus außer Reich- können z. B. auf Heizkörpern / weite von Kindern. -
Page 65: Vorbereitung
Sicherheit / Vorbereitung Im Falle eines Auslaufens der vor dem Einlegen! Batterien / Akkus entfernen Sie Entfernen Sie erschöpfte diese sofort aus dem Produkt, um Batterien / Akkus umgehend Beschädigungen zu vermeiden. aus dem Produkt. Verwenden Sie nur Batterien / Akkus des gleichen Typs. -
Page 66: Funksteckdose Vorbereiten
Vorbereitung drehen und herausnehmen Punkte 2. und 3. 30 Sekunden (open). Zeit. Hinweis: Die Funksteckdose 2. Setzen Sie die Knopfzelle Typ CR 2032 ein. Achten Sie auf darf nur in der auf dem Gerä- die richtige Polarität (+ = oben). teetikett angezeigten Richtung 3. - Page 67 Vorbereitung Hinweis: Wenn Sie die Funk- gesteuert ein- oder ausschalten. Nach erfolgreicher Zuweisung steckdose vom Netz nehmen, wird der Vorgang beendet. bleiben die Codierungen dau- 4. Wiederholen Sie die den Vor- erhaft gespeichert. gang 1. – 3. mit der anderen Eine Codierung löschen: Funksteckdose.
-
Page 68: Inbetriebnahme
Vorbereitung / Inbetriebnahme wiederholen Sie zuerst den in eine beliebige Schutzkon- Vorgang 1. – 2. taktsteckdose ein und schließen Drücken Sie dann während der Sie den zu schaltenden Ver- 30 Sekunden die MASTER- braucher an. OFF-Taste an der Fernbe- 2. Schalten Sie das Verbraucher- dienung. -
Page 69: Fernbedienung Benutzen
Inbetriebnahme © © Fernbedienung Fehlerhinweise benutzen (Abb. A) Sollte die Fernschaltung 1. Betätigen Sie die ON-/OFF-Ta- nicht funktionieren, prüfen für den Kanal, dessen Sie bitte das System auf folgende Punkte: Verbraucher Sie ein- oder aus- schalten möchten. Die Fernbe- Pro- Betriebskontroll- dienung steuert bis zu 4 Funk- Leuchte 1 an der... - Page 70 Inbetriebnahme Pro- Betriebskontroll- Pro- Keine Reaktion am Leuchte 1 an der Verbraucher blem blem Fernbedienung · Prüfen Sie, ob Abhilfe leuchtet nicht beim der Verbraucher ein- Drücken von ON geschaltet ist. oder OFF · Ordnen Sie der Funk- · Prüfen Sie, ob die Bat- Abhilfe steckdose terie richtig eingelegt...
-
Page 71: Reinigung
Inbetriebnahme / Reinigung / Entsorgung © Pro- Reichweite zu Reinigung gering blem Trennen Sie vor der Reinigung · Stellen Sie für hohe Abhilfe immer die Funksteckdose von Reichweiten sicher, dass möglichst wenig der Wandsteckdose und alle Wände, Möbel, aber Netzstecker vom Gerät. auch Bäume, Sträu- Es dürfen keine Flüssigkeiten in cher etc. -
Page 72: Garantie Und Service
Entsorgung / Garantie und Service Elektronik-Altgeräte müssen ver- Sondermüllbehandlung. Geben Sie brauchte Elektrogeräte, Leuchtmittel deshalb verbrauchte Batterien bei und Batterien getrennt gesammelt einer kommunalen Sammelstelle ab. und einer umweltgerechten Wie- derverwertung zugeführt werden. © Garantie und Möglichkeiten zur Entsorgung des Service ausgedienten Geräts erfahren Sie bei Ihrer Gemeinde- oder Stadtver-... -
Page 73: Serviceadresse
Garantie und Service Konformitäts- nisch in Verbindung setzen. Nur so erklärung kann eine kostenlose Einsendung Ihres Geräts gewährleistet werden. Hiermit erklären wir, dass der Funk- anlagentyp RC DP3 0201-A DE © Serviceadresse 3726 der Richtlinie 2014/53/EU und 2011/65/EU (RoHS II) ent- BAT, Lindenstraße 35, spricht. - Page 74 Lindenstraße 35 DE-72074 Tübingen GERMANY Estado de las informaciones · Versione delle informazioni · Last Information Update Stand der Informationen: 06 / 2017 Ident.-No.: 0496298 062017-ES/IT IAN 284705...