Table of Contents
Advertisement
OWNER'S MANUAL
AUTO EMPTY
CHARGING STATION
Before beginning installation, read these instructions
carefully. This will simplify installation and ensure that the
product is installed correctly and safely. Leave these
instructions near the product after installation for future
reference.
ENGLISH
VDS-ST1AU / VDS-ST1WU
MFL71780904
Rev.02_070721
Copyright © 2021 LG Electronics Inc. All Rights Reserved.
www.lg.com
Advertisement
Table of Contents

Related Manuals for LG VDS-ST1AU


Summary of Contents for LG VDS-ST1AU
- Page 1 This will simplify installation and ensure that the product is installed correctly and safely. Leave these instructions near the product after installation for future reference. ENGLISH VDS-ST1AU / VDS-ST1WU www.lg.com MFL71780904 Rev.02_070721 Copyright © 2021 LG Electronics Inc. All Rights Reserved.
-
Page 2: Table Of Contents
TABLE OF CONTENTS This manual may contain images or content that may be different from the model you purchased. This manual is subject to revision by the manufacturer. SAFETY INSTRUCTION READ ALL INSTRUCTIONS BEFORE USE............3 WARNING ......................3 CAUTION ......................9 INSTALLATION Product Overview.....................12 Installing the Charging Station ..............15 Storing the Accessories ...................17... -
Page 3: Safety Instruction
SAFETY INSTRUCTION SAFETY INSTRUCTION READ ALL INSTRUCTIONS BEFORE USE The following safety guidelines are intended to prevent unforeseen risks or damage from unsafe or incorrect operation of the appliance. The guidelines are separated into ‘WARNING’ and ‘CAUTION’ as described below. Safety Messages This symbol is displayed to indicate matters and operations that can cause risk. - Page 4 If the appliance is not working as it should, has been dropped, damaged, left outdoors, or dropped into water, return it to an LG Electronics service centre. • Do not pull or carry by cord, use cord as a handle, close a door on cord, or pull cord around sharp edges or corners.
- Page 5 SAFETY INSTRUCTION • Do not use a battery pack or appliance that is damaged or modified. Damaged or modified batteries may exhibit unpredictable behavior resulting in fire, explosion or risk of injury. • Do not disassemble, remove or short-circuit the battery. •...
- Page 6 • When installing or moving the appliance, be careful not to pinch, crush, or damage the power cord or plug. Operation • This appliance is exclusively for use with the LG Electronics CordZero A9 Vacuum Cleaner. Do not use it for other appliances or other purposes.
- Page 7 • Never attempt to operate this appliance if it is damaged, malfunctioning, partially disassembled, or has missing or broken parts, including a damaged cord or plug. Take it to an authorized LG Electronics service centre or dealer for assistance. • Do not apply excessive force to the power cord to bend it, or place it under a heavy object as this will damage it.
- Page 8 • If the earth leakage breaker is tripped when the product is put on the charging station, immediately remove the appliance from the charging station. Contact an LG Electronics customer service centre. • Do not use or store a heating device or flammable substance (ether, benzene, alcohol, chemicals, combustible sprays, insecticide, air freshener or cosmetics) in close proximity to the appliance.
-
Page 9: Caution
SAFETY INSTRUCTION • Never allow any water, beverage or detergent to get inside the battery. • Do not apply physical impacts to the battery. • Do not use the appliance without the dust bag and filters in place. Maintenance • Make sure to unplug the power cord when cleaning or maintaining the charging station. - Page 10 SAFETY INSTRUCTION • Do not carry the product with the Vacuum Cleaner, nozzles, or accessories inside; it may cause injury or product damage. • When opening and closing the product door or control panel, be careful not to get your fingers caught. •...
- Page 11 SAFETY INSTRUCTION • Do not remove the battery during operation.
-
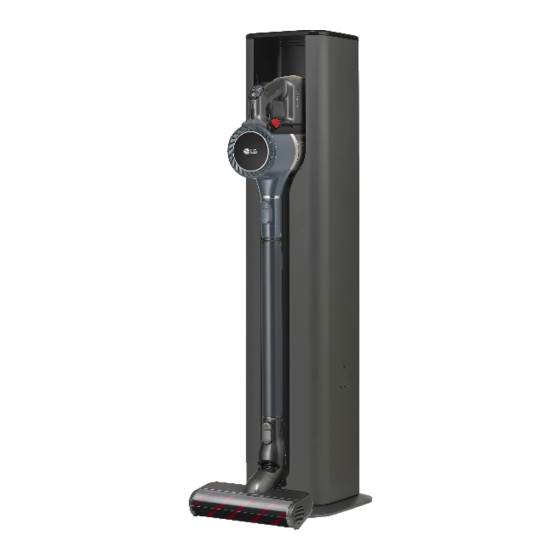
Page 12: Installation Product Overview
INSTALLATION INSTALLATION Product Overview The images in this guide may be different from the actual components and accessories, which are subject to change by the manufacturer without prior notice for product improvement purposes. Front View List Part Name List Part Name Control Panel Motor Protection Filter (Expendable) Vacuum Cleaner Mounting Unit... - Page 13 Wall Fixing Anchor Product Fixing Screw Dust Bag (Expendable) NOTE • The dust bag exhaust filter and the motor Installation Kit protection filter will eventually need to be replaced. Contact an LG Electronics customer service center. Specifications Appliance Model VDS-ST1****** Dimensions...
- Page 14 INSTALLATION NOTE • The number of batteries varies depending on the vacuum cleaner purchased. The spare battery is available to buy separately. Model EAC633822** Voltage DC 25.2 V Capacity 2400 mA...
-
Page 15: Installing The Charging Station
INSTALLATION Installing the Charging • When storing with the mop nozzle, install the product further away from the wall. Station Installation Follow the steps below to install the charging station on a hard and level floor. CAUTION 5 cm • Do not install on carpeted floors or rugs. The product may fall, causing injury or damage. - Page 16 INSTALLATION Drill a 4 mm wide and 44.5 mm deep hole at the WARNING selected position on the concrete wall and insert the wall fixing anchor into the hole. Fix • Manage and supervise children or pet animals to the fixing rack to the wall firmly using the wall prevent them from bumping into product and fixing screw.
-
Page 17: Storing The Accessories
INSTALLATION Storage Inside the product falls, resulting in personal injury or product damage. Open the left door of the product and insert • If the distance between the wall and the product the bedding nozzle or the pet nozzle is too great, the product may fall. storage. - Page 18 INSTALLATION NOTE • To carry the product, open both doors and hold the areas shown.
-
Page 19: Operation
OPERATION OPERATION Charging the Battery To insert, align the battery with the outline of the battery charger. Before Charging the Battery • Make sure that the adapter is connected to both the charging station and the power outlet. • Fully charging a single battery usually takes 4 hours. -
Page 20: Getting Started
OPERATION Getting Started Control Panel Features Control Panel List Descriptions Status Display The display shows the dust emptying operation status or when to replace the dust bag, charging status of the spare battery, and dust emptying mode. Start Press the Start/Stop button once to start the dust emptying operation. •... - Page 21 OPERATION Status Display AUTO List Descriptions Dust Emptying • Indicates the dust emptying operation status or when to replace the (Replace Bag) dust bag. Indicator - White: Product is emptying dust. - Flashing red: If the indicator flashes red while emptying dust, this indicates dust bag requires replacement.
- Page 22 OPERATION Using the Product Using the Auto Mode When the automatic dust emptying mode is set, Using the Manual Mode the dust emptying operation starts automatically whenever the vacuum cleaner is properly inserted Insert the vacuum cleaner into the product. into the product.
- Page 23 OPERATION • Once power is restored, product will reset and then product can be removed from emptying station. NOTE • The sound of the high-performance motor may be louder than the existing wireless vacuum cleaner. It is normal to hear sounds such as the vacuum cleaner, dust bin cover opening, product operating unit, and suction.
-
Page 24: Maintenance
MAINTENANCE MAINTENANCE Cleaning the Appliance Changing the Dust Bag Cleaning the Product Body Open the left and right doors of the component storage. Disconnect the power plug from the outlet. Wipe the control panel using a soft cloth. • Product may malfunction if there is dust on the control panel. - Page 25 MAINTENANCE Press button above the PUSH label with Place the end of the dust bag on the rail inside one hand. The dust bag is released. the product. Pull out the dust bag lever to remove the Slide the dust bag in along the rails of the dust bag.
- Page 26 • Replace the dust bag if it smells, even if it is not full. • The motor protection filter will eventually need to be replaced. Contact an LG Electronics customer service centre. Hold the product with one hand and take out Cleaning the Filters the motor protection filter with the other hand.
- Page 27 MAINTENANCE Remove dust from the motor protection filter and exhaust filter once every 3 months and wash it using room temperature water. • To avoid odor and the malfunction of the motor, allow the motor protection filter and the exhaust filter to dry completely in a well- ventilated area out of direct sunlight for at least 24 hours before reassembling.
-
Page 28: Troubleshooting
Product setting The internal motor of the product is not operating properly . initialization doesn't • Disconnect the power plug from the outlet and contact an LG Electronics work even after the Service Centre. power plug is plugged in again. - Page 29 Two icons [dust The motor that holds the Vacuum Cleaner isn't working properly. emptying (replace bag) • Disconnect the power plug from the outlet and contact an LG Electronics and auxiliary battery] Service Centre. flash simultaneously.
- Page 30 The motor that presses the Vacuum Cleaner dust bin cover separation battery and auto button isn't working properly. emptying) flash • Disconnect the power plug from the outlet and contact an LG Electronics simultaneously. Service Centre. During the dust The dust bag is full.
- Page 31 Memo...