
Related Manuals for Bosch HKS79U2 0 Series


Summary of Contents for Bosch HKS79U2 0 Series
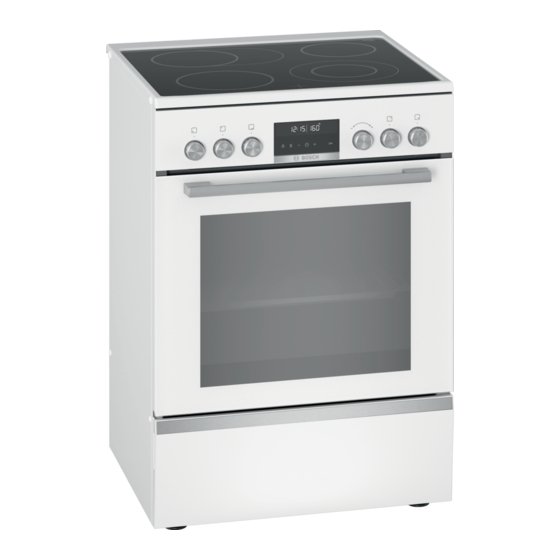
- Page 1 Free standing cooker HKS79U2.0, HKS79U220C Instruction manual Free standing cooker [en]...
-
Page 3: Table Of Contents
Table of contents [ e n ] I n s t r u c t i o n m a n u a l F r e e s t a n d i n g c o o k e r Intended use . -
Page 4: Intended Use
Additional information on products, accessories, replacement parts and services can be found at cable. www.bosch-home.com and in the online shop Always slide accessories into the cooking www.bosch-eshop.com compartment the right way round. - Page 5 Important safety information If the appliance is placed on a base and is Warning – Risk of burns! ■ not secured, it may slide off the base. The The appliance becomes very hot. Never ■ appliance must be fixed to the base. touch the interior surfaces of the cooking The hinges on the appliance door move compartment or the heating elements.
-
Page 6: Halogen Lamp
Important safety information Halogen lamp Warning – Risk of burns! The cooking compartment becomes ■ Warning – Risk of burns! extremely hot during the cleaning function. The bulbs in the cooking compartment Never open the appliance door. Allow the become very hot. There is still a risk of burning appliance to cool down. -
Page 7: Causes Of Damage
Causes of damage Damage can occur if hard or pointed objects fall on ]Causes of damage ■ the hob. Aluminium foil and plastic containers melt on hot ■ hotplates. Oven protective foil is not suitable for your H ob C a u s e s o f d a m a g e hob. -
Page 8: Environmental Protection
Environmental protection Open the appliance door as infrequently as possible 7Environmental protection ■ when the appliance is in use. Y our new appliance is particularly energy-efficient. E n v i r o n m e n t a l p r o t e c t i o n Here you can find tips on how to save even more energy when using the appliance, and how to dispose of your appliance properly. -
Page 9: Environmentally-Friendly Disposal
Installation and connection Use the residual heat. For longer cooking times, you The mains cable is not kinked, crushed, modified or ■ ■ can switch the hotplate off 5-10 minutes before the severed. end of the cooking time. The mains cable does not come into contact with ■... -
Page 10: Getting To Know Your Appliance
Getting to know your appliance Keep the original appliance packaging. Only transport *Getting to know your the appliance in the original packaging. Observe the transport arrows on the packaging. appliance If the original packaging is no longer available I n this chapter, we will explain the indicators and pack the appliance in protective packaging to G e t t i n g t o k n o w y o u r a p p l i a n c e controls. -
Page 11: Control Panel
Getting to know your appliance Control panel Details may vary depending on the appliance model. Interior lighting Switch the interior lighting on or off. Control knobs Rapid heating Start or cancel Rapid heating for the cooking compartment. The control knobs can be pushed in and remain pressed down when they are in the "out"... -
Page 12: Cooking Compartment
Getting to know your appliance For each heating function, the appliance specifies Note: a default temperature or level. You can accept this value or change it in the appropriate area. Other functions Your new oven has yet more functions; see below for a brief description of these. -
Page 13: Accessories
Accessories Depending on the appliance features, the pull-out rails _Accessories should lock in place when they are fully pulled out. This makes it easy to place the accessories in position. To unlock the pull-out rails, use a little force to push them Y our appliance is accompanied by a range of A c c e s s o r i e s back into the cooking compartment. -
Page 14: Before Using For The First Time
Before using for the first time KBefore using for the first Universal pan, non-stick For moist cakes, baked items, frozen food and large roasts. time Allows baked items and roasts to be removed more easily from the universal pan. B efore you can use your new appliance, you must Baking tray, non-stick B e f o r e u s i n g f o r t h e f i r s t t i m e make some settings. -
Page 15: Setting The Cooking Time
Setting the cooking time Turn the hotplate control to position 9 - where you will 1 Setting the cooking time feel a slight resistance - then continue turning to the symbol = large dual-circuit hotplate or ð symbol = extended cooking zone T his chapter explains how to set a hotplate. - Page 16 Setting the cooking time Ongoing cooking Ongoing cooking setting time in minutes Braising Roulades 50-60 mins Pot roasts 60-100 mins Goulash 50-60 mins Frying** Escalope, plain or breaded 6-10 mins Escalope, frozen 8-12 mins Steak (3 cm thick) 8-12 mins Fish and fish fillet, plain 8-20 mins Fish and fish fillet, breaded...
-
Page 17: Operating The Appliance
Operating the appliance If you change the heating function, the temperature will 1Operating the appliance be changed to the corresponding default value. Y ou have already learnt about the controls and how Rapid heating O p e r a t i n g t h e a p p l i a n c e they work. -
Page 18: Time-Setting Options
Time-setting options Use the button to set the cooking time. OTime-setting options Y our appliance has different time-setting options. T i m e - s e t t i n g o p t i o n s Time-setting option Use Cooking time Once the set cooking time has elapsed, the appliance will automatically stop heating. -
Page 19: Setting The Timer
Time-setting options Example in the picture: The time is 10.30 a.m., a To check the values for the different time-setting cooking time of 45 minutes has been set and you want options, touch the button repeatedly until the the food to be ready at 12.30 p.m. required symbol is indicated. -
Page 20: Setting The Time
Childproof lock Setting the time AChildproof lock Once the appliance has been connected to the mains or following a power failure, the clock will flash on the Y our appliance is equipped with a childproof lock so display. Set the time. C h i l d p r o o f l o c k that children cannot switch it on accidentally or change any settings. -
Page 21: Basic Settings
Basic settings Changing the basic settings QBasic settings The function selector must be set to the "Off" position. T here are various settings available to you in order to Press and hold the button for approximately B a s i c s e t t i n g s help use your appliance effectively and simply. -
Page 22: Sabbath Mode
Sabbath mode FSabbath mode DCleaning S abbath mode lets you set a cooking time of over 70 W ith good care and cleaning, your appliance will retain S a b b a t h m o d e C l e a n i n g hours. - Page 23 Cleaning Area Cleaning products Area Cleaning products Upper glass cover* Glass cleaner: Glass hob* Care: Protective/care products for glass Clean with a soft cloth. Cleaning: Cleaning agents for glass. (Depending on the (Depending on the You can remove the upper glass cover for Follow the cleaning instructions on the packag- appliance model) appliance model)
-
Page 24: Keeping The Appliance Clean
Cleaning Notes Area Cleaning products Slight differences in colour on the front of the ■ Rack Hot soapy water: appliance are caused by the use of different Clean with a dishcloth or a brush. materials, such as glass, plastic and metal. Remove the rail for cleaning. -
Page 25: Cleaning Function
Cleaning function .Cleaning function Warning Risk of fire! Loose food remnants, fat and meat juices may catch ■ U se the "Pyrolytic self-cleaning" function to clean the fire when the cleaning function is in progress. Before C l e a n i n g f u n c t i o n cooking compartment. -
Page 26: After Running The Cleaning Function
Rails After running the cleaning function pRails Allow the cooking compartment to cool down. Use a damp cloth to wipe off the ash that has been left behind W ith good care and cleaning, your appliance will retain in the cooking compartment and around the appliance R a i l s its appearance and remain fully functional for a long door. -
Page 27: Appliance Door
Appliance door Attaching the door qAppliance door Reattach the oven door in the reverse sequence to removal. W ith good care and cleaning, your appliance will retain A p p l i a n c e d o o r When attaching the oven door, ensure that both its appearance and remain fully functional for a long hinges are inserted straight into the opening... -
Page 28: Removing And Installing The Door Panels
Appliance door Removing and installing the door panels Warning – Risk of injury! Scratched glass in the appliance door may develop into To facilitate cleaning, you can remove the glass panels a crack. Do not use a glass scraper, sharp or abrasive from the oven door. -
Page 29: Trouble Shooting
Trouble shooting 3Trouble shooting Warning – Risk of electric shock! Incorrect repairs are dangerous. Repairs may only be carried out and damaged power cables replaced by I f a fault occurs, there is often a simple explanation. one of our trained after-sales technicians. If the T r o u b l e s h o o t i n g Before calling the after-sales service, please refer to the appliance is defective, unplug the appliance from the... -
Page 30: Replacing The Bulb In The Oven Ceiling Light
Customer service Replacing the bulb in the oven ceiling light 4Customer service If the bulb in the oven light fails, it must be replaced. Heat-resistant, 25 watt, 230 V halogen bulbs are O ur after-sales service is there for you if your appliance available from the after-sales service or specialist C u s t o m e r s e r v i c e needs to be repaired. -
Page 31: Programmes
Programmes clay or plastic, and cookware with plastic handles, is PProgrammes not suitable. Size of the cookware: Y ou can prepare food very easily using the various The roast should cover around two thirds of the P r o g r a m m e s programmes. - Page 32 Programmes Programme Food Cookware Add liquid Shelf posi- Set weight Notes tion Baked potatoes, whole Unpeeled, starchy Universal pan Total potatoes weight Stew, with vegetables Vegetarian Deep roasting As per recipe Total Cut vegetables that take dish with lid weight longer to cook (e.g.
-
Page 33: Setting A Programme
Programmes Programme Food Cookware Add liquid Shelf posi- Set weight Notes tion Joint of veal, lean E.g. tenderloin or Roasting dish Cover the bottom of the Meat Do not sear the meat with lid roasting dish, and add weight beforehand up to 250 g vegetables if you wish Haunch of roe venison Boned, seasoned... -
Page 34: Tested For You In Our Cooking Studio
Tested for you in our cooking studio method of preparation and the type of food, it is JTested for you in our possible to save energy. If you open the appliance door before the food has finished cooking or if you preheat cooking studio the appliance, you may not be able to achieve this result. -
Page 35: Cakes And Pastries
Tested for you in our cooking studio Tinplate baking tins, ceramic dishes and glass dishes Accessories extend baking time and mean that the baked item will Only use original accessories supplied with your not brown evenly. appliance. These have been tailored to the cooking compartment and the operating modes of your If you are using silicone moulds, follow the appliance. - Page 36 Tested for you in our cooking studio Dish Accessories/cookware Shelf posi- Heating Temperature Cooking tion function in °C time in mins Yeast cake with dry topping, 2 levels Universal pan + baking tray 150-170 20-30 < Yeast cake with moist topping Universal pan 160-180 30-50...
- Page 37 Tested for you in our cooking studio Bread and rolls Dish Accessories/cookware Shelf posi- Heating Step Temperature in Cooking tion function °C time in mins Bread, 750 g (in a loaf tin or free-form) Universal pan or loaf tin 180-200 50-60 Bread, 1000 g (in a loaf tin or free-form) Universal pan or loaf tin...
-
Page 38: Bakes And Gratins
Tested for you in our cooking studio The baked item is too light on top, and Bake the cake one level higher in the oven the next time. too dark underneath. The baked item is too dark on top, Bake the cake one level lower in the oven the next time. Select a lower temperature and extend the baking and too light underneath. -
Page 39: Poultry, Meat And Fish
Tested for you in our cooking studio Poultry, meat and fish When grilling, try wherever possible to use pieces of food which are of a similar thickness and weight. This Your appliance offers you a range of heating types for will allow them to brown evenly and remain succulent preparing poultry, meat and fish. - Page 40 Tested for you in our cooking studio roasting dish, it will need a little more liquid than if Meat cooked in glass cookware. Baste lean meat with fat as required or cover it with strips of bacon. The steam evaporates in the cookware when roasting. Carefully pour in more liquid if required.
-
Page 41: Vegetables And Side Dishes
Tested for you in our cooking studio Dish Accessories/cookware Shelf posi- Heating Step Tempera- Cooking tion function ture in °C time in mins Knuckle of veal, 1.5 kg Cookware, uncovered 210-230 130-150 Leg of lamb, boned, medium, 1.5 kg Cookware, uncovered 170-190 70-80* Saddle of lamb on the bone, medium, 1.5 kg... -
Page 42: Yoghurt
Tested for you in our cooking studio Yoghurt It is sufficient to heat UHT milk to 40 °C. Stir in 30 g (approx. 1 tbsp) (chilled) yoghurt. You can use your appliance to make your own yoghurt. Pour into cups or small jars with lids and cover. Place the cups or jars onto the cooking Remove accessories and shelf supports from the compartment floor and use the settings indicated in... -
Page 43: Drying
Tested for you in our cooking studio Dish Accessories/cook- Shelf posi- Heating Searing time Tempera- Cooking ware tion function in min ture in °C time in Duck breast, 300 g each Cookware, uncovered 60-70 Chicken breast fillet, 200 g each, well done Cookware, uncovered 120* 80-110... -
Page 44: Preserving
Tested for you in our cooking studio Preserving Seal the jars with the clips. Place no more than six jars in the cooking For preserving, the jars and rubber seals must be clean compartment. and intact. If possible, use jars of the same size. The information in the table is for round, one-litre jars. -
Page 45: Prove Dough
Tested for you in our cooking studio Prove dough Condensation builds up during the proving process, which steams up the door panel. Wipe out the cooking Your yeast dough will prove considerably more quickly compartment after dough proving.Remove any using this heating function than at room temperature limescale with a little vinegar and wipe with clean water. -
Page 46: Test Dishes
Tested for you in our cooking studio Test dishes These tables have been produced for test institutes to facilitate appliance testing. As per EN 60350-1. Baking Items that are placed in the oven on baking trays or in baking tins/dishes at the same time will not necessarily be ready at the same time. - Page 48 *9001304781* 9001304781 271297(B)