Advertisement
Quick Links
60in or 72in Recycler
Model No. 139-6655
Model No. 139-6659
Important:
This kit does not come with the recycler blades.
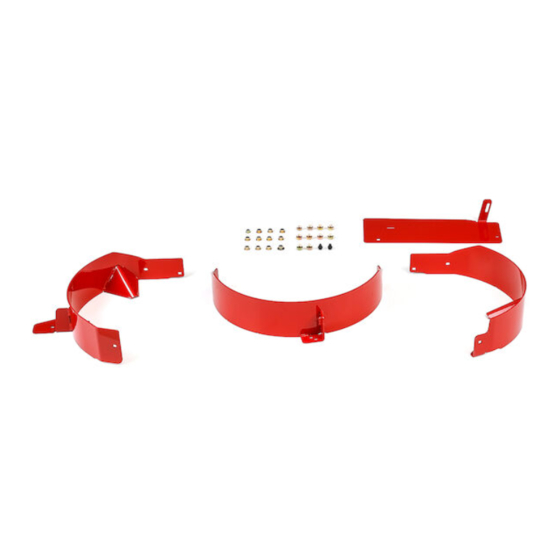
Loose Parts
Use the chart below to verify that all parts have been shipped.
Procedure
1
2
3
4
5
6
7
8
9
10
11
© 2021—The Toro® Company
8111 Lyndale Avenue South
Bloomington, MN 55420
Description
No parts required
No parts required
No parts required
No parts required
No parts required
No parts required
Discharge plate
Cover plate
Carriage bolt (3/8 x 1-1/4 inches)
Carriage bolt (5/16 x 7/8 inch)
Small flange nut (3/8 inch)
Flange nut (5/16 inch)
Large flange nut (3/8 inch)
Carriage bolt (3/8 x 1 inch)
Left baffle
Center baffle
Right baffle
Small flange nut (3/8 inch)
Carriage bolt (3/8 x 1 inch)
Bolt (3/8 x 1 inch)
Large flange nut (3/8 inch)
Kickers
Carriage bolt (5/16 x 7/8 inch)
Locknut (5/16 inch)
No parts required
Recycler blade (sold separately)
Register at www.Toro.com.
®
Kit
Qty.
Raise the mower for access
–
(GrandStand mowers only).
–
Prepare the machine.
Remove the existing baffles (for mower
–
decks with existing baffles).
Remove the deck fasteners and
–
discharge baffle (for Z Master 4000
mower deck).
–
Remove the existing discharge chute.
–
Drill holes (for G3 mower decks).
1
1
2
1
Install the discharge plate.
2
1
2
2
1
1
1
7
Install the baffles.
6
2
1
2
Install the kickers (for 72-inch mower
4
decks).
4
–
Tighten all the fasteners.
3
Install the recycler blades.
Original Instructions (EN)
Printed in the USA
All Rights Reserved
Form No. 3447-975 Rev A
Installation Instructions
Use
*3447-975*
Advertisement

Related Manuals for Toro 139-6655


Summary of Contents for Toro 139-6655
- Page 1 Form No. 3447-975 Rev A 60in or 72in Recycler ® Model No. 139-6655 Model No. 139-6659 Installation Instructions Important: This kit does not come with the recycler blades. Loose Parts Use the chart below to verify that all parts have been shipped.
- Page 2 Raising the Mower for Access GrandStand Mowers Only No Parts Required Procedure You can raise the front of the mower and support to access under the machine for maintenance. WARNING g009434 The machine could fall onto someone and Figure 1 cause serious injury or death.
-
Page 3: Preparing The Machine
Preparing the Machine No Parts Required Procedure Disengage the PTO, move the motion-control levers to the N position, and engage the EUTRAL LOCK parking brake. Shut off the engine, remove the key, and wait for all moving parts to stop before leaving the operating position. - Page 4 g309824 Figure 3 1. Discharge baffle...
- Page 5 Removing the Deck Fasteners and Discharge Baffle For Z Master 4000 Mower Decks No Parts Required Procedure Remove the 6 carriage bolts (3/8 x 7/8 inch), 6 locknuts (3/8 inch), and discharge baffle from the mower deck (Figure After removing the discharge baffle, install the 2 carriage bolts (3/8 x 7/8 inch) and 2 locknuts (3/8 inch) back into the mower deck (Figure Retain the fasteners and discharge baffle for converting back to side discharge.
-
Page 6: Drilling Holes
Removing the Existing Drilling Holes Discharge Chute For G3 Mower Decks No Parts Required No Parts Required Procedure Procedure Remove the locknut, bolt, spring, and spacer Check the hole diameters in the locations shown holding the deflector to the pivot brackets Figure (Figure Drill the holes to the specified diameter in the... - Page 7 Installing the Discharge and Cover Plate Parts needed for this procedure: Discharge plate Cover plate Carriage bolt (3/8 x 1-1/4 inches) Carriage bolt (5/16 x 7/8 inch) Small flange nut (3/8 inch) Flange nut (5/16 inch) Large flange nut (3/8 inch) Carriage bolt (3/8 x 1 inch) Procedure Install the discharge plate to the outside of the...
- Page 8 Installing the Baffles Parts needed for this procedure: Left baffle Center baffle Right baffle Small flange nut (3/8 inch) Carriage bolt (3/8 x 1 inch) Bolt (3/8 x 1 inch) Large flange nut (3/8 inch) Procedure Note: Loosely install the baffles to align the baffles with all holes in the mower (Figure Position the right baffle into the mower.
- Page 9 g010688 Figure 9 1. Small flange nut (3/8 inch) 3. Bolt (3/8 x 1 inch) 5. Right baffle 2. Carriage bolt (3/8 x 1 inch) 4. Left baffle 6. Large flange nut (3/8 inch) Loosely install the center baffle to the right baffle with 1 carriage bolt (3/8 x 1 inch) and 1 small flange nut (3/8 inch) as shown in Figure Loosely install the center baffle to the top of the mower deck with 1 bolt (3/8 x 1 inch) and 1 small flange...
- Page 10 Installing the Kickers Tightening all the Fasteners For 72-inch Mower Decks No Parts Required Parts needed for this procedure: Procedure Kickers Tighten all nuts and bolts for the baffles; refer to the Installing the Baffles sections. Carriage bolt (5/16 x 7/8 inch) For GrandStand mowers, lower the machine, Locknut (5/16 inch) remove the plastic from the hydraulic tank, and...
- Page 11 Notes:...