Silvercrest 102464 Operating Instructions Manual
Electric oven & grill
Hide thumbs
Also See for 102464:
- Operating instructions manual (74 pages) ,
- Operating instructions manual (60 pages)
Table of Contents
Advertisement
Available languages
Available languages
Quick Links
Advertisement
Chapters
Table of Contents

Related Manuals for Silvercrest 102464


Summary of Contents for Silvercrest 102464
- Page 1 HORNO ELÉCTRICO CON GRILL FORNO ELETTRICO CON GRILL SGBR 1500 A1 HORNO ELÉCTRICO CON GRILL FORNO ELETTRICO CON GRILL Instrucciones de uso Istruzioni per l'uso ELECTRIC OVEN & GRILL GRILL- UND BACKAUTOMAT Operating instructions Bedienungsanleitung IAN 102464...
- Page 2 Antes de empezar a leer abra la página que contiene las imágenes y, en seguida, familiarícese con todas las funciones del dispositivo. Prima di leggere aprire la pagina con le immagini e prendere confi denza con le diverse funzioni dell'apparecchio. Before reading, unfold the page containing the illustrations and familiarise yourself with all functions of the device.
-
Page 4: Table Of Contents
Índice Introducción ............2 Uso previsto . -
Page 5: Introducción
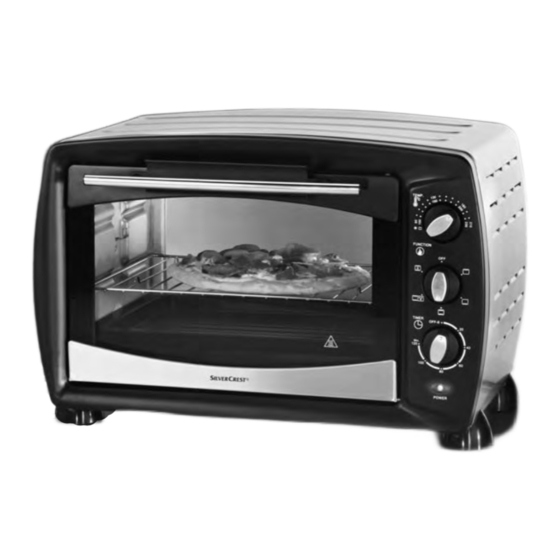
Introducción Descripción del aparato Felicidades por la compra de su aparato nuevo. Figura A: 1 Accionamiento Ha adquirido un producto de alta calidad. Las instrucciones de uso forman parte del producto y 2 Regulador de temperatura contienen indicaciones importantes acerca de la 3 Selector de función seguridad, el uso y el desecho de este aparato. -
Page 6: Indicaciones De Seguridad
Indicaciones de seguridad ¡PELIGRO DE DESCARGA ELÉCTRICA! No se permite la apertura ni la reparación de la carcasa del apa- ► rato. De lo contrario, no podrá garantizarse la seguridad del aparato y se anulará el derecho a la garantía. Si el aparato está defectuoso, encomiende su reparación exclusivamente al personal especializado autorizado. - Page 7 ¡ADVERTENCIA – PELIGRO DE LESIONES! Este aparato puede ser utilizado por niños a partir de 8 años y ► por personas cuyas facultades físicas, sensoriales o mentales sean reducidas o carezcan de los conocimientos y de la experiencia necesaria siempre que sean vigilados o hayan sido instruidos correctamente sobre el uso seguro del aparato y hayan com- prendido los peligros que entraña.
- Page 8 ATENCIÓN – ¡DAÑOS MATERIALES! No utilice ningún tipo de reloj programador externo ni sistema de ► control remoto para accionar el aparato. No deje nunca el aparato desatendido durante su funcionamiento. ► Asegúrese de que el aparato, el cable de red o la clavija de red ►...
-
Page 9: Instalación
Instalación Uso del aparato Puerta de cristal ¡ADVERTENCIA! ¡RIESGO DE INCENDIO! ¡ATENCIÓN! ► No coloque nunca el aparato bajo armarios ¡PELIGRO DE DAÑOS MATERIALES! suspendidos ni junto a cortinas, paredes de No se apoye en la puerta de cristal 6. ►... -
Page 10: Uso Del Espetón
Uso del espetón INDICACIÓN ¡ADVERTENCIA! Coloque siempre la bandeja de horno q en ¡PELIGRO DE LESIONES! ► el carril inferior cuando utilice el espetón z. Utilice siempre el mango w para introducir ► Así podrán recogerse los líquidos que goteen. el espetón z caliente en el aparato o para Para retirar el espetón z caliente, inserte los o extraerlo. -
Page 11: Uso De La Bandeja De Horno/Parrilla
Uso de la bandeja de horno/parrilla Antes del primer uso 1) Inserte la clavija de red en una base de ¡ADVERTENCIA! enchufe. ¡PELIGRO DE LESIONES! 2) Gire el regulador de temperatura 2 hasta el Utilice siempre el mango 0 para insertar la ►... -
Page 12: Manejo Del Aparato
Manejo del aparato Temporizador Puede ajustar el tiempo de horneado deseado con Selector de función el temporizador 4. Con el selector de función 3, puede encender Ajuste el temporizador 4 en el tiempo deseado. ■ el aparato y ajustar 5 funciones distintas: Tras fi... -
Page 13: Gratinado Con Espetón
El aparato se apaga automáticamente una vez INDICACIÓN transcurrido el tiempo ajustado, se emite un sonido ► Si selecciona la función con ventilador, por y el piloto de control 5 se apaga. norma general, puede prescindirse del preca- INDICACIÓN lentamiento del horno. Si desea interrumpir brevemente el proceso –... - Page 14 INDICACIÓN EJEMPLO: POLLO ASADO Si desea interrumpir brevemente el proceso Ingredientes de calentamiento, gire el regulador de tempera- ♦ Pollo entero (aprox. 1,3 kg, limpio) tura 2 hasta el tope en sentido antihorario ♦ Condimentos (sal, pimentón) y ajuste el temporizador 4 en la posición "OFF - 0"...
-
Page 15: Limpieza Y Mantenimiento
■ Limpie el aparato con un paño húmedo. En Limpieza y mantenimiento caso necesario, añada un producto de limpieza suave en el paño y después frote el aparato con ¡PELIGRO DE DESCARGA ELÉCTRICA! un paño humedecido con agua limpia. Seque ►... -
Page 16: Eliminación De Fallos
Eliminación de fallos Error Causa Solución La clavija de red no está conectada a la red Inserte la clavija de red en una eléctrica. base de enchufe. El aparato no Utilice una base de enchufe La base de enchufe está defectuosa. funciona. -
Page 17: Garantía Y Asistencia Técnica
Tel.: 902 59 99 22 (0,08 EUR/Min. + 0,11 EUR/llamada (tarifa normal)) (0,05 EUR/Min. + 0,11 EUR/llamada (tarifa reducida)) E-Mail: kompernass@lidl.es IAN 102464 Disponibilidad de la línea de atención al cliente: de lunes a viernes de 8.00 a 20.00 h (CET) SGBR 1500 A1... - Page 18 Indice Introduzione ............16 Uso conforme .
-
Page 19: Introduzione
Introduzione Descrizione dell'apparecchio Congratulazioni per l'acquisto del Suo nuovo Figura A: apparecchio. 1 Azionamento È stato acquistato un prodotto di alta qualità. 2 Regolatore della temperatura Il manuale di istruzioni è parte integrante del pre- 3 Commutatore di funzione sente prodotto. Esso contiene importanti indicazioni 4 Timer per la sicurezza, l'uso e lo smaltimento. -
Page 20: Indicazioni Relative Alla Sicurezza
Indicazioni relative alla sicurezza PERICOLO DI SCOSSA ELETTRICA! Non è consentito aprire l'alloggiamento dell'apparecchio o tentare ► di ripararlo. Aprendolo ci si espone a pericoli e la garanzia deca- de. Fare riparare l'apparecchio guasto solo dal rivenditore o da personale specializzato autorizzato. Al fi... - Page 21 AVVERTENZA – PERICOLO DI LESIONI! Questo apparecchio può essere utilizzato dai bambini di almeno ► 8 anni di età e da persone con capacità fi siche, sensoriali o mentali ridotte o insuffi ciente esperienza o conoscenza, solo se sorvegliati o istruiti sull'uso sicuro dell'apparecchio e qualora ne abbiano compreso i pericoli associati.
- Page 22 ATTENZIONE – DANNI MATERIALI! Non utilizzare timer esterni o un sistema di telecomando separato ► per azionare l'apparecchio. Non lasciare mai l'apparecchio incustodito durante l'uso. ► Assicurarsi che l'apparecchio, il cavo di rete o la spina non ► vengano mai a contatto con sorgenti di calore come piastre di cottura o fi...
-
Page 23: Installazione
Installazione Utilizzo dell’apparecchio Sportello di vetro ATTENZIONE! PERICOLO D'INCENDIO! ► Non collocare mai l'apparecchio sotto pensili ATTENZIONE! o accanto a tendine, pareti di armadi o altri PERICOLO DI DANNI MATERIALI! oggetti infi ammabili. Non appoggiarsi sullo sportello di vetro 6. ►... -
Page 24: Utilizzo Dello Spiedo
Utilizzo dello spiedo AVVERTENZA ATTENZIONE! PERICOLO DI LESIONI! Quando si utilizza lo spiedo z, infi lare ► Per inserire lo spiedo bollente z nell'appa- ► sempre la teglia da forno q nella guida recchio o per estrarlo da esso, utilizzare inferiore. -
Page 25: Utilizzo Della Teglia Da Forno/Griglia
Utilizzo della teglia da forno/griglia Prima del primo impiego 1) Inserire la spina in una presa di corrente. ATTENZIONE! PERICOLO DI LESIONI! 2) Ruotare il regolatore della temperatura 2 in ► Per inserire nell'apparecchio o estrarre da senso orario fi no al fermo per raggiungere la esso la teglia da forno bollente q/la griglia temperatura massima. -
Page 26: Utilizzo Dell'apparecchio
Utilizzo dell'apparecchio Timer Con l'ausilio del timer 4 si può impostare il tempo Commutatore di funzione di cottura: Sul commutatore di funzione 3 si può sia accendere Impostare il timer 4 sul tempo di cottura deside- ■ l'apparecchio sia impostare 5 diverse funzioni. rato. -
Page 27: Cottura Alla Griglia Con Spiedo
Alla scadenza del tempo impostato l'apparecchio AVVERTENZA si spegne automaticamente, viene emesso un se- ► In caso venisse selezionata la funzione con gnale acustico e la spia di controllo 5 si spegne. ventilazione, di solito non è necessario preri- AVVERTENZA scaldare il forno elettrico con grill. - Page 28 AVVERTENZA ESEMPIO GALLETTO ALLA GRIGLIA Se si desidera interrompere precocemente il Ingredienti processo di riscaldamento, ruotare il regolatore ♦ Galletto (ca. 1,3 kg, sventrato) della temperatura 2 in senso antiorario fi no al ♦ Spezie (sale, peperoncino) fermo e portare il timer 4 su "OFF - 0". ♦...
-
Page 29: Pulizia E Manutenzione
■ Pulire l'apparecchio con un panno umido. In Pulizia e manutenzione caso di necessità, applicare sul panno qualche goccia di detergente delicato e risciacquare poi PERICOLO DI FOLGORAZIONE! la superfi cie con un panno inumidito di acqua ► Prima della pulizia staccare sempre la spina pulita. -
Page 30: Eliminazione Dei Guasti
Eliminazione dei guasti Guasto Causa Soluzione La spina di rete non è collegata alla rete di Inserire la spina in una presa di corrente. corrente. L'apparecchio non Utilizzare un'altra presa di La presa di corrente è guasta. funziona. corrente. L'apparecchio è guasto. Rivolgersi al servizio clienti. -
Page 31: Garanzia E Assistenza
Le riparazioni eseguite dopo la sca- denza del periodo di garanzia sono a pagamento. Assistenza Italia Tel.: 02 36003201 E-Mail: kompernass@lidl.it IAN 102464 Assistenza Malta Tel.: 80062230 E-Mail: kompernass@lidl.com.mt IAN 102464 Raggiungibilità della hotline: dal lunedì... - Page 32 Contents Introduction ............30 Proper use .
-
Page 33: Introduction
Introduction Appliance description Congratulations on the purchase of your new Figure A: appliance. 1 Drive You have selected a high-quality product. 2 Temperature control The operating instructions are part of this product. 3 Function switch They contain important information on safety, usage 4 Timer and disposal. -
Page 34: Safety Instructions
Safety instructions DANGER – RISK OF ELECTRIC SHOCK! Do not open the housing of the appliance or attempt to repair it. ► Doing so can lead to risks and also invalidates the warranty. Defective appliances should be repaired by the retailer or authorized personnel only. - Page 35 WARNING – RISK OF INJURY! This appliance may be used by children of the age of 8 years or ► more and by persons with reduced physical, sensory or mental capabilities or lack of experience and/or knowledge if they are being supervised or have been instructed with regard to the safe use of the appliance and have understood the potential risks.
- Page 36 CAUTION – PROPERTY DAMAGE! Do not use an external timer switch or a separate remote control ► system to operate the appliance. Never leave the appliance unattended during operation. ► Ensure that the appliance, the power cable and the plug do not ►...
-
Page 37: Setting Up
Setting up Using the appliance Glass door WARNING! RISK OF FIRE! ► Never place the appliance beneath wall cup- ATTENTION! DAMAGE TO PROPERTY! boards or next to curtains, cupboard walls or Do not lean on the glass door 6. Do not ►... -
Page 38: Using The Rotisserie
Using the rotisserie NOTE Always slide the baking tray q into the lower ► WARNING! RISK OF INJURY! rail when you use the rotisserie z. Always use the tongs w to insert the hot rotis- ► This will collect any drips. serie z into the appliance or to remove it. -
Page 39: Using The Baking Tray/Rack
Using the baking tray/rack Before fi rst use 1) Insert the plug into a mains power socket. WARNING! RISK OF INJURY! 2) Turn the temperature control 2 clockwise to Always use the tongs 0 to insert the hot ► the maximum temperature (to the stop). baking tray q/the hot rack e into the appli- 3) Turn the function switch 3 to “upper and ance or to remove it. -
Page 40: Operating The Appliance
Operating the appliance Timer User the timer 4 to set the cooking time. Function switch Set the timer 4 to the desired cooking time. ■ You can switch on the appliance with the function After expiry of the set time a signal tone sounds switch 3, and also set 5 diff... -
Page 41: Grilling With The Rotisserie
The appliance switches off automatically after the NOTE set period, there is a beep and the control lamp 5 ► As a general rule, if you are baking or grilling switches off . with hot air you can dispense with a preheating NOTE of the grilling/cooking space. - Page 42 NOTE EXAMPLE: GRILLED CHICKEN If you want to interrupt the heating process pre- Ingredients maturely, turn the temperature control 2 counter- ♦ Grilling chicken (approx. 1.3 kg, clockwise to the stop and set the timer 4 to guts removed) "OFF - 0". ♦...
-
Page 43: Cleaning And Care
■ Wipe the appliance with a damp cloth. If neces- Cleaning and care sary, put a little mild detergent on the cloth and wipe this off afterwards with a cloth dampened DANGER – ELECTRIC SHOCK! with clean water. Dry everything properly. ►... -
Page 44: Troubleshooting
Troubleshooting Fault Cause Solution The mains plug is not connected to the Insert the plug into a mains power mains power. socket. The appliance is not Use a diff erent mains power The mains power socket is defective. working. socket. The appliance is defective. -
Page 45: Warranty And Service
Repairs made after expiry of the warranty period are chargeable. Service Great Britain Tel.: 0871 5000 720 (£ 0.10/Min.) E-Mail: kompernass@lidl.co.uk IAN 102464 Service Malta Tel.: 80062230 E-Mail: kompernass@lidl.com.mt IAN 102464 Hotline availability:... - Page 46 Inhaltsverzeichnis Einleitung .............44 Bestimmungsgemäßer Gebrauch .
-
Page 47: Einleitung
Einleitung Gerätebeschreibung Herzlichen Glückwunsch zum Kauf Ihres neuen Abbildung A: Gerätes. 1 Antrieb Sie haben sich damit für ein hochwertiges Produkt 2 Temperaturregler entschieden. Die Bedienungsanleitung ist Bestand- 3 Funktionsschalter teil dieses Produkts. Sie enthält wichtige Hinweise 4 Timer für Sicherheit, Gebrauch und Entsorgung. Machen Sie sich vor der Benutzung des Produkts mit allen 5 Kontrollleuchte Bedien- und Sicherheitshinweisen vertraut. -
Page 48: Sicherheitshinweise
Sicherheitshinweise GEFAHR – ELEKTRISCHER SCHLAG! Sie dürfen das Gerätegehäuse des Gerätes nicht öff nen oder ► reparieren. In diesem Falle ist die Sicherheit nicht gegeben und die Gewährleistung erlischt. Lassen Sie ein defektes Gerät nur vom Händler oder autorisiertem Fachpersonal reparieren. Lassen Sie beschädigte Netzstecker oder Netzkabel sofort von ►... - Page 49 WARNUNG – VERLETZUNGSGEFAHR! Dieses Gerät kann von Kindern ab 8 Jahren sowie von Personen ► mit reduzierten physischen, sensorischen oder mentalen Fähigkeiten oder Mangel an Erfahrung und/oder Wissen benutzt werden, wenn sie beaufsichtigt oder bezüglich des sicheren Gebrauchs des Gerätes unterwiesen wurden und die daraus resultierenden Gefahren verstanden haben.
- Page 50 ACHTUNG – SACHSCHADEN! Benutzen Sie keine externe Zeitschaltuhr oder ein separates Fern- ► wirksystem, um das Gerät zu betreiben. Lassen Sie das Gerät während des Betriebes niemals unbeaufsichtigt. ► Stellen Sie sicher, dass das Gerät, das Netzkabel oder der Netz- ►...
-
Page 51: Aufstellen
Aufstellen Benutzung des Gerätes Glastür WARNUNG! BRANDGEFAHR! ► Stellen Sie das Gerät niemals unter Hänge- ACHTUNG! SACHSCHADEN! schränke oder neben Gardinen, Schrankwänden Stützen Sie sich nicht auf der Glastür 6 ► oder anderen entzündlichen Gegenständen. ab. Stellen Sie keine Gegenstände auf die ►... -
Page 52: Drehspieß Benutzen
Drehspieß benutzen HINWEIS WARNUNG! VERLETZUNGSGEFAHR! Schieben Sie immer das Backblech q in die ► Benutzen Sie immer die Zange w, um den ► untere Schiene, wenn Sie den Drehspieß z heißen Drehspieß z in das Gerät einzusetzen verwenden. So werden herunterfallende oder herauszunehmen. -
Page 53: Backblech/Gitterrost Benutzen
Backblech/Gitterrost benutzen Vor dem ersten Gebrauch 1) Stecken Sie den Netzstecker in eine Netzsteck- WARNUNG! VERLETZUNGSGEFAHR! dose. Benutzen Sie immer die Zange 0, um das hei- ► 2) Drehen Sie den Temperaturregler 2 bis zum ße Backblech q/den heißen Gitterrost e in Anschlag im Uhrzeigersinn auf die höchste das Gerät einzusetzen oder herauszunehmen. -
Page 54: Bedienen Des Gerätes
Bedienen des Gerätes Timer Mit Hilfe des Timers 4 können Sie die Garzeit Funktionsschalter einstellen: Am Funktionsschalter 3 können Sie das Gerät Stellen Sie die Timer 4 auf die gewünschte ■ einschalten, sowie 5 verschiedene Funktionen Garzeit. Nach Beendigung der eingestellten einstellen: Zeit erklingt ein Signalton und das Gerät stoppt das Heizen. -
Page 55: Grillen Mit Drehspieß
Das Gerät schaltet sich nach der eingestellten Zeit HINWEIS automatisch aus, ein Signalton erklingt und die ► Falls Sie die Funktion mit Umluft wählen, Kontrollleuchte 5 erlischt. können Sie in der Regel auf ein Vorheizen HINWEIS des Grill- und Garraums verzichten. Wenn Sie den Heizvorgang vorzeitig unterbre- –... - Page 56 HINWEIS BEISPIEL GRILLHÄHNCHEN Wenn Sie den Heizvorgang vorzeitig unterbre- Zutaten chen wollen, drehen Sie den Temperaturregler 2 ♦ Grillhähnchen (ca. 1,3 kg, ausgenommen) bis zum Anschlag gegen den Uhrzeigersinn und ♦ Gewürze (Salz, Paprika) stellen Sie den Timer 4 auf „OFF - 0“. ♦...
-
Page 57: Reinigung Und Pfl Ege
■ Wischen Sie das Gerät mit einem feuchten Tuch Reinigung und Pfl ege ab. Bei Bedarf geben Sie ein mildes Spülmittel auf das Tuch und wischen Sie mit einem mit kla- GEFAHR - ELEKTRISCHER SCHLAG! rem Wasser befeuchteten Tuch nach. Trocknen ►... -
Page 58: Fehlerbehebung
Fehlerbehebung Fehler Ursache Lösung Der Netzstecker ist nicht mit dem Stromnetz Stecken Sie den Netzstecker in verbunden. eine Netzsteckdose. Das Gerät Benutzen Sie eine andere Netz- Die Netzsteckdose ist defekt. funktioniert nicht. steckdose. Das Gerät ist defekt. Wenden Sie sich an den Service. Die Kontrollleuchte 5 Drehen Sie den Funktionsschalter 3 Der Funktionsschalter 3 steht auf OFF. -
Page 59: Garantie Und Service
Tage nach Kaufdatum. Nach Ablauf der Garantie- zeit anfallende Reparaturen sind kostenpfl ichtig. Service Deutschland Tel.: 0800 5435 111 (Kostenfrei aus dem dt. Festnetz/Mobilfunknetz) E-Mail: kompernass@lidl.de IAN 102464 Service Österreich Tel.: 0820 201 222 (0,15 EUR/Min.) E-Mail: kompernass@lidl.at IAN 102464 Service Schweiz Tel.: 0842 665566 (0,08 CHF/Min.,... - Page 60 KOMPERNASS HANDELS GMBH BURGSTRASSE 21 44867 BOCHUM DEUTSCHLAND / GERMANY www.kompernass.com Estado de las informaciones · Versione delle informazioni Last Information Update · Stand der Informationen: 06/ 2014 · Ident.-No.: SGBR1500A1-022014-2 IAN 102464...