Table of Contents
Advertisement
Quick Links
RAK-XJ-Q-R-HAE SERIES
RAK-XJ-Q-R-HBE SERIES
RAK-VJ-OHAT
SERIES
RAK-VJ-QHAE
SERIES
RAK-VJ-RHAE
SERIES
Remote Controller Manual
Anleitung für Fernbedienung
Manuel de la télécommande
Manuale del telecomando
Manual del mando a distancia
Manual do controlo remoto
Εγχειρίδιο τηλεχειριστηρίου
Handleiding voor afstandsbediening
Návod k používání dálkového ovladače
< rev.0-10/2023>
Page. 1~40
Instrukcja obsługi pilota zdalnego
sterowania
Seite.41~80
Manual pentru telecomandă
Page. 81~120
A távirányító használati útmutatója
Pagina. 121~160
Página. 161~200
Handbok för fjärrkontroll
Pág. 201~240
Kaukosäätimen ohjekirja
Σελίδα. 241~280
Pagina. 281~320
.321~360
Priručnik za daljinski upravljač
Nuotolinio valdiklio vadovas
Strana. 361~400
Priručnik za daljinski upravljač
RC-BGH1FA0G
Strona. 401~440
Pagina. 441~480
520/481. oldal
. 521~560
Sidan. 561~600
Sivut. 601~640
. 641~680
Stranica. 681~720
721~760 psl.
Stranica. 761~800
Advertisement
Table of Contents

Related Manuals for Hitachi RC-BGH1FA0G


Summary of Contents for Hitachi RC-BGH1FA0G
- Page 1 RC-BGH1FA0G RAK-XJ-Q-R-HAE SERIES RAK-XJ-Q-R-HBE SERIES RAK-VJ-OHAT SERIES RAK-VJ-QHAE SERIES RAK-VJ-RHAE SERIES Page. 1~40 Strona. 401~440 Remote Controller Manual Instrukcja obsługi pilota zdalnego sterowania Seite.41~80 Anleitung für Fernbedienung Pagina. 441~480 Manual pentru telecomandă Page. 81~120 Manuel de la télécommande 520/481. oldal A távirányító...
-
Page 2: Preparation Before Operation
Preparation Before Operation ■ To install the batteries 1. Slide the cover to take it off. 2. Install two dry batteries AAA.LR03 (alkaline). The direction of the batteries should match the marks in the case. 3. Replace the cover at its original position. ■... - Page 3 Preparation Before Operation ■ To set calendar and clock 1. Press (Reset) button when fi rst time setting. "Year" blinks. 2. Press (Time) button to set the current year. 3. Press (Clock) button. "Day" and "Month" blink. 4. Press (Time) button to set the current day and month.
-
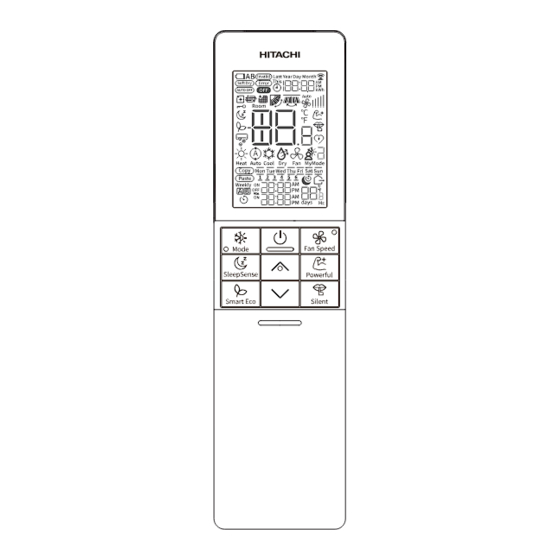
Page 4: Names And Functions Of Remote Controller
Names and Functions of Remote Controller REMOTE CONTROLLER This controls the operation of the indoor unit. The range of control is about 7 meters. If indoor lighting is controlled electronically, the range of control may be shorter. This unit can be fixed on a wall using the fixture provided. Before fixing it, make sure the indoor unit can be controlled from the remote controller. - Page 5 Names and Functions of Remote Controller My Mode Button Info Button Page 30) Page 40) Wide Reach Button FrostWash Button Control the angle of the Page 12) Vertical air deflector. Page 27) Up/Down Button LeaveHome Button Control the angle of the Page 11) horizontal air deflector.
-
Page 6: Various Functions
Various Functions Auto Restart Control If there is a power failure, operation will be automatically restarted when the power is resumed with previous operation mode and airflow direction. (As the operation is not stopped by remote controller.) If you intend not to continue the operation when the power is resumed, switch off the power supply. When you switch on the circuit breaker, the operation will be automatically restarted with previous operation mode and airflow direction. -
Page 7: Heat Mode
Heat Mode Use the device for heating when the outdoor temperature is under 24°C. When it is too warm (over 24°C), the heating function may not work in order to protect the device. Press the Mode Selector Button so that the display indicates (Heat). -
Page 8: Dry Mode
Dry Mode Use the device for dehumidifying when the room temperature is over 16°C. When it is under 15°C, the dehumidifying function will not work. Press the Mode Selector Button so that the display indicates (Dry). The fan speed is set at Auto. Press (Fan Speed) button to select Silent, Low or Auto fan speed. -
Page 9: Cool Mode
Cool Mode Use the device for cooling when the outdoor temperature is -10 to 46°C. If humidity is very high (over 80%) indoors, some dew may form on the air outlet grille of the indoor unit. Press the Mode Selector Button so that the display indicates (Cool). -
Page 10: Powerful Operation
User can use the device simply as an air circulator. Press the M selector button so that the display indicates Press the button. Fan Speed (High) (Super High) START Press the button. Fan operation starts with a beep. STOP Press the button again to stop operation. Powerful Operation •... - Page 11 LeaveHome Operation Prevent the room temperature from falling too much when no one is at home. The initial setting temperature is 10°C and the temperature range can be set between 10°C and 16°C. This operation is able to operate by "Continuous operation" or "Day timer operation". Please use "Day timer operation" to set the number of days up to 99 days.
- Page 12 Indoor FrostWash3.0 operation The dust and dirt adhering to indoor heat exchanger which is the cause of the smell. They are washed away ● by freezing and thawing of the heat exchanger. FrostWash3.0 function can work when the outdoor temperature is 1℃ to 43℃ and Indoor humidity is 30% to 70%. ●...
- Page 13 FrostWash3.0 (Auto Mode) and DuraSpin (Auto Mode) (For single model connection) How to enable FrostWash3.0 (Auto) and DuraSpin (Auto) FrostWash3.0 FrostWash 3.0 (Auto) and DuraSpin (Auto) enable. If FrostWash3.0 (Auto) and DuraSpin (Auto) FrostWash3.0 How to disable FrostWash3.0 (Auto) and DuraSpin (Auto) FrostWash3.0 FrostWash3.0 (Auto) and DuraSpin (Auto) disable.
- Page 14 Indoor FrostWash operation(For multi model connection) Indoor FrostWash(Manual Mode) When the unit is off, press (FrostWash) button, manual FrostWash will start. How to start and cancel indoor FrostWash (Manual mode). Press the FrostWash button , FrostWash & display on LCD ●...
- Page 15 FrostWash operation for outdoor unit(For single model connection) FrostWash 5℃ 25℃ 5℃ 25℃. Outdoor FrostWash operation will operate automatically (accumulated operation or standby time reaches 60 days). During operation of outdoor frostwash, a bit of condensation on the base pan surface of the outdoor unit is normal.
- Page 16 Mold guard function 2.0 Operation (For single model connection) Mold guard function 2.0 will be operated not only immediately after stopping operation but also during stop conditions, if room temperature and ambient temperature will match the condition after some hours' condition of high humidity.
- Page 17 Mold guard function (fan only)(For multi model connection) After the cooling operation is stopped, the fan of the indoor unit is dried by fan mode to suppress the generation of mold inside the indoor unit. - Mold Guard Operation period is about 60 minutes. - It can't remove mold or sterilize.
- Page 18 Mold guard function (with heat) After the cooling operation is stopped, the fan of the indoor unit is dried by heating or fan mode to suppress the generation of mold inside the indoor unit. - Mold Guard Operation period is about 100 minutes. - It can't remove mold or sterilize.
- Page 19 Once Timer (On/Off Timer) Operation Off Timer The device can be set to turn off at a preset time. 1. Press (Off-Timer) button. blink on the display. 2. Set the "turn-off time" with (Time) button. 3. After setting, direct the remote controller towards the indoor and press (Send) button.
- Page 20 Smart Eco operation • The sensor detects the presence of people in the room. When nobody is detected, the unit automatically starts energy saving operation by shifting the set temperature in two steps. • Smart Eco button is scrolling button , First Press of button , it will start Eco operation , on second Press of button it will start Eco with Auto-Off operation and on Third press of button , it will cancel Eco and Eco with Auto-Off function.
- Page 21 Smart Eco Logic When the presence of people is not detected for 20 minutes, the set temperature is automatically shifted for energy saving. If nobody is in the room for 60 minutes, the set temperature is shifted further. Cooling operation [diagram representation Heating operation [diagram representation for illustrative purpose only] for illustrative purpose only]...
- Page 22 Power Safe (Max Current Switching ) • This function limit the maximum current during the operation of Air conditioner so it will help to avoid breaker trips if maximum current reaches to breaker limit. It limits the electrical current during operation.
- Page 23 SleepSense Operation • With motion sensor, the room air conditioner detects movements, its location and temperature around people to control set temperature and control fan speed to provide comfortable and energy saving operation as well as to achieve comfortable sleep environment. To Start SleepSense operation ●...
- Page 24 SleepSense Operation LOGIC ( SleepSense) At first, unit will operate cooling mode for 60 minutes at setting condition. With the motion sensor, the room air conditioner can monitor human movement. If no human movement is detected, then the temperature will increase by 1℃( in case of cooling operation ) automatically and The fan speed will be changed to silent fan speed.
-
Page 25: Silent Mode
Silent Mode (Silent) button during Auto, Heat, Dry, Cool or Fan operation, the fan speed changes (Silent) (On/Off) (Silent) (Fan Speed) Silent Silent Powerful Silent Silent Silent Silent (Silent) By Pressing Mode button or LeaveHome button or My Mode button , Silent operation is cancelled. - 25 -... - Page 26 Adjusting the Airflow Direction(Up/Down) Adjust the airflow upward and downward. According to operation, the horizontal air deflector is automatically set to the proper angle suitable for each operation.The deflector can be swings up and down and also set to the desired angle using the “ (Up/Down)”...
- Page 27 Adjust the Airflow Direction(Left/Right) Adjusting the airflow leftward and rightward parallelly. Adjustment of airflow in Left and Right direction. Press the Left/Right button . The deflector(s) will start to swing Left and Right side parallelly. is display on LCD screen. Press the Left/Right button again.
- Page 28 Initialization of the Built-in airCloud Go Module You can reset the internal settings (restore the factory settings) by remote controller. How to restore factory setting Please make this setting with the remote control in off mode. Press button (Mode) and button (On Timer) 3 seconds ...
- Page 29 How to Reset Filter Sign on the indoor unit Filter Sign on the indoor unit will show with “ ” lamp by blinking with 1 second on and 4 seconds off. Because cleaning of Air filter has not been done for a long time. Clean the Air filter.
- Page 30 My Mode(Start or Stop of My Mode Operation) Default Setting of My Mode My Mode Mode Temperature Fan Speed ON Timer / Silent OFF Timer My Mode1 COOL 25.℃ Auto No setting No setting My Mode2 COOL 25.℃ Auto No setting No setting My Mode3 COOL...
- Page 31 My Mode(Programming) Use this mode for personalized comfortable settings. The My Mode can be set by using the remote controller. Up to 3 programs can be set. How To programming the My Mode Enter to My Mode programming Press (My Mode) button continuously for 5 seconds to enter into My Mode programming.
- Page 32 My Mode(Programming) How To programming the My Mode Off Timer Setting Press ( Off Timer) Button to select OFF timer. ● and " " or previous "set time" Symbol start blinking on LCD screen. Press button to set desire OFF timer. ●...
- Page 33 Operation Mode Lock The remote controller can be set to fix the Heat Mode (including Fan Mode), Cool Mode and Dry Mode (including Fan Mode) operations. Method to lock Heat Mode (including Fan Mode) operation. Press (Mode) and buttons simultaneously for about 3 seconds when the remote controller is OFF.
-
Page 34: Weekly Timer Operation
Weekly Timer Operation It is possible to select Mode A or Mode B. For each mode, up to 6 programs can be set per day. In total, a maximum of 42 programs can be set for a week for each mode. If calendar and clock are not set, the reservation setting for Weekly Timer cannot be set. - Page 35 Weekly Timer Operation 5. Press (On-Off Timer) button to select On Timer or Off Timer reservation. 6. Press (Time) button to set time reservation. 7. Press (Temp ) button to set temperature reservation. Temperature reservation is possible with ON timer reservation. 8.
- Page 36 Weekly Timer Operation Step 2: Select Mode A or Mode B and activate or deactivate Weekly Timer. ■ How to select Mode A or Mode B of Weekly Timer setting. 1. Press (Weekly) button. blink on the display. (Normally Mode A will blink fi rst). 2.
- Page 37 Weekly Timer Operation Step 3: Copy and cancel the reservation schedule. ■ How to copy and paste. Editing the reservation schedule is easy by copying data from one day to another day. 1. Press (Weekly) button to select Mode A or Mode B. 2.
- Page 38 Weekly Timer Operation Step 3: Copy and cancel the reservation schedule. ■ How to delete Weekly Timer data. [Delete one program number reservation] 1. Press (Weekly) button to select Mode A or Mode B. Press (Weekly) button for 3 seconds to start editing the reserva- tion schedule.
- Page 39 Weekly Timer Operation Step 3: Copy and cancel the reservation schedule. [Delete one day reservation] 1. Press (Weekly) button to select Mode A or Mode B. 2. Press (Weekly) button for 3 seconds to start editing the reservation schedule. 3. Press (Day) button to select a day of the week to edit.
-
Page 40: Info Function
Info Function By pressing (Info) button, temperature around remote controller and monthly power consumption will ● be displayed on the remote controller. After changing the batteries, direct the remote controller towards the indoor unit and press (Info) button. ● Current calendar and clock will be transmitted from indoor unit. In order to receive information from indoor unit, the distance between remote controller and receiver of indoor ●...