Table of Contents
Advertisement
Quick Links
Advertisement
Table of Contents

Related Manuals for Epson G10 Series


Summary of Contents for Epson G10 Series
- Page 1 SCARA ROBOT G10 / G20 series MANIPULATOR MANUAL Rev.2 EM082R1662F...
- Page 3 SCARA ROBOT G10 / G20 series Manipulator Manual Rev.2 Copyright © 2007-2008 SEIKO EPSON CORPORATION. All rights reserved. G10 / G20 Rev.2...
- Page 4 FOREWORD Thank you for purchasing our robot products. This manual contains the information necessary for the correct use of the manipulator. Please carefully read this manual and other related manuals before installing the robot system. Keep this manual handy for easy access at all times. WARRANTY The Manipulator and its optional parts are shipped to our customers only after being subjected to the strictest quality controls, tests, and inspections to certify its compliance...
- Page 5 TRADEMARKS Microsoft, Windows, and Windows logo are either registered trademarks or trademarks of Microsoft Corporation in the United States and/or other countries. Other brand and product names are trademarks or registered trademarks of the respective holders. NOTICE No part of this manual may be copied or reproduced without authorization. The contents of this manual are subject to change without notice.
- Page 6 MANUFACTURER & SUPPLIER Japan & Others SUPPLIERS North & South America EPSON AMERICA, INC. Europe SEIKO EPSON CORPORATION Suwa Minami Plant Factory Automation Systems Dept. 1010 Fujimi, Fujimi-machi, Suwa-gun, Nagano, 399-0295 JAPAN : +81-(0)266-61-1802 : +81-(0)266-61-1846 Factory Automation/Robotics 18300 Central Avenue...
-
Page 7: Before Reading This Manual
Setting by Using Software This manual contains setting procedures by using software. They are marked with the following icon. EPSON G10 / G20 Rev.2 : RC180 : EPSON RC+ 5.0 Ver. 5.2 or later Use the... - Page 8 G10 / G20 Rev.2...
-
Page 9: Table Of Contents
1.5 Emergency Movement Without Drive Power ...7 1.6 Manipulator Labels ...8 2. Specifications 2.1 Features of G10 series and G20 series Manipulators...10 2.2 Model Number and Model Differences ... 11 2.3 Part Names and Outer Dimensions ...12 2.3.1 Table Top Mounting ...12 2.3.2 Wall Mounting ...16... - Page 10 TABLE OF CONTENTS 4. Setting of End Effectors 4.1 Attaching an End Effector... 44 4.2 Attaching Cameras and Valves ... 46 4.3 Weight and Inertia Settings ... 47 4.3.1 Weight Setting ... 47 4.3.2 Inertia Setting ... 51 4.4 Precautions for Auto Acceleration/Deceleration of Joint #3... 56 5.
-
Page 11: Setup & Operation
Setup & Operation This volume contains information for setup and operation of the G10 / G20 series Manipulators. Please read this volume thoroughly before setting up and operating the Manipulators. -
Page 13: Safety
1. Safety Installation and transportation of robots and robotic equipment shall be performed by qualified personnel and should conform to all national and local codes. Please read this manual and other related manuals before installing the robot system or before connecting cables. -
Page 14: Design And Installation Safety
The following items are safety precautions for design personnel: ■ Personnel who design and/or construct the robot system with this product must read the Safety chapter in the EPSON RC+ User’s Guide to understand the safety requirements before designing and/or constructing the robot system. -
Page 15: Operation Safety
The following items are safety precautions for qualified Operator personnel: ■ Please carefully read the Safety-related Requirements in the Safety chapter of the EPSON RC+ User’s Guide before operating the robot system. Operating the robot system without understanding the safety requirements is extremely hazardous and may result in serious bodily injury and/or severe equipment damage to the robot system. -
Page 16: Emergency Stop
Setup & Operation 1. Safety 1.4 Emergency Stop If the Manipulator moves abnormally during operation, immediately press the Emergency Stop switch. Stops the power supply to the motor, and the arm stops in the shortest distance with the dynamic brake and mechanical brake. However, avoid pressing the Emergency Stop switch unnecessarily while the Manipulator is running normally. -
Page 17: Emergency Movement Without Drive Power
1.5 Emergency Movement Without Drive Power When the system is placed in emergency mode, push the arm or joint of the Manipulator by hand as shown below: Arm #1 Arm #2 Joint #3 Joint #4 brake release button Arm #2 Joint #3 (up and down) The brake release button affects both Joints #3 and #4. -
Page 18: Manipulator Labels
Setup & Operation 1. Safety 1.6 Manipulator Labels The following labels are attached near the locations of the Manipulator where specific dangers exist. Be sure to comply with descriptions and warnings on the labels to operate and maintain the Manipulator safely. Do not tear, damage, or remove the labels. - Page 19 Setup & Operation 1. Safety Table Top Mounting: G10/G20-**** Wall Mounting: G10/G20-****W Ceiling Mounting: G10/G20-****R G10 / G20 Rev.2...
-
Page 20: Specifications
The 1000 mm long arm model of the G20 series enables wide range motion. The features of the G10 series and G20 series Manipulators are as follows: Compatibility with E2H Manipulators (our existing models) The installation procedure and mounting dimensions of the end effector are compatible with those for the E2H Manipulators (our existing models). -
Page 21: Model Number And Model Differences
: 180 mm (G10/G20***S*) : 150 mm (G10/G20***C*) : 420 mm (G10/G20***S*) : 390 mm (G10/G20***C*) Arm Length 65 : 650 mm (G10 series only) 85 : 850 mm A0 : 1000 mm (G20 series only) Series G10 : G10 series... -
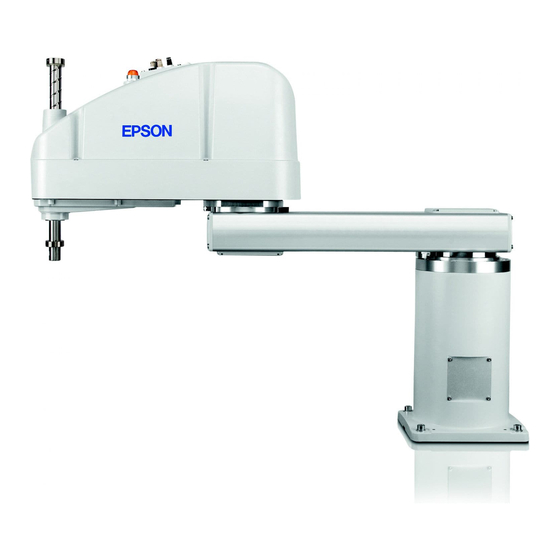
Page 22: Part Names And Outer Dimensions
Setup & Operation 2. Specifications 2.3 Part Names and Outer Dimensions 2.3.1 Table Top Mounting Standard-model : G10/G20-***S Joint #3 and #4 brake release button Arm #2 Joint #3 (up and down) Signature label (Serial No. of Manipulator) User connector (9-pin D-sub connector) Fitting (white) for ø... - Page 23 (*) indicates the stroke margin by mechanical stop. 1 mm flat cut Conical hole ø4,90° Detail of “A” (Calibration point position of Joints #3 and #4) G10 / G20 Rev.2 G10-65*S G10/G20-**1S 813.5 213.5 Max.ø18 through hole ø25 h7 shaft diameter ø39.5 mechanical stop diameter (View from the bottom of the base) Setup &...
- Page 24 Setup & Operation 2. Specifications Cleanroom-model G10/G20-***C The following figure shows the additional parts and specifications for the Table Top mounting Cleanroom-model when compared with the Standard-model in appearance. Upper bellows Lower bellows Cover Plate cover for Table Top mounting surface (For static electricity countermeasure) Plate cover...
- Page 25 (*) indicates the stroke margin by mechanical stop. 1 mm flat cut Conical hole ø4,90° Max.ø18 through hole ø25 h7 shaft diameter ø39.5 mechanical stop diameter Detail of “A” (Calibration point position of Joints #3 and #4) G10 / G20 Rev.2 Setup &...
-
Page 26: Wall Mounting
Setup & Operation 2. Specifications 2.3.2 Wall Mounting Standard-model G10/G20-***SW Joint #2 (rotating) Joint #3 and #4 brake release button Joint #3 (up and down) Shaft − − Joint #4 (rotating) NOTE The brake release button affects both Joints #3 and #4. When the brake release button is pressed in emergency mode, the brakes for both Joints #3 and #4 are released simultaneously. - Page 27 (*) indicates the stroke margin by mechanical stop. 1 mm flat cut Conical hole ø4,90° Max.ø18 through hole ø25 h7 shaft diameter ø39.5 mechanical stop diameter Detail of “A” (Calibration point position of Joints #3 and #4) G10-65*SW G10/G20-85*SW G10/G20-**1SW G10/G20-**4SW -27.5 G10 / G20 Rev.2...
- Page 28 Setup & Operation 2. Specifications Cleanroom-model G10/G20-***CW The following figure shows the additional parts and specifications for the Wall mounting Cleanroom-model when compared with the Standard-model in appearance. Upper bellows Lower bellows Plate cover (For static electricity countermeasure) Plate cover (For static electricity countermeasure) Exhaust port...
- Page 29 (*) indicates the stroke margin by mechanical stop. 1 mm flat cut Conical hole ø4,90° Detail of “A” (Calibration point position of Joints #3 and #4) G10-65*CW G10/G20-85*CW G10/G20-**1CW G10/G20-**4CW 29.5 G10 / G20 Rev.2 Detail of “B” Max.ø18 through hole ø25 h7 shaft diameter ø39.5 mechanical stop diameter G20-A0*CW...
-
Page 30: Ceiling Mounting
Setup & Operation 2. Specifications 2.3.3 Ceiling Mounting Standard-model G10/G20-***SR Joint #2 (rotating) Joint #3 and #4 − brake release button Joint #3 (up and down) − Shaft − Joint #4 (rotating) Fitting (black) for ø 6 mm pneumatic tube (15-pin D-sub connector) (only for custom specification) Signature label... - Page 31 (*) indicates the stroke margin by mechanical stop. 1 mm flat cut Conical hole ø4,90° Max.ø18 through hole ø25 h7 shaft diameter ø39.5 mechanical stop diameter Detail of “A” (Calibration point position of Joints #3 and #4) G10 / G20 Rev.2 Setup &...
- Page 32 Setup & Operation 2. Specifications Cleanroom-model G10/G20-***CR The following figure shows the additional parts and specifications for the Ceiling mounting Cleanroom-model when compared with the Standard-model in appearance. Cover for Ceiling mounting surface Upper bellows Lower bellows Plate cover (For static electricity countermeasure) Exhaust port Plate cover...
- Page 33 (*) indicates the stroke margin by mechanical stop. 1 mm flat cut Conical hole ø4,90° Detail of “A” (Calibration point position of Joints #3 and #4) G10 / G20 Rev.2 G10-65*CR G10/G20-**1CR 29.5 Max.ø18 through hole ø25 h7 shaft diameter ø39.5 mechanical stop diameter Setup &...
-
Page 34: Specifications
Setup & Operation 2. Specifications 2.4 Specifications Item Mount method Environment Arm #1, #2 Arm length Arm #3 Weight G10/G20 (not include the weight of cables) Driving method All joints Joints #1, #2 Max. operating Joint #3 speed *3 Joint #4 Joints #1, #2 Repeatability Joint #3... - Page 35 Item Joint #1 Joint #2 Resolution Joint #3 Joint #4 Joint #1 Motor power Joint #2 consumption Joint #3 Joint #4 rated Payload max. Joint #4 allowable rated moment of inertia *4 max. Shaft diameter Hand Through hole Joint #3 down force Installed wire for customer use Installed pneumatic tube for customer use...
-
Page 36: How To Set The Model
MT label and contact us when necessary. The Manipulator model can be set from software. Refer to the chapter Robot Configuration in the EPSON RC+ User’s Guide. : Polyurethane tube Outer diameter: ø12 mm (Inner diameter:ø8 mm) or Inner diameter ø16mm or larger... -
Page 37: Environments And Installation
3. Environments and Installation 3.1 Environmental Conditions A suitable environment is necessary for the robot system to function properly and safely. Be sure to install the robot system in an environment that meets the following conditions: Ambient temperature Ambient relative humidity First transient burst noise Electrostatic noise Environment... -
Page 38: Base Table
Controller manual. ■ To ensure safety, a safeguard must be installed for the robot system. For details on the safeguard, refer to the EPSON RC+ User’s Guide. WARNING Ensure that there is enough strength on the base table by... -
Page 39: Mounting Dimensions
3.3 Mounting Dimensions The maximum space described in figures shows that the radius of the end effector is 60 mm or less. If the radius of the end effector exceeds 60 mm, define the radius as the distance to the outer edge of maximum space. If a camera or electromagnetic valve extends outside of the arm, set the maximum range including the space that they may reach. - Page 40 Setup & Operation 3. Environments and Installation Wall Mounting G10-65**W Length of Arm #1 (mm) Length of Arm #2 (mm) (Motion range) Motion range of Joint #1 (degree) Motion range of Joint #2 (degree) (Mechanical stop area) Joint #1 angle to hit mechanical stop (degree) Joint #2 angle to hit mechanical stop (degree)
-
Page 41: Unpacking And Transportation
3.4 Unpacking and Transportation 3.4.1 Precautions for Transportation THE INSTALLATION SHALL BE PREFORMED BY QUALIFIED INSTALLATION PERSONNEL AND SHOULD CONFORM TO ALL NATIONAL AND LOCAL CODES. ■ Only authorized personnel should perform sling work and operate a crane and a forklift. -
Page 42: Transportation
Setup & Operation 3. Environments and Installation 3.4.2 Transportation Transport the Manipulator following the instructions below: (1) Attach the eyebolts to the upper back side of the Arm. (2) Pass the belts through the eyebolts. (3) Hoist the Manipulator slightly so that it does not fall. Then, remove the bolts securing the Manipulator to the delivery equipment or pallet. -
Page 43: Installation Procedure
3.5 Installation Procedure The following sections describe the installation of the Standard Manipulator. 3.5.1 Table Top Mounting 3.5.2 Wall Mounting 3.5.3 Ceiling Mounting When the Manipulator is a Cleanroom-model, refer to the following section. 3.5.4 Cleanroom-model 3.5.1 Table Top Mounting ■... -
Page 44: Wall Mounting
Setup & Operation 3. Environments and Installation 3.5.2 Wall Mounting ■ Install the Wall Mounting Manipulator with four or more people. The Manipulator weights are as follows. Be careful not to get hands, fingers, or feet caught and/or have equipment damaged by a fall of the Manipulator. G10-65**W G10/G20-85**W : Approximately 53 kg :117 lb. -
Page 45: Ceiling Mounting
3.5.3 Ceiling Mounting ■ Install the Ceiling Mounting Manipulator with four or more people. The Manipulator weights are as follows. Be careful not to get hands, fingers, or feet caught and/or have equipment damaged by a fall of the Manipulator. G10-65**R G10/G20-85**R : Approximately 48 kg :106 lb. -
Page 46: Cleanroom-Model
Setup & Operation 3. Environments and Installation 3.5.4 Cleanroom-model Unpack it outside of the clean room. Secure the Manipulator to delivery equipment such as a pallet with bolts so that the Manipulator does not fall. Wipe off the dust on the Manipulator with a little alcohol or distilled water on a lint-free cloth. -
Page 47: Connecting The Cables
3.6 Connecting the Cables ■ To shut off power to the robot system, pull out the power plug from the power source. Be sure to connect the AC power cable to a power receptacle. DO NOT connect it directly to a factory power source. ■... -
Page 48: User Wires And Pneumatic Tubes
Setup & Operation 3. Environments and Installation 3.7 User Wires and Pneumatic Tubes ■ Only authorized or certified personnel should be allowed to perform wiring. Wiring by unauthorized or uncertified personnel may result in bodily injury and/or malfunction of the robot system. CAUTION User electrical wires and pneumatic tubes are contained in the cable unit. - Page 49 Table Top Mounting Wall Mounting Ceiling Mounting G10 / G20 Rev.2 Setup & Operation 3. Environments and Installation User connector (9-pin D-sub connector) Fitting (white) for ø6 mm pneumatic tube Fitting (white) Fitting (black) for ø4 mm pneumatic tube for ø4 mm pneumatic tube Fitting (white) for ø6 mm pneumatic tube Fitting (black)
-
Page 50: Relocation And Storage
Setup & Operation 3. Environments and Installation 3.8 Relocation and Storage 3.8.1 Precautions for Relocation and Storage Observe the following when relocating, storing, and transporting the Manipulators. THE INSTALLATION SHALL BE PREFORMED BY QUALIFIED INSTALLATION PERSONNEL AND SHOULD CONFORM TO ALL NATIONAL AND LOCAL CODES. -
Page 51: Table Top Mounting
3.8.2 Table Top Mounting ■ Install or relocate the Table Top Mounting Manipulator with four or more people. The Manipulator weights are as follows. Be careful not to get hands, fingers, or feet caught and/or have equipment damaged by a fall of the Manipulator. G10-65** CAUTION G10/G20-85**... -
Page 52: Wall Mounting
Setup & Operation 3. Environments and Installation 3.8.3 Wall Mounting ■ Install or relocate the Wall Mounting Manipulator with four or more people. The Manipulator weights are as follows. Be careful not to get hands, fingers, or feet caught and/or have equipment damaged by a fall of the Manipulator. G10-65**W G10/G20-85**W : Approximately 53 kg :117 lb. -
Page 53: Ceiling Mounting
3.8.4 Ceiling Mounting ■ Install or relocate the Ceiling Mounting Manipulator with four or more people. The Manipulator weights are as follows. Be careful not to get hands, fingers, or feet caught and/or have equipment damaged by a fall of the Manipulator. G10-65**R G10/G20-85**R : Approximately 48 kg :106 lb. -
Page 54: Setting Of End Effectors
Setup & Operation 4. Setting of End Effectors 4. Setting of End Effectors 4.1 Attaching an End Effector Users are responsible for making their own end effector(s). Before attaching an end effector, observe these guidelines. ■ If you use an end effector equipped with a gripper or chuck, connect wires and/or pneumatic tubes properly so that the gripper does not release the work piece when the power to the robot system is turned OFF. - Page 55 Layouts - When you operate the manipulator with an end effector, the end effector may interfere with the Manipulator because of the outer diameter of the end effector, the size of the work piece, or the position of the arms. When designing your system layout, pay attention to the interference area of the end effector.
-
Page 56: Attaching Cameras And Valves
Setup & Operation 4. Setting of End Effectors 4.2 Attaching Cameras and Valves Arm #2 has threaded holes as shown in the figure below. Use these holes for attaching cameras, valves, and other equipment. Common Dimensions 37.5 43.5 Table Top Mounting Wall Mounting Ceiling Mounting 4-M4 depth 8... -
Page 57: Weight And Inertia Settings
Manipulator, and/or shorten the life cycle of parts/mechanisms. The acceptable weight capacity (end effector and work piece) in G10 series and G20 series Manipulators are as follows. - Page 58 When you attach the equipment near Arm #2: When you attach the equipment to the end of Arm #2: <Example> A “1 kg” camera is attached to the end of the G10 series arm (450 mm : equivalent weight : weight of camera etc.
- Page 59 Automatic speed setting by Weight G10 series G20 series G10 / G20 Rev.2 Setup & Operation 4. Setting of End Effectors 100 100 Contact us for details of G10-65*** and G20-85***. * The percentage in the graph is based on the speed at rated weight (5 kg) as 100%.
- Page 60 Setup & Operation 4. Setting of End Effectors Automatic acceleration/deceleration setting by Weight G10 series G20 series Contact us for details of G10-65*** and G20-85***. * The percentage in the graph is based on the acceleration / deceleration at rated weight (5 kg) as 100%.
-
Page 61: Inertia Setting
Setting a value that is smaller than the actual moment of inertia may cause errors, excessive shock, insufficient function of the Manipulator, and/or shorten the life cycle of parts/mechanisms. The acceptable moment of inertia of load for a G10 series and G20 series Manipulators are as follows. G10 series... - Page 62 Enter a value into the [Load inertia:] text box on the [Inertia] panel ([Tools]-[Robot Manager]). (You may also execute the Inertia command from the [Command Window].) Automatic acceleration/deceleration setting of Joint #4 by Inertia (moment of inertia) G10 series 100 100 G20 series 0.05 0.10 0.15 0.20 0.25 (kg・m...
- Page 63 Manipulator, and/or shorten the life cycle of parts/mechanisms. The acceptable eccentric quantity of load in G10 series and G20 series Manipulators is 0 mm at the default rating and 200 mm at the maximum. When the eccentric quantity of load exceeds the rating, change the setting of eccentric quantity parameter of Inertia command.
- Page 64 Manager]). (You may also execute the Inertia command from the [Command Window].) Automatic acceleration/deceleration setting by Inertia (eccentric quantity) G10 series and G20 series Calculating the Moment of Inertia Refer to the following examples of formulas to calculate the moment of inertia of load (end effector with work piece).
- Page 65 The methods for calculating the moment of inertia for (a), (b), and (c) are shown below. Calculate the total moment of inertia using the basic formulas. (a) Moment of inertia of a rectangular parallelepiped (b) Moment of inertia of a cylinder Cylinder’s center of gravity (c) Moment of inertia of a sphere Rotation center...
-
Page 66: Precautions For Auto Acceleration/Deceleration Of Joint #3
The upper limit of Joint #3 during horizontal motion can be set by the LimZ command. Automatic acceleration/deceleration vs. Joint #3 position G10 series and G20 series When moving the Manipulator horizontally while the shaft is being lowered, it may cause NOTE over-shoot at the time of final positioning. -
Page 67: Motion Range
5. Motion Range ■ When setting up the motion range for safety, both the pulse range and mechanical stops must always be set at the same time. CAUTION The motion range is preset at the factory as explained in Setup & Operation: 5.4 Standard Motion Range. -
Page 68: Motion Range Setting By Pulse Range (For All Joints)
Manipulator does not move. The pulse range can be set on the [Range] panel shown by selecting [Tools]-[Robot EPSON Manager]. (You may also execute the Range command from the [Command Window].) 5.1.1 Max. Pulse Range of Joint #1 The 0 (zero) pulse position of Joint #1 is the position where Arm #1 faces toward the positive (+) direction on the X-coordinate axis. -
Page 69: Max. Pulse Range Of Joint #2
5.1.2 Max. Pulse Range of Joint #2 The 0 (zero) pulse position of Joint #2 is the position where Arm #2 is in-line with Arm #1. With the 0 pulse as a starting point, the counterclockwise pulse value is defined as the positive (+) and the clockwise pulse value is defined as the negative (-). -
Page 70: Max. Pulse Range Of Joint #3
Setup & Operation 5. Motion Range 5.1.3 Max. Pulse Range of Joint #3 The 0 (zero) pulse position of Joint #3 is the position where the shaft is at its upper limit. The pulse value is always negative because Joint #3 always moves lower than the 0 pulse position. -
Page 71: Motion Range Setting By Mechanical Stops
5.2 Motion Range Setting by Mechanical Stops Mechanical stops physically limit the absolute area that the Manipulator can move. Both Joints #1 and #2 have threaded holes in the positions corresponding to the angle for the mechanical stop settings. Install the bolts in the holes corresponding to the angle that you want to set. -
Page 72: Setting The Mechanical Stops Of Joints #1 And #2
Setup & Operation 5. Motion Range 5.2.1 Setting the Mechanical Stops of Joints #1 and #2 Both Joints #1 and #2 have threaded holes in the positions corresponding to the angle for the mechanical stop settings. Install the bolts in the holes corresponding to the angle that you want to set. - Page 73 Joint #2 Mechanical Stops Joint #2 Model Table Top / Ceiling / Wall Standard Table Top Cleanroom Standard Ceiling / Wall Cleanroom Table Top Ceiling / Wall +100° Setting Angle +1820445 Pulse Value -152.5° Setting Angle -2776178 Pulse Value NOTE In the range Z: –360 to –390 mm, the area is limited by interference of the Manipulator body and the arm.
- Page 74 NOTE Be sure to set the pulse range inside the positions of the mechanical stop range. Example: Execute the following commands from the [Command Window]. EPSON >JRANGE 1,-436907,5679787 >JRANGE 2,-2230045,2230045 ' Sets the pulse range of Joint #2 >RANGE -436907,5679787,-2230045,2230045,-1976708...
-
Page 75: Setting The Mechanical Stop Of Joint #3
In this example, Joint #1 is moved to the center of its motion range (pulse value: 2621440) when checking Joint #2. If the arm is hitting the mechanical stops or if an error occurs after the arm hits the mechanical stops, either reset the pulse range to a narrower setting or extend the positions of the mechanical stops within the limit. - Page 76 G10-854S (Z: 420mm) Lower limit of pulse = lower limit Z coordinate value / 50 × 131072 × (66 / 32) Example: Execute the following command from the [Command Window]. EPSON >JRANGE 3,-1081344,0 Example: EPSON Execute the following command from the [Command Window].
-
Page 77: Setting The Cartesian (Rectangular) Range In The Xy Coordinate System Of The Manipulator (For Joints #1 And #2)
Example: Execute the following commands from the [Command Window]. EPSON >MOTOR ON >SPEED 5 >PULSE 0,0,-1081344,0 ' Moves to the lower limit-pulse position of Joint #3. Example: Execute the following commands from the [Command Window]. EPSON >MOTOR ON >SPEED 5 >PULSE 0,0,-540672,0... -
Page 78: Standard Motion Range
Setup & Operation 5. Motion Range 5.4 Standard Motion Range The following “motion range” diagrams show the standard (maximum) specification. When each Joint motor is under servo control, the center of Joint #3’s (shaft’s) lowest point moves in the areas shown in the figure. “Area limited by mechanical stop”... - Page 79 Wall Mounting Center of Joint#3 G10-65**W Motion range Area limited by mechanical stop G10-65**W G10/G20-85*SW 107° 3° G10/G20-85*CW G20-A0**W G10/G20-**1SW G10/G20-**4SW G10/G20-**1CW G10/G20-**4CW G10 / G20 Rev.2 G10/G20-85**W Maximum space Center of base reference hole 130° 291.2 306.5 3.5° 152.5° 207.8 183.3 151°...
- Page 80 Setup & Operation 5. Motion Range Ceiling Mounting Center of Joint#3 G10-65**R Motion range Area limited by mechanical stop G10-65**R 107° G10/G20-85*SR 3° 152° G10/G20-85*CR G20-A0**R G10/G20-**1SR G10/G20-**4SR G10/G20-**1CR G10/G20-**4CR G10/G20-85**R Maximum space Base mounting face 130° 291.2 306.5 3.5° 152.5°...
-
Page 81: Maintenance Parts List
6. Maintenance Parts List Common Parts Part Name Joint #1 Joint #2 AC Servo Motor Joint #3 Joint #4 Joint #1 Joint #2 Reduction Gear Unit Joint #4 650 mm Cable Unit 850 mm 1000 mm Cable Length 3 m M/C Cable Cable Length 5 m Cable Length 10 m... - Page 82 Setup & Operation 6. Maintenance parts list Parts by Environment Model Part Name For G10 Ball Screw Spline For G20 Arm Cover Bellows Common with G6 series (S: Standard-model C: Cleanroom-model) 180 mm 420 mm 150 mm 390 mm 180 mm 420 mm 150 mm 390 mm...