Hitachi C12LCH User Manual
Saw
Hide thumbs
Also See for C12LCH:
- Handling instructions manual (100 pages) ,
- Technical data and service manual (87 pages) ,
- Safety instructions and instruction manual (84 pages)
Table of Contents
Advertisement
IMPORTANT SAFETY INFORMATION
Read and understand all of the safety precautions, warnings and operating instructions in the Instruction
Manual before operating or maintaining this power tool.
Most accidents that result from power tool operation and maintenance are caused by the failure to observe
basic safety rules or precautions. An accident can often be avoided by recognizing a potentially hazardous
situation before it occurs, and by observing appropriate safety procedures.
Basic safety precautions are outlined in the "SAFETY" section of this Instruction Manual and in the sections
which contain the operation and maintenance instructions.
Hazards that must be avoided to prevent bodily injury or machine damage are identified by WARNINGS on
the power tool and in this Instruction Manual.
NEVER use this power tool in a manner that has not been specifically recommended by HITACHI.
MEANINGS OF SIGNAL WORDS
WARNING
indicates a potentially hazardous situations which, if ignored, could result in death or serious
injury.
CAUTION
indicates a potentially hazardous situations which, if not avoided, may result in minor or moderate
injury, or may cause machine damage.
NOTE
emphasizes essential information.
IMPORTANT SAFETY INSTRUCTIONS FOR USING ALL POWER TOOLS
READ ALL OF THE WARNINGS AND OPERATING INSTRUCTIONS IN THIS MANUAL
BEFORE OPERATING OR MAINTAINING THIS TOOL:
WARNING:
When using this electric tool, take all necessary precautions to minimize the risk of electric
shock or other personal injury.
In particular, always comply with the following safety rules:
1. ALWAYS KEEP GUARDS IN PLACE
2. ALWAYS REMOVE ADJUSTING KEYS AND WRENCHES BEFORE STARTING TOOL.
Always confirm that all keys and adjusting wrenches have been removed from the tool before it is
turned on.
3. ALWAYS KEEP WORK AREA CLEAN.
benches.
4. NEVER USE TOOL IN HAZARDOUS ENVIRONMENTS.
wet places and never expose it to rain. Always keep the work area well lighted.
5. NEVER PERMIT CHILDREN OR OTHERS TO LOITER NEAR THE WORK AREA.
people (especially children) away from the work area. Always unplug unattended tools and keep the
work place tamper-proof by installing locks on the doors and on the master switches.
6. NEVER FORCE THE TOOL.
which it was designed.
7. ALWAYS USE THE RIGHT TOOLS.
was not designed.
8. ALWAYS WEAR PROPER APPAREL WHEN WORKING WITH THE TOOL.
clothing, gloves, neckties, rings, bracelets or other jewelry which may get caught in the moving parts.
Always wear non-slip footwear, preferably with steel toes. Wear protective hair covering to contain
long hair.
SAFETY
and in working order.
Avoid injuries by not cluttering the work areas and work
It will do the job better and more safely if it is operated at the rate for
Never force a tool or an attachment to do a job for which it
Never use the power tool in damp or
Never wear loose
English
Keep all
3
Advertisement
Table of Contents

Related Manuals for Hitachi C12LCH


Summary of Contents for Hitachi C12LCH
-
Page 1: Important Safety Information
Hazards that must be avoided to prevent bodily injury or machine damage are identified by WARNINGS on the power tool and in this Instruction Manual. NEVER use this power tool in a manner that has not been specifically recommended by HITACHI. MEANINGS OF SIGNAL WORDS... - Page 2 English 9. ALWAYS USE EYE PROTECTION WHEN WORKING WITH THE TOOL TO PREVENT EYE INJURY. Ordinary eyeglasses do not provide adequate protection because the lenses are not made of safety glass. Also, use a face mask for additional safety and wear a dust mask if the cutting operation produces dust.
- Page 3 English Always confirm that the POWER TOOL is clean before using it. Always wear snug-fitting clothing, non-skid footwear (preferably with steel toes) and eye protection when operating the POWER TOOL. Always handle the POWER TOOL carefully. If the POWER TOOL falls or strikes against a hard object, it might become deformed or cracked or sustain other damage.
-
Page 4: Replacement Parts
No load speed is 4000/min. To reduce the risk of injury, return carriage to the full rear position after each crosscut operation. REPLACEMENT PARTS When servicing use only identical replacement parts. Repairs should be conducted only by a Hitachi authorized service center. -
Page 5: Use Proper Extension Cord
DOUBLE INSULATION FOR SAFER OPERATION To ensure safer operation of this power tool, HITACHI has adopted a double insulation design. “Double insulation” means that two physically separated insulation systems have been used to insulate the electrically conductive materials connected to the power supply from the outer frame handled by the operator. -
Page 6: Operation And Maintenance
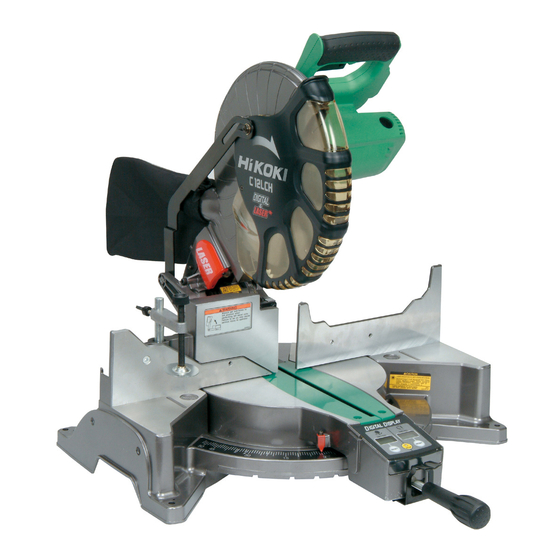
The information contained in this Instruction Manual is designed to assist you in the safe operation and maintenance of the power tool. Some illustrations in this Instruction Manual may show details or attachments that differ from those on your own power tool. NAME OF PARTS MODEL C12LCH/MODEL C12LC/MODEL C12FCH Motor Head Handle Gear Case... -
Page 7: Specifications
For how to use, refer to page 21. 3 Vise Assembly w/knob bolt 5 4mm Hex. bar wrench (1 piece) (For C12LCH/C12FCH) (No. of teeth 32 Code No. 323522) For how to use, refer to For how to use, refer to page 14. -
Page 8: Preparation Before Operation
3 Crown molding Vise Ass’y (Code No. 322712) (Include Crown molding Stopper (L)) 4 Crown molding Stopper (L) (Code No. 322713) 5 Crown molding Stopper (R) (Code No. 322714) NOTE: Accessories are subject to change without any obligation on the part of the HITACHI. APPLICATIONS Wood and aluminum sash. PREPARATION BEFORE OPERATION Make the following preparations before operating the power tool: 1. -
Page 9: Before Using
English 2. Releasing the locking pin Handle When the power tool is prepared for shipping, its main parts are secured by a locking pin. Move the handle slightly so that the locking pin can be disengaged. NOTE: Lowering the handle slightly will enable you to disengage the locking pin more easily and safely. -
Page 10: Before Cutting
English 7. Check the Power Receptacle. To prevent overheating, accidental stopping or intermittent operation, confirm that the power cord plug fits properly in the electrical receptacle and does not fall out after it is inserted. Repair or replace the receptacle if it is faulty. 8. -
Page 11: Confirmation For Use Of Sub Fence
In the case of left bavel cutting, raise the sub fence up as illustrated in Fig. 11 and then turn it counterclockwise. Fig. 11 6. Position adjustment of laser line (For C12LCH/C12FCH) WARNING: * Make sure before plugging the power plug into the receptacle that the main body and the laser marker are turned off. - Page 12 * The laser marker will not light up if the digital display switch is turned off. (only on C12LCH) Ink lining can be easily made on this tool to the laser marker. A switch lights up the laser marker.
- Page 13 • The laser marker will not light up if the digital display switch is turned off. (only on C12LCH) • Do not use the main unit near equipment that generates electrical noise such as generators.
-
Page 14: Practical Applications
English PRACTICAL APPLICATIONS WARNING: * To avoid personal injury, never remove or place a workpiece on the table while the tool is being operated. * Never place your limbs inside of the line next to warning sign while the tool is being operated. -
Page 15: Cutting Operation
(viewed from the operator’s position) when length b is desired, or to the left when length a is desired. (For Model C12LCH/C12FCH) If a laser marker is used, align the laser line with the left side of the saw blade, and then align the ink line with the laser line. -
Page 16: Bevel Angle Fine Adjustment
English 5. Bevel cutting procedures (1) Loosen the clamp lever and bevel the saw blade to the left. Indicator (2) Adjust the bevel angle to the desired setting while watching (for bevel scale) the bevel angle scale and indicator, then secure the clamp lever. Clamp Lever Tighten Loosen... - Page 17 English 8. Crown molding cutting procedures Fig. 28 shows two common crown molding types having angles of (θ) 38° and 45°. For the typical crown molding fittings, see Fig. 29. A upper surface Ceiling Ceiling Wall B lower surface Walt Inside corner Outside corner Fig.
- Page 18 English Motor Head Motor Head Bevel Angle Scale Bevel Angle Scale Fence Base Miter Angle Scale Turntable Base Turntable Miter Angle Scale Fig. 30 Fig. 31 Fence Fence Table on Base Table on Base Fig. 32 Fig. 33 Cutting method of crown molding without tilting the saw blade Crown Molding (1) Crown molding Stopper (L) and (R) (optional accessories) allow Stopper (R)
-
Page 19: Saw Blade Mounting And Dismounting
English 9. Cutting easily-deformed materials, such as aluminum sash Materials such as aluminum sash can easily deform when tightened too much in a vise assembly. This will cause inefficient cutting and possible overload of the motor. When cutting such materials, use a wood plate to protect the workpiece as shown in Fig. 35-a. Set the wood plate near the cutting section. -
Page 20: Maintenance And Inspection
English (4) Remove the bolt and washer (B). Spindle Lock 5mm Machine Screw Spindle Cover Fig. 37-a Fig. 37-b (5) Lift the lower guard and mount the saw blade. WARNING: When mounting the saw blade, confirm that the rotation indicator mark on the saw blade and the rotation direction of the gear case (see Fig. - Page 21 English 2. Inspecting the lever If the M8 hexagonal head bolts (2) are loose, align the sides of the fence and saw blade with the steel square. After adjusting the saw blade and fence to a ninety-degree angle, tighten the lever securing hexagonal head bolts (2).
-
Page 22: Service And Repairs
Repair, modification and inspection of Hitachi Power Tools must be carried out by a Hitachi Authorized Service Center. This Parts List will be helpful if presented with the tool to the Hitachi Authorized Service Center when requesting repair or other maintenance. In the operation and maintenance of power tools, the safety regulations and standards prescribed in each country must be observed.