Motorola AP-5131 Installation Manual
Hide thumbs
Also See for AP-5131:
- Antenna connection manual (18 pages) ,
- Quick setup manual (13 pages) ,
- User manual (2 pages)
Table of Contents
Advertisement
Advertisement
Table of Contents

Related Manuals for Motorola AP-5131


Summary of Contents for Motorola AP-5131
- Page 1 AP-5131 Access Point INSTALLATION Installation Guide...
-
Page 3: Table Of Contents
3.3 AP-5131 Placement ........6... - Page 4 4.0 Basic AP-5131 Configuration ......22 4.1 Resetting the AP-5131 Password ......24 4.2 Configuring Basic AP-5131 Device Settings .
- Page 5 MOTOROLA and the Stylized M Logo are registered in the US Patent & Trademark Office. Symbol is a registered trademark of Symbol Technologies, Inc. All other product or service names are the property of their respective owners. © Motorola, Inc. 2009. All rights reserved.
-
Page 7: Introduction
• Dual 802.11a+g radio, external antenna (Part No. AP-5131-1304X-WWR) If new to the AP-5131 and access point technology, refer to the AP-51xx Product Reference Guide to familiarize yourself with access point technology and the feature set exclusive to the Motorola AP-5131. -
Page 8: Warnings
1.2 Warnings Read all installation instructions and site survey reports, and verify correct equipment installation before • connecting the AP-5131 to its power source. Remove jewelry and watches before installing this equipment. • Verify that the unit is grounded before connecting it to the power source. -
Page 9: Ap-5131 Specifications
AP-5131 Specifications AP-5131 Specifications 2.1 Physical Characteristics The AP-5131 has the following physical characteristics: Dimensions 5.32 inches long x 9.45 inches wide x 1.77 inches thick. 135 mm long x 240 mm wide x 45 mm thick. Housing Metal, Plenum Housing (UL2043) Weight 1.95 lbs/0.88 Kg (single-radio model) -
Page 10: Radio Characteristics
AP-5131 Access Point: Installation Guide 2.3 Radio Characteristics The AP-5131 has the following radio characteristics: Transmitter Power 22 dBm Maximum (country, channel and data-rate dependant) 802.11b/g 19 dBm +/- 1 dBm @ 1, 2, 5.5, 11 Mbps 19 dBm +/- 1 dBm @ 6 and 9 Mbps... -
Page 11: Hardware Installation
AP-5131 product SKUs. The guide is available on the Motorola Web site, at http://support.symbol.com/support/product/manuals.do. Verify the model indicated on the bottom of the AP-5131 is correct. Contact the Motorola Support Center to report missing or improperly functioning items. -
Page 12: Ap-5131 Placement
For optimal performance, install the AP-5131 away from transformers, heavy-duty motors, fluorescent lights, microwave ovens, refrigerators and other industrial equipment. Signal loss can occur when metal, concrete, walls or floors block transmission. Install the AP-5131 in open areas or add access points as needed to improve coverage. - Page 13 Hardware Installation Certain Rogue AP Detection and Intrusion Detection features use an AP-5131 radio to perform dual- band scanning. The dedicated radio should be connected to an appropriate dual-band dipole antenna (Part No. ML-2452-APA2-01). The 2.4 GHz antenna suite includes the following models:...
-
Page 14: Power Injector System
110-220V AC power to combine low-voltage DC with Ethernet data in a single cable connecting to the AP-5131. The Motorola AP-5131 Power Supply (Part No. 50-14000-243R) is not included in the kit and is orderable separately as an accessory. - Page 15 Hardware Installation A separate Power Injector is required for each AP-5131 comprising the network. Data Power Power Injector to AP-5131 LAN Port AP-5131 Wireless LAN The Power Injector can be installed free standing, on an even horizontal surface or wall mounted using the power injector’s wall mounting key holes.
- Page 16 AP-5131 non-operational. Only use a AP-PSBIAS-1P2-AFR model power injector with the AP-5131’s LAN port. Ensure the cable length from the Ethernet source (host) to the Power Injector and AP-5131 does not exceed 100 meters (333 ft). The Power Injector has no On/Off power switch. The Power Injector receives power and is...
-
Page 17: Mounting The Ap-5131
3.4 Mounting the AP-5131 The AP-5131 can rest on a flat surface, attach to a wall, mount under a suspended T-Bar or above a ceiling (plenum or attic). Choose one of the following mounting options based on the physical environment of the coverage area. - Page 18 (depending on your single or dual-radio model and frequency used) to ensure the successful operation of the AP-5131. 4. Cable the AP-5131 using either the Motorola Power Injector solution or an approved line cord and power supply. For Motorola Power Injector installations: a.
-
Page 19: Wall Mounting
LED Indicators page 21. 6. Return the AP-5131 to an upright position and place it in the location you wish it to operate. Ensure the AP-5131 is sitting evenly on all four rubber feet. 7. The AP-5131 is ready to configure. For information on basic AP-5131 device configuration, see “... - Page 20 AP-5131 Antenna Options 7. Place the large corner of each of the mount slots over the screw heads. 8. Slide the AP-5131 down along the mounting surface to hang the mount slots on the screw heads. Ensure you are placing the antennas on the correct connectors...
-
Page 21: Suspended Ceiling T-Bar Installations
3.4.3 Suspended Ceiling T-Bar Installations A suspended ceiling mount requires holding the AP-5131 up against the T-bar of a suspended ceiling grid and twisting the AP-5131 chassis onto the T-bar. The mounting hardware and tools (customer provided) required to install the AP-5131 on a ceiling T-bar consists of: •... - Page 22 (depending on your single or dual-radio model and frequency used) to ensure the successful operation of the AP-5131. 4. Cable the AP-5131 using either the Power Injector solution or an approved line cord and power supply. For Motorola Power Injector installations: a.
-
Page 23: Above Ceiling Installations
Hardware Installation 8. Rotate the AP-5131 chassis 45 degrees clockwise, or about 10 o’clock. 9. Push the back of the AP-5131 chassis on to the bottom of the ceiling T-bar. Ensure the safety wire and cabling used in the T-Bar AP-5131... - Page 24 5. Create a light pipe path hole in the target position on the ceiling tile. 6. Use a drill to make a hole in the tile the approximate size of the AP-5131 LED light pipe. Motorola recommends care be taken not to damage the finished...
- Page 25 (depending on your single or dual-radio model and frequency used) to ensure the successful operation of the AP-5131. 13. Attach safety wire (if used) to the AP-5131 safety wire tie point or security cable (if used) to the AP-5131’s lock port.
- Page 26 Ensure the cable length from the Ethernet source (host) to the Power Injector and AP-5131 does not exceed 100 meters (333 ft). The Power Injector has no On/Off power switch. The Power Injector receives power as soon as AC power is applied. For more information on using the Power Injector, see “...
-
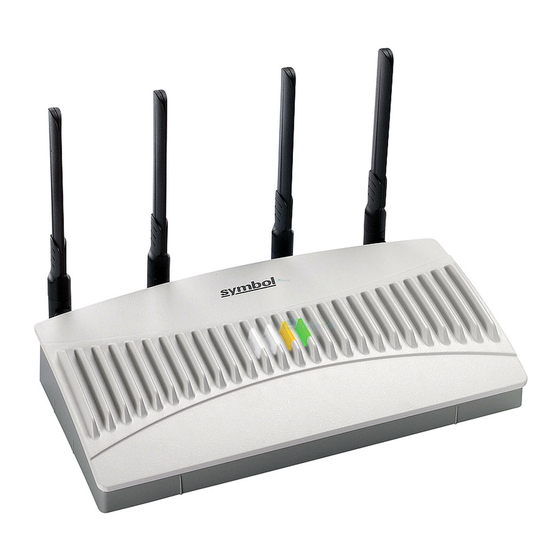
Page 27: Led Indicators
(the side containing the LAN, WAN and antenna connectors). The five LEDs on the top housing of the AP-5131 are clearly visible in table-top, wall and below ceiling installations. The five AP-5131 top housing LEDs have the following display and functionality:... -
Page 28: Basic Ap-5131 Configuration
For the basic setup described in this guide, the Java-based Web UI will be used to configure the AP-5131. To access the AP-5131 via the LAN port, the LAN port default setting is DHCP client. For this example, the AP-5131’s WAN interface will be used to connect to the access point. The default WAN IP address is 10.1.1.1. - Page 29 For optimum compatibility, use Sun Microsystems’ JRE 1.5 or higher NOTE (available from Sun’s Website), and be sure to disable Microsoft’s Java Virtual Machine if installed. The AP-5131 login screen displays. 2. Log in using admin as the default User ID and motorola as the default password.
-
Page 30: Resetting The Ap-5131 Password
5131 could be operating illegally unless set to operate in the correct country. Proceed to “ ” on page 25 to validate the country setting. Configuring “Basic” Device Settings Though the AP-5131 can have its basic settings defined using a number of NOTE different screens, Motorola recommends using the AP-5131 Quick... -
Page 31: Configuring Basic Ap-5131 Device Settings
Quick Setup screen are also configurable in numerous other locations within the AP-5131 menu tree. When you change the settings in the Quick Setup screen, the values also change within the screen where these parameters also exist. Additionally, if the values are updated in these other screens, the values initially set within the Quick Setup screen will be updated. - Page 32 AP-5131 or to change other default settings. 4. Optionally enter the IP address of the server used to provide system time to the AP-5131 within the Time Server field.
- Page 33 ISP for a DSL or cable-modem connection, or from an administrator if the AP-5131 connects to a larger network. A subnet mask uses a series of four numbers expressed in dot notation. For example, 255.255.255.0 is a valid subnet mask.
- Page 34 ISP. When the Internet session starts, the ISP authenticates the password. Click the tab to set a minimum set of parameters to use the AP-5131 LAN interface. a. Select the Enable LAN Interface checkbox to forward data traffic over the AP-5131 LAN connection.
- Page 35 802.11a or 802.11b/g radio. Ensure the radio selected has been enabled (see step 8). c. Even an AP-5131 configured with minimal values must protect its data against theft and corruption. A security policy should be configured for WLAN1 as part of the basic configuration outlined in this guide.
- Page 36 WEP 128 is described in this guide as a basic security scheme sufficient to protect the AP-5131’s initial transmissions. For details on configuring more sophisticated authentication and encryption options available to the AP-5131, refer to the AP-51xx Product Reference Guide. The guide is available on the Motorola Web site, at http://support.symbol.com/support/product/manuals.do.
- Page 37 For WEP 128 (104-bit key), the keys are 26 hexadecimal characters in length or 13 ASCII characters. Select one of these keys for activation by clicking its radio button. The AP-5131 and its target client(s) must use the same key to interoperate.
- Page 38 ACL) or test the AP-5131 for MU interoperability. 4.2.2 Excluding MUs from AP-5131 Association Optionally, use the AP-5131 Access Control List ACL to specify which MUs can or cannot gain access to an AP-5131 managed WLAN. By default, all mobile units can gain access. For specific information on configuring (restricting) MU access, refer to the AP-51xx Product Reference Guide.
-
Page 39: Testing Mobile Unit Connectivity
Echo Test screen to specify a target MU and configure the parameters of the ping test. The WNMP ping test only works with Motorola MUs. Only use a Motorola MU to test AP-5131 connectivity using WNMP. To ping a specific MU to assess its connection with an AP-5131: NOTE Before testing for connectivity, the target MU needs to be set to the same ESSID as the AP-5131. -
Page 40: Where To Go From Here
AP-5131 Access Point: Installation Guide 4.3 Where to Go From Here? Once basic connectivity has been verified, the AP-5131 can be fully configured to meet the needs of the network and the users it supports. The sections referenced below are located within the AP-51xx Product Reference Guide. -
Page 41: Regulatory Compliance
Motorola, Inc (“Motorola”). All Motorola devices are designed to be compliant with rules and regulations in locations they are sold and will be labeled as required. Any changes or modifications to Motorola equipment, not expressly approved by Motorola, could void the user's authority to operate the equipment. -
Page 42: Safety In Hospitals
Power Supply Use only a Motorola approved power supply output rated at 48Vdc and minimum 0.25A. The power supply shall be Listed to UL/CSA 60950-1; and certified to IEC60950-1 and EN60950-1 with SELV outputs. The AP5131 can also be powered from a 802.3af compliant power source. -
Page 43: Radio Transmitters
Regulatory Compliance Radio Frequency Interference Requirements—FCC This equipment has been tested and found to comply with the limits for a Class B digital device, pursuant to Part 15 of the FCC rules. These limits are designed to provide reasonable protection against harmful interference in a residential installation. -
Page 44: Statement Of Compliance
Italy requires a user license for outside usage. Statement of Compliance Motorola hereby, declares that this device is in compliance with the essential requirements and other relevant provisions of Directive 1999/5/EC. A Declaration of Conformity may be obtained from http://www2.symbol.com/doc/. - Page 45 Regulatory Compliance...
-
Page 46: Waste Electrical And Electronic Equipment (Weee)
AP-5131 Access Point: Installation Guide Waste Electrical and Electronic Equipment (WEEE English: For EU Customers: All products at the end of their life must be returned to Symbol for recycling. For information on how to return product, please go to: http://www.symbol.com/environmental_compliance. - Page 47 Waste Electrical and Electronic Equipment (WEEE) Nederlands: Voor klanten in de EU: alle producten dienen aan het einde van hun levensduur naar Symbol te worden teruggezonden voor recycling. Raadpleeg http://www.symbol.com/ environmental_compliance voor meer informatie over het terugzenden van producten. Português: Para clientes da UE: todos os produtos no fim de vida devem ser devolvidos à Symbol para reciclagem.
-
Page 48: Motorola's Enterprise Mobility Support Center
• Model number or product name • Software type and version number Motorola responds to calls by email, telephone or fax within the time limits set forth in support agreements. If you purchased your Enterprise Mobility business product from a Motorola business partner, contact that business partner for support. - Page 50 MOTOROLA INC 1303 E. ALGONQUIN ROAD SCHAUMBURG, IL 60196 http://www.motorola.com 72E-124689-01 Revision A - May 2009...