
Related Manuals for KitchenAid Pro Line KPCM050


Summary of Contents for KitchenAid Pro Line KPCM050
- Page 1 I N E ® E R I E S GUIDE PROFESSIONAL RESULTS Model KPCM050 Coffee Maker...
- Page 2 ® FOR THE WAY IT’S MADE. ™ ® Registered Trademark/™ Trademark of KitchenAid, U.S.A. © 2004. All rights reserved. Specifications subject to change without notice. dZw904...
- Page 3 I N E ® E R I E S MODEL KPCM050 COFFEE MAKER Introduction Section Contents Table of Contents ...3 Coffee Maker Safety ...4 Important Safeguards...5 Proof of Purchase & Registration...6 Electrical Requirements ...7...
-
Page 4: Introduction Introduction
The KitchenAid performance to the home, combining outstanding construction and durability with features that make brewing abundant amounts of superb coffee easy. The commercial, 1350-watt stainless steel heat pump brews quickly, providing exceptionally smooth and flavorful coffee. The elegant die-cast metal housing and stainless steel brew basket will stand up to the heaviest use. -
Page 5: Table Of Contents
TABLE INTRODUCTION Introduction Coffee Maker Safety Important Safeguards Proof of Purchase & Product Registration Electrical Requirements FEATURES OPERATION Coffee Maker Features ...10 Preparing the Coffee Maker for Use Pre-Use Cleaning ...13 Installing the Water Filter...13 Setting the Time-of-Day Clock ...14 Brewing Coffee ...16 Using the Warming Plate Adjusting Warming Plate Temperature...19... -
Page 6: Coffee Maker Safety
COFFEE MAKER SAFETY Your safety and the safety of others are very important. We have provided many important safety messages in this manual and on your appliance. Always read and obey all safety messages. This is the safety alert symbol. This symbol alerts you to potential hazards that can kill or hurt you and others. -
Page 7: Important Safeguards
IMPORTANT SAFEGUARDS When using electrical appliances, basic safety precautions should always be followed, including the following: Read all instructions. Do not touch hot surfaces. Use handles or knobs. To protect against electrical shock, do not immerse cord, plugs, or Coffee Maker in water or other liquid. Close supervision is necessary when any appliance is used by or near children. -
Page 8: Proof Of Purchase & Product Registration
Consumer Product Safety Act. This card does not verify your warranty. PURCHASE & PRODUCT REGISTRATION Please complete the following for your personal records: Model: KPCM050 Serial Number ___________________________________________ Date Purchased__________________________________________ Store Name... -
Page 9: Electrical Requirements
ELECTRICAL REQUIREMENTS Volts: 120 V.A.C. only. Hertz: 60 Hz NOTE: Your Coffee Maker has a 3 prong grounded plug. To reduce the risk of electrical shock, this plug will fit in an outlet only one way. If the plug does not fit in the outlet, contact a qualified electrician. -
Page 11: Features And Operation
FEATURES OPERATION I N E ® E R I E S Features and Operation Coffee Maker Features ...10 Preparing For Use Pre-Use Cleaning ...13 Installing the Water Filter...13 Setting the Time-of-Day Clock ...14 Brewing Coffee...16 Using the Warming Plate...19 Programming the Brew Timer ...20 Adjusting Message Tone Volume ...22 Resetting the Water Filter Icon...23 Coffee Brewing Suggestions ...24... -
Page 12: Coffee Maker Features
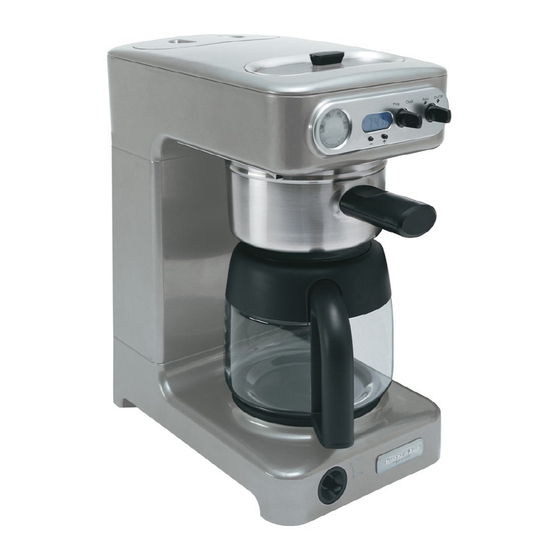
MODEL KPCM050 COFFEE MAKER FEATURES Front-Fill Water Guide Fill the water reservoir through the convenient front-fill water guide. A tone sounds to prevent overfilling when the maximum water level is reached. Water Guide Cover Cover prevents debris from falling into the water guide. - Page 13 12-Cup Glass Carafe The Carafe features drip-free pouring, a comfortable handle, and a removable lid that snaps in and out. Orange and black lids can be alternated to indicate regular or decaffeinated coffee. Warming Plate Temperature Switch Keep coffee heated to taste: “low” preserves the flavor of coffee served at a leisurely pace, while “high”...
- Page 14 MODEL KPCM050 COFFEE MAKER FEATURES Water Filter Icon Icon appears on the brew timer display when the water filter needs to be replaced. Sound Level Icon Icon is displayed when message tones are enabled. Message Tones Convenient message tones instantly communicate coffee maker status.
-
Page 15: Pre-Use Cleaning
PREPARING COFFEE MAKER Pre-Use Cleaning Wash the filter basket, basket insert, carafe, and carafe lids in hot, soapy water, then rinse with clean water and dry. Do not use abrasive cleansers or scouring pads. These parts may also be washed in the top rack of the dishwasher. Installing the Water Filter Since most tap water is chlorinated and contains some level of calcium, the use of a PRO LINE... -
Page 16: Setting The Time-Of-Day Clock
PREPARING COFFEE MAKER Place the filter cartridge in the circular well at the bottom of the water reservoir. Push the cartridge slightly to make sure it fits snugly. Replace the water filter access cover and run the coffee maker through a complete brewing cycle without coffee. Use a full carafe of clean, cool water. - Page 17 To Enter Clock-Setting Mode If the digits on the brew timer display are not flashing, enter the clock-setting mode by turning the Program-Clock Switch clockwise to the “Clock” position, then releasing. The hour digits will begin to flash. To Set The Clock Press the “–”...
-
Page 18: Brewing Coffee
BREWING COFFEE Before brewing coffee for the first time, run the coffee maker through a complete brewing cycle without coffee. Use a full carafe of clean, cool water. This rinses the water reservoir, heat pump, and showerhead. This first brew cycle will yield slightly less water than the amount added, since the brew system retains a small amount of water. - Page 19 If message tones are enabled, the coffee maker will beep once when the water reservoir is near full. After filling the reservoir, place the carafe on the coffee maker warming plate. Grasp the brew basket handle and remove the brew basket from the front of the coffee maker.
- Page 20 BREWING COFFEE NOTE: The coffee maker cannot be switched on if there are fewer than 4 cups (17 oz.) of brew water in the reservoir. If message tones are enabled, the coffee maker will: • beep once if there are fewer than 4 cups (17 oz.) of brew water in the reservoir •...
-
Page 21: Adjusting Warming Plate Temperature
USING Adjusting Warming Plate Temperature The warming plate can hold coffee at a choice of two serving temperatures. Turn the Temperature Switch clockwise to the “Low” position to preserve the flavor of coffee served at a leisurely pace. Turn the Temperature Switch counter-clockwise to the “High” position to keep coffee piping hot. -
Page 22: Programming The Automatic Brew Timer
PROGRAMMING AUTOMATIC BREW The KitchenAid ® PRO LINE ® Series Coffee Maker can be programmed to brew coffee at a preset time, making it easy to wake up to fresh coffee every morning. To set the automatic brew timer, perform the following steps: Enter the brew timer program mode by turning the Program-Clock Switch counter-clockwise to the “Prog”... - Page 23 Fill the coffee maker with coffee and fresh water, then activate the automatic brew timer by turning the Auto-On/Off Switch counter-clockwise to the “Auto” position, then releasing. When the brew timer is active, the auto indicator light will be illuminated. NOTE: The brew timer will not activate if there are fewer than 4 cups (17 oz.) of brew water in the reservoir.
-
Page 24: Adjusting The Message Tone Volume
ADJUSTING MESSAGE TONE Message tones instantly communicate coffee maker status. Tone volume can be set high or low, or turned off for silent operation. When first used, the coffee maker automatically defaults to high volume tones. The sound level icon will be visible on the brew timer display when message tones are enabled: High-Volume Icon Low-Volume Icon... -
Page 25: Resetting The Water Filter Icon
RESETTING WATER FILTER ICON ® The PRO LINE Series Water Filter will filter approximately 25 Filter Icon gallons of water (60 full carafes). When a filter has reached the end of its life, the water filter icon will appear on the brew timer display. -
Page 26: Coffee Brewing Suggestions: Advice For Great Taste
COFFEE BREWING The flavor of coffee depends on a variety of factors, including the quality, freshness, and roast of the beans, the fineness and consistency of the grind, the ratio of coffee to brew water, the cleanliness of the brewing equipment, and the brew water purity. - Page 27 A proper grind is critical for good coffee, and that means using a ® quality burr grinder like the PRO LINE Series Burr Coffee Mill or the KitchenAid ® Model A-9™ Coffee Mill. A good burr grinder will produce an extremely consistent grind with little frictional heating, and preserve the full flavor of your coffee.
- Page 28 COFFEE BREWING SUGGESTIONS: ADVICE FOR GREAT TASTE Coffee Maker Cleanliness Coffee oils build up quickly within the brew basket and carafe. Over time, these oils will go stale and taint the flavor of freshly brewed coffee. Daily cleaning of the brew basket, brew basket insert, and carafe is strongly recommended for the best-tasting coffee.
-
Page 29: Care And Cleaning
I N E ® E R I E S CARE CLEANING Care and Cleaning Section Contents Cleaning the Coffee Maker ...28 Descaling...29 Storing the Coffee Maker ...30 Cleaning the Optional Permanent Filter ...30 Troubleshooting & Error Codes ...31... -
Page 30: Cleaning The Coffee Maker
CARE CLEANING Cleaning the Coffee Maker Unplug the coffee maker. Remove the brew basket insert from the brew basket. Wash the brew basket, brew basket insert, carafe, and carafe lid in hot, soapy water and rinse with hot water. Do not use abrasive cleansers or scouring pads. -
Page 31: Descaling
If “E1” or “E2” error codes appear during descaling, unplug the coffee maker for 30 seconds to reset the display, then plug it back in and continue. If error codes continue to appear after cleaning, see the KitchenAid Warranty and Service section on page 33. Continued…... -
Page 32: Storing The Coffee Maker
CARE CLEANING Storing the Coffee Maker Since the coffee maker retains a small amount of water after brewing, never use it in environments where the temperature drops below freezing (32˚F or 0˚C). If the coffee maker will not be used for a prolonged period, or if it will be stored at temperatures below freezing, empty all water from the unit. -
Page 33: Troubleshooting & Error Codes
The coffee maker needs to be descaled. Unplug the coffee maker for 30 seconds to reset the display, then plug it back in again. See “Descaling” on page 29. If error codes continue to appear after cleaning, see the KitchenAid Warranty and Service section on page 33. •... -
Page 35: Ordering Accessories & Replacement Parts
I N E ® E R I E S WARRANTY SERVICE INFORMATION Warranty Information Section Contents Warranty for the U.S..34 Warranty for Puerto Rico ...35 Arranging for Hassle-Free Replacement ...35 Ordering Accessories & Replacement Parts...36 Arranging for Service After the Warranty Expires...36 Arranging for Service Outside the U.S. -
Page 36: Warranty And Service Information Warranty For The 50 United States & District Of Columbia
KITCHENAID DOES NOT ASSUME ANY RESPONSIBILITY FOR INCIDENTAL OR CONSEQUENTIAL DAMAGES. Some states do not allow the exclusion or limitation of incidental or consequential damages, so this exclusion may not apply to you. This warranty gives you specific legal rights and you may also have other rights which vary from state to state. -
Page 37: Warranty For Puerto Rico
Authorized KitchenAid Service Center. ARRANGING HASSLE-FREE IF YOU RESIDE IN THE 50 UNITED STATES and your KitchenAid ® PRO LINE Series Coffee Maker should fail within two years of ownership, simply call our toll-free Customer Satisfaction Center at 1-800-541-6390 Monday through Friday, 8 a.m. -
Page 38: Ordering Accessories & Replacement Parts
To order accessories or replacement parts for your Coffee Maker, call toll-free 1-800-541-6390 Monday through Friday, 8 a.m. to 8 p.m. (Eastern Time), or Saturday, 10 a.m. to 5 p.m., or write to: Customer Satisfaction Center, KitchenAid Portable Appliances, P.O. Box 218, St. Joseph, MI 49085-0218. SERVICE... - Page 39 SERVICE ARRANGING FOR OUTSIDE 50 UNITED STATES AND PUERTO RICO Consult your local KitchenAid dealer or the store where you purchased your PRO LINE ® Series Coffee Maker for information on how to obtain service.