
Related Manuals for Huawei ETP4860-B1A2


Summary of Contents for Huawei ETP4860-B1A2
- Page 1 ETP4860-B1A2 Embedded Power User Manual Issue Date 2021-01-05 HUAWEI TECHNOLOGIES CO., LTD.
- Page 2 Notice The purchased products, services and features are stipulated by the contract made between Huawei and the customer. All or part of the products, services and features described in this document may not be within the purchase scope or the usage scope. Unless otherwise specified in the contract, all statements, information, and recommendations in this document are provided "AS IS"...
-
Page 3: About This Document
Indicates a potentially hazardous situation which, if not avoided, could result in equipment damage, data loss, performance deterioration, or unanticipated results. NOTICE is used to address practices not related to personal injury. Issue 04 (2021-01-05) Copyright © Huawei Technologies Co., Ltd. - Page 4 Updated Components. Issue 02 (2019-09-12) Added contents about the WiFi function. Upgraded installation procedures. Issue 01 (2019-07-12) This issue is the first official release. Software version: SMU V500R002C20, LIVE-C APP V100R001C80. Issue 04 (2021-01-05) Copyright © Huawei Technologies Co., Ltd.
-
Page 5: Table Of Contents
4.4 Installing Cables..................................41 4.4.1 (Optional) Installing a Dry Contact Signal Cable....................41 4.4.2 Installing Signal Cables for a Battery Temperature Sensor................42 4.4.3 Installing Signal Cables for a Door Status Sensor....................43 Issue 04 (2021-01-05) Copyright © Huawei Technologies Co., Ltd. - Page 6 7.4.3 Identifying Circuit Breaker Faults..........................77 7.5 Replacing Components............................... 77 7.5.1 Replacing a Rectifier................................. 78 7.5.2 Replacing an SMU11B..............................79 7.5.3 Replacing an SMU11C..............................80 7.5.4 Replacing a Circuit Breaker............................81 Issue 04 (2021-01-05) Copyright © Huawei Technologies Co., Ltd.
- Page 7 ETP4860-B1A2 Embedded Power User Manual Contents A Technical Specifications.......................83 B Electrical Conceptual Diagram..................86 C Acronyms and Abbreviations....................87 Issue 04 (2021-01-05) Copyright © Huawei Technologies Co., Ltd.
-
Page 8: Safety Precautions
The "NOTICE", "CAUTION", "WARNING", and "DANGER" statements in this document do not cover all the safety instructions. They are only supplements to the safety instructions. Huawei will not be liable for any consequence caused by the violation of general safety requirements or design, production, and usage safety standards. - Page 9 Installation personnel mark tightened bolts in blue. Quality inspection personnel confirm if the bolts are tightened and then mark them in red. (The marks should cross the edges of the bolts, as shown in the following figure.) Issue 04 (2021-01-05) Copyright © Huawei Technologies Co., Ltd.
- Page 10 Seal the unused cable holes with the caps delivered with the cabinet. The following figure shows the criteria for correct sealing with firestop putty. ● Do not use water, alcohol, oil, or other solvents to clean electrical components inside and outside a cabinet. Issue 04 (2021-01-05) Copyright © Huawei Technologies Co., Ltd.
- Page 11 ESD gloves or an ESD wrist strap. Indicates that the equipment is safe to use at altitudes below 2000 m (6561.6 ft.). Indicates that the equipment is not safe to use in tropical climates. Issue 04 (2021-01-05) Copyright © Huawei Technologies Co., Ltd.
-
Page 12: Personnel Requirements
1.2 Personnel Requirements ● Personnel who plan to install or maintain Huawei equipment must receive thorough training, understand all necessary safety precautions, and be able to correctly perform all operations. ●... -
Page 13: Electrical Safety
Before connecting a power cable, check that the label on the power cable is correct. ● Before connecting the power supply, ensure that cable connections are correct. ● If the equipment has multiple inputs, disconnect all the inputs before operating the equipment. Issue 04 (2021-01-05) Copyright © Huawei Technologies Co., Ltd. -
Page 14: Installation Environment Requirements
● Do not expose the equipment to flammable or explosive gas or smoke. Do not perform any operation on the equipment in such environments. Issue 04 (2021-01-05) Copyright © Huawei Technologies Co., Ltd. - Page 15 When removing a part, ensure that other parts will not collapse. ● Do not loiter when working at heights. Do not sleep at heights. Issue 04 (2021-01-05) Copyright © Huawei Technologies Co., Ltd.
-
Page 16: Mechanical Safety
Do not drag steel ropes and hoisting tools or bump hoisted objects against hard objects during hoisting. Using Ladders ● Use wooden or fiberglass ladders when you need to perform live working at heights. Issue 04 (2021-01-05) Copyright © Huawei Technologies Co., Ltd. - Page 17 Ensure that your body's center of gravity does not shift outside the legs of the ladder. Drilling Holes When drilling holes into a wall or floor, observe the following safety precautions: Issue 04 (2021-01-05) Copyright © Huawei Technologies Co., Ltd.
-
Page 18: Battery Safety
For additional safety precautions, see the instructions provided by the battery manufacturer. Basic Requirements Before operating batteries, carefully read the safety precautions for battery handling and master the correct battery connection methods. Issue 04 (2021-01-05) Copyright © Huawei Technologies Co., Ltd. - Page 19 If the temperature is outside the specified range, the battery charge and discharge performance and safety are affected. Battery Installation Before installing batteries, observe the following safety precautions: Issue 04 (2021-01-05) Copyright © Huawei Technologies Co., Ltd.
- Page 20 Lead-acid batteries emit flammable gas when used. Ensure that batteries are kept in a well-ventilated area and take preventive measures against fire. Battery Leakage NO TICE Battery overheating causes deformation, damage, and electrolyte spillage. Issue 04 (2021-01-05) Copyright © Huawei Technologies Co., Ltd.
- Page 21 Otherwise, a short circuit would occur inside the battery. ● Do not throw a lithium battery in fire. ● When maintenance is complete, return the waste lithium battery to the maintenance office. Issue 04 (2021-01-05) Copyright © Huawei Technologies Co., Ltd.
-
Page 22: Overview
User Manual 2 Overview Overview 2.1 Introduction The ETP4860-B1A2 is an embedded power system that supplies power to –48 V DC telecom equipment. It has a maximum output current of 60 A. 2.2 System Features ● Supports AC or HVDC input. AC input voltage range: 85–300 V AC; HVDC input voltage range: 85–420 V DC... - Page 23 ETP4860-B1A2 Embedded Power User Manual 2 Overview Item System Configuration Rectifier A maximum of two R4830G1s or R4815G1s (R4830G1 and R4815G1 support HVDC input) can be configured. Monitoring module SMU11B or SMU11C Issue 04 (2021-01-05) Copyright © Huawei Technologies Co., Ltd.
-
Page 24: Components
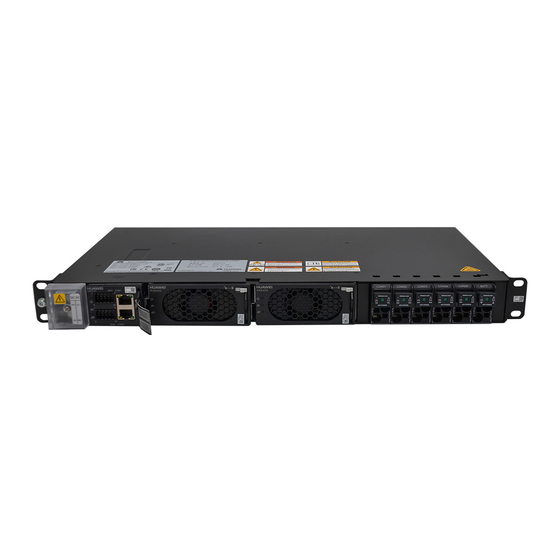
User Manual 3 Components Components 3.1 Appearance Figure 3-1 Appearance (1) Ground screw (2) Input terminals (3) Space for SMU (4) Space for rectifiers (5) Load circuit breakers (6) Battery circuit breaker Issue 04 (2021-01-05) Copyright © Huawei Technologies Co., Ltd. -
Page 25: Smu11B
The SMU is running properly but fails to communicate with the host properly. Minor alarm Yellow No minor alarm or warning is indicator generated. Steady on A minor alarm or warning is generated. Issue 04 (2021-01-05) Copyright © Huawei Technologies Co., Ltd. - Page 26 When used as a dry IO2+ contact output, the alarm action is as follows: open when normal, closed when alarm.) IO2- IO3+ IO3- IO4+ IO4- Issue 04 (2021-01-05) Copyright © Huawei Technologies Co., Ltd.
- Page 27 BIN protocol Connects to a Huawei NMS. HTTPS protocol Connects to a PC and manages the SMU through the WebUI. NOTE All these ports are protected by a security mechanism. Issue 04 (2021-01-05) Copyright © Huawei Technologies Co., Ltd.
- Page 28 Ground Figure 3-5 Pins in the FE port Table 3-6 Pin definitions for the FE port Signal Description Transmits data over FE. Receives data over FE. 4, 5, 7 and 8 Issue 04 (2021-01-05) Copyright © Huawei Technologies Co., Ltd.
-
Page 29: Smu11C
Minor alarm Yellow No minor or warning alarm is indicator generated. Steady on A minor or warning alarm is generated. Major alarm No critical or major alarm is indicator generated. Issue 04 (2021-01-05) Copyright © Huawei Technologies Co., Ltd. - Page 30 The dual in-line package switch (DIP switch) is used to set the northbound RS485 communications address. Figure 3-7 DIP switch Table 3-8 DIP switch settings Monitoring Toggle Toggle Toggle Toggle Address Switch 1 Switch 2 Switch 3 Switch 4 Issue 04 (2021-01-05) Copyright © Huawei Technologies Co., Ltd.
- Page 31 SMU11C is normal when the dry contact input is disconnected, and an alarm is Issue 04 (2021-01-05) Copyright © Huawei Technologies Co., Ltd.
- Page 32 Table 3-11 Communications port description Communications Communications Communicatio Function Port Parameter ns Protocol COM1 Baud rate: 9600 Master/slave Northbound bit/s, 19200 bit/s, protocol communication or 115200 bit/s port, connects to a Huawei NMS. Issue 04 (2021-01-05) Copyright © Huawei Technologies Co., Ltd.
- Page 33 Table 3-12 Pin definitions for the COM1 port Signal Description Transmits data over RS485. Reserved Receives data over RS485. PGND Grounding (PE) Reserved Reserved Table 3-13 Pin definitions for the COM2 port Signal Description Transmits data over RS485. Issue 04 (2021-01-05) Copyright © Huawei Technologies Co., Ltd.
-
Page 34: Rectifier
(4) Locking latch (5) Handle Table 3-14 Indicator description Indicator Color Status Description Power Green Steady The rectifier has an AC input. indicator The rectifier has no AC input. The rectifier is faulty. Issue 04 (2021-01-05) Copyright © Huawei Technologies Co., Ltd. - Page 35 Fault indicator The rectifier is normal. Steady The rectifier locks out due to output overvoltage. The rectifier has no output due to an internal fault. Issue 04 (2021-01-05) Copyright © Huawei Technologies Co., Ltd.
-
Page 36: Expansion Box Mue03A
Modbus protocol Connects to the bit/s, 19200 bit/s, monitoring or 115200 bit/s module. COM_OUT1 Baud rate: 9600 Modbus protocol Connects to bit/s, 19200 bit/s, intelligent COM_OUT2 or 115200 bit/s equipment. COM_OUT3 Issue 04 (2021-01-05) Copyright © Huawei Technologies Co., Ltd. - Page 37 Table 3-18 Pin definitions for the COM_OUT1, COM_OUT2, and COM_OUT3 ports Signal Description RS485+ RS485 data + RS485- RS485 data – 12 V Power supply RS485+ RS485 data + RS485- RS485 data – Reserved Issue 04 (2021-01-05) Copyright © Huawei Technologies Co., Ltd.
- Page 38 12 V power outputs. The wiring terminals are located inside the MUE03A. Figure 3-13 Wiring terminals (without the panel, top view) Figure 3-14 DIN and WATER pin definitions Issue 04 (2021-01-05) Copyright © Huawei Technologies Co., Ltd.
- Page 39 Table 3-20 ALM and SMOKE pin definitions Terminal Signal Description ALM5–ALM10 ALM+ Dry contact output + ALM- Dry contact output – SMOKE SMOKE Smoke sensor signal input 12 V 12 V output Figure 3-16 J7 pin definitions Issue 04 (2021-01-05) Copyright © Huawei Technologies Co., Ltd.
- Page 40 ETP4860-B1A2 Embedded Power User Manual 3 Components Table 3-21 J7 pin definitions Terminal Signal Description 12 V 12 V output Ground (PE) Reserved – Issue 04 (2021-01-05) Copyright © Huawei Technologies Co., Ltd.
-
Page 41: Installation
Neutral 21.2 wire N AC input power Live wire L, cable (single- L1, HVDC+ phase, dual-live Neutral wire, HVDC) wire N, live wire L2, HVDC- DC output power cable Issue 04 (2021-01-05) Copyright © Huawei Technologies Co., Ltd. -
Page 42: Tools
● Battery cables should be able to withstand a temperature of at least 90°C. 4.1.2 Tools NO TICE Use tools with insulated handles. The following table is for reference only. Table 4-2 Installation tools and instruments Issue 04 (2021-01-05) Copyright © Huawei Technologies Co., Ltd. -
Page 43: Installation Dimensions
● When installing subracks, ensure to reserve enough space for personnel to install cables. 4.2 Installing a Subrack Procedure Step 1 (Optional) Remove the cover of the RTN ground bar at the bottom of the subrack. Issue 04 (2021-01-05) Copyright © Huawei Technologies Co., Ltd. - Page 44 Step 3 (Optional) Relocate the mounting ears based on the cabinet depth. Figure 4-4 Installation positions for mounting ears (1) Adjustable positions (2) Default position Step 4 (Optional) When installing on an ETSI rack, ensure to use the ETSI mounting ears. Issue 04 (2021-01-05) Copyright © Huawei Technologies Co., Ltd.
- Page 45 ETP4860-B1A2 Embedded Power User Manual 4 Installation Figure 4-5 Installing ETSI mounting ears Step 5 Install the subrack in a 19-inch rack. Figure 4-6 Installing a subrack Step 6 Install a ground cable. Issue 04 (2021-01-05) Copyright © Huawei Technologies Co., Ltd.
-
Page 46: Installing Components
Step 1 Set the DIP switch based on the assigned address. Step 2 Insert the SMU11C into the slot and slide it into the subrack along the guide rails. Step 3 Push the SMU11C handle upwards until it is in place. Issue 04 (2021-01-05) Copyright © Huawei Technologies Co., Ltd. -
Page 47: Installing A Rectifier
The filler panel has been removed from the rectifier slot. NO TICE ● If the rectifier is damaged, contact your local Huawei office. ● The rectifier slot presents a risk of electric shock. Do not touch the slot with your hands. -
Page 48: Installing Cables
Step 3 Remove the screwdriver and check that the signal cable is securely connected to the dry contact. Figure 4-11 Installing a dry contact signal cable NO TE Connect the output dry contacts to IO1 and IO2 ports. ----End Issue 04 (2021-01-05) Copyright © Huawei Technologies Co., Ltd. -
Page 49: Installing Signal Cables For A Battery Temperature Sensor
Figure 4-12 Installing signal cables for a battery temperature sensor (1) Battery temperature sensor ----End Issue 04 (2021-01-05) Copyright © Huawei Technologies Co., Ltd. -
Page 50: Installing Signal Cables For A Door Status Sensor
NO TE Ensure that the RTN ground bar is installed. Procedure Step 1 Connect the alarm signal cable for the cable distribution frame to the VD2 port on the monitoring module. Issue 04 (2021-01-05) Copyright © Huawei Technologies Co., Ltd. -
Page 51: Installing A Cable For The Expansion Box (Smu11B)
COM2 port on the SMU. Figure 4-15 Installing a cable for the expansion box NO TE Ensure that the expansion box side with holes does not face downwards. ----End Issue 04 (2021-01-05) Copyright © Huawei Technologies Co., Ltd. -
Page 52: Installing A Cable For The Expansion Box (Smu11C)
When there is a need to use the U2000 network management system to remotely manage the power system, connect the COM1 port on the SMU11C to the corresponding serial port on the Huawei access network equipment using a communications cable. -
Page 53: Installing A Communications Cable (Smu11B)
When using the U2000 network management system to remotely manage the power system, connect the FE port on the SMU11B to the corresponding serial port on the Huawei access network equipment using a communications cable. Figure 4-18 Installing a communications cable (SMU11B) -
Page 54: Installing Dc Output Power Cables
Pre-insulated and with an insertion depth of 12–18 mm 0.75–6 mm Pre-insulated and with an insertion depth of 18 mm 10 mm Not pre-insulated and with an insertion depth of 18 mm 16 mm Issue 04 (2021-01-05) Copyright © Huawei Technologies Co., Ltd. - Page 55 Install a battery cable at the wiring hole. Remove the screwdriver and ensure that the battery cable is securely installed. Figure 4-22 Installing DC output power cables (1) DC load ----End Issue 04 (2021-01-05) Copyright © Huawei Technologies Co., Ltd.
-
Page 56: Installing Battery Cables
Table 4-4 Preparing cables Cross-Sectional Area Recommended Cord End Terminal Specifications Pre-insulated and with an insertion depth of 18 mm 10 mm Not pre-insulated and with an insertion depth of 18 mm 16 mm Issue 04 (2021-01-05) Copyright © Huawei Technologies Co., Ltd. - Page 57 Use a flat-head screwdriver (2 mm wide) to push the slider in a wiring hole in place. Install a battery cable at the wiring hole. Remove the screwdriver and ensure that the battery cable is securely installed. Figure 4-24 Installing battery cables (1) Battery string Issue 04 (2021-01-05) Copyright © Huawei Technologies Co., Ltd.
-
Page 58: Installing Input Power Cables
Table 4-5 Mapping between lithium battery and SMU communications ports Lithium Battery Communications Port SMU Communications Port RS485 T+ RS485 T- RS485 R+ RS485 R- CANH CAN+ CANL CAN- ----End 4.4.11 Installing Input Power Cables Issue 04 (2021-01-05) Copyright © Huawei Technologies Co., Ltd. -
Page 59: Installing 220 V Ac Single-Phase Input Power Cables
4.4.11.3 Installing DC Input Power Cables Procedure Step 1 Remove the protective cover from DC input terminals. Step 2 Connect the DC input power cables to the corresponding DC input terminals. Issue 04 (2021-01-05) Copyright © Huawei Technologies Co., Ltd. - Page 60 ETP4860-B1A2 Embedded Power User Manual 4 Installation Figure 4-28 Installing DC input power cables Step 3 Reinstall the protective cover for the DC input terminals. ----End Issue 04 (2021-01-05) Copyright © Huawei Technologies Co., Ltd.
-
Page 61: Verifying The Installation
Check that all cables are arranged neatly and bound properly to their nearest cable ties, and are not twisted or overly bent. ● Check that cable labels are properly and securely attached in the same direction. Issue 04 (2021-01-05) Copyright © Huawei Technologies Co., Ltd. -
Page 62: Commissioning
Step 2 Switch on the upstream input circuit breaker and measure the output voltage of the circuit breaker. The value should range from 85 V AC to 300 V AC or 85 V DC to 420 V DC. Issue 04 (2021-01-05) Copyright © Huawei Technologies Co., Ltd. -
Page 63: Smu11B
Figure 6-1 Setting the PC IP address (Windows 10 is used as an example) local IP address for the SMU (default address: https://192.168.0.10) Step 2 Enter https:// in the address box of Internet Explorer and press Enter. The login page is displayed. Issue 04 (2021-01-05) Copyright © Huawei Technologies Co., Ltd. -
Page 64: Setting Parameters On The Webui
● Change the preset password when you first log in to ensure system security. ----End 6.2.2 Setting Parameters on the WebUI Selecting a Language The SMU11B supports English, Chinese, French, Spanish, Portuguese, Russian, Italian, German, Turkish, and Japanese. Figure 6-3 Selecting a language Issue 04 (2021-01-05) Copyright © Huawei Technologies Co., Ltd. - Page 65 ----End Setting Basic Battery Parameters Basic battery parameters are fundamental for the SMU to manage batteries and should be set based on the actual number and capacity of battery strings connected. Issue 04 (2021-01-05) Copyright © Huawei Technologies Co., Ltd.
- Page 66 Path: Monitoring > Lithium Battery Group > Running Parameter > Basic Parameters ----End Configuring IO Ports You can set the IO ports on the SMU panel to dry contact inputs or outputs based on site requirements. Issue 04 (2021-01-05) Copyright © Huawei Technologies Co., Ltd.
- Page 67 You can set alarm conditions for dry contact inputs based on site requirements. For example, if DIN1 Alarm Condition is set to Close, the SMU generates a DIN1 Alarm for dry contact input DIN1 when it is closed. Issue 04 (2021-01-05) Copyright © Huawei Technologies Co., Ltd.
- Page 68 Alarm severities are classified into critical, major, minor, and warning. Step 1 Access the Alarm Parameters menu. Path: System Settings > Alarm Parameters Step 2 Select a device type and set alarm parameters. Issue 04 (2021-01-05) Copyright © Huawei Technologies Co., Ltd.
-
Page 69: Live-C App (Smu11C)
Prerequisites There is a mobile phone running Android 5.0 or later. Procedure Step 1 Obtain the latest LIVE-C APP installation package from Huawei technical support. Step 2 Install the LIVE-C APP on the mobile phone. Figure 6-12 LIVE-C APP icon ----End 6.3.2 Logging In to the LIVE-C App... - Page 70 ● After the first login, change the password in time to ensure account security and prevent unauthorized network attacks, such as data tampering. ● Huawei will not be liable for any security issues caused by your failure to change the default password in time or password loss after changing. (The password cannot be retrieved if it is lost.)
-
Page 71: Setting Parameters
----End Setting Basic Battery Parameters Basic battery parameters are fundamental for the SMU to manage batteries and should be set based on the actual number and capacity of battery strings connected. Issue 04 (2021-01-05) Copyright © Huawei Technologies Co., Ltd. - Page 72 You can set the IO ports on the SMU panel to dry contact inputs or outputs based on site requirements. Path: Site Configuration > Power System > Basic ParametersDI/DO N Config Issue 04 (2021-01-05) Copyright © Huawei Technologies Co., Ltd.
-
Page 73: Connecting The Battery Supply
Step 2 Select a device type and set alarm parameters. ----End 6.4 Connecting the Battery Supply Prerequisites NO TICE To avoid damage to batteries, switch on the battery circuit breaker only after you correctly set battery parameters on the SMU. Issue 04 (2021-01-05) Copyright © Huawei Technologies Co., Ltd. - Page 74 If the door status sensor is not configured and you need to disable the door status sensor alarm, refer to Setting the Alarm Enable Option, Alarm Severity, and Associated Relays Setting the Alarm Enable Option, Alarm Severity, and Associated Relays. ----End Issue 04 (2021-01-05) Copyright © Huawei Technologies Co., Ltd.
-
Page 75: Maintenance
Figure 7-1 Backing up the current settings Restoring Factory Defaults After factory defaults are restored, all parameter values change to their default factory values. You are advised to back up the current settings before restoring factory defaults. Issue 04 (2021-01-05) Copyright © Huawei Technologies Co., Ltd. - Page 76 ● Exercise caution to choose the version rollback function during software upgrade. After version rollback, the user accounts created are deleted, and the initial user name and password are required for login. Figure 7-3 Upgrading software Issue 04 (2021-01-05) Copyright © Huawei Technologies Co., Ltd.
- Page 77 Step 1 Choose Maintenance > User Management. The user management page is displayed. Figure 7-5 User management page Step 2 Select the user whose password needs to be changed and click Modify. The dialog box for modifying user information is displayed. Issue 04 (2021-01-05) Copyright © Huawei Technologies Co., Ltd.
- Page 78 ● You are advised to periodically change the WiFi password to improve account security and prevent unauthorized network attacks, such as data tampering. ● Huawei will not be liable for any loss caused by your failure to change the password in time or to keep the new password properly.
- Page 79 Step 2 To view historical alarms. Figure 7-9 Viewing historical alarms ----End Viewing Version Information View the Monitoring unit version number to facilitate fault diagnosis and check whether the upgrade is successful. Issue 04 (2021-01-05) Copyright © Huawei Technologies Co., Ltd.
- Page 80 Exporting Maintenance Information Step 1 To export historical data. Figure 7-11 Exporting historical data Step 2 To export e-label information. Figure 7-12 Exporting e-label information Step 3 To export fault information. Issue 04 (2021-01-05) Copyright © Huawei Technologies Co., Ltd.
-
Page 81: Common Maintenance Operations On The Live-Capp (Smu11C)
Upgrading the Software ● The SMU restarts after the software is upgraded. ● The latest LIVE-C app upgrade package has been acquired from Huawei technical support. Step 1 Access the SMU upgrade management menu. Path: OM Tool > SMU upgrade management Step 2 Select the upgrade file (for example, SMU11C V500R002C10B218) and import it. - Page 82 If rectifier alarms cannot be cleared according to Rectifying Common Faults, Collect Fault Info can be performed to export rectifier data, which can be provided to Huawei technicians for rectifier fault diagnosis. Path: Site Configuration > Rectifier Group > Basic Control > Collect Fault Info Switching Between Equalized and Float Charge for Lead-Acid Batteries ●...
-
Page 83: Routine Maintenance
0.1 replace the ohm. ground cable. 7.4 Identifying Component Faults 7.4.1 Identifying Rectifier Faults The following lists the rectifier faults Issue 04 (2021-01-05) Copyright © Huawei Technologies Co., Ltd. -
Page 84: Identifying Smu Faults
● Obtain prior written consent from the customer if load disconnection is required. ● Do not perform maintenance on rainy days. Otherwise, rain water can enter the system and damage devices and components. Issue 04 (2021-01-05) Copyright © Huawei Technologies Co., Ltd. -
Page 85: Replacing A Rectifier
Step 6 Gently slide the converter into the slot along guide rails until it is engaged. Close the handle, and push the locking latch towards the right to lock the handle. Figure 7-15 Installing a rectifier Issue 04 (2021-01-05) Copyright © Huawei Technologies Co., Ltd. -
Page 86: Replacing An Smu11B
7 Maintenance Step 7 Take off protective gloves. ----End Follow-up Procedure Pack the removed component, and return it to Huawei local warehouse. 7.5.2 Replacing an SMU11B Prerequisites ● An ESD wrist strap, ESD gloves, and ESD box or bag are available. -
Page 87: Replacing An Smu11C
Step 7 Disconnect the ground cable of the ESD wrist strap, and remove the ESD wrist strap and ESD gloves. ----End Follow-up Procedure Pack the removed component and send it to the local Huawei warehouse. 7.5.3 Replacing an SMU11C Prerequisites ●... -
Page 88: Replacing A Circuit Breaker
Step 9 Disconnect the ground cable of the ESD wrist strap, and remove the ESD wrist strap and ESD gloves. ----End Follow-up Procedure Pack the removed component and send it to the local Huawei warehouse. 7.5.4 Replacing a Circuit Breaker Prerequisites The new circuit breaker is intact. - Page 89 ETP4860-B1A2 Embedded Power User Manual 7 Maintenance Follow-up Procedure Pack the removed component and send it to the local Huawei warehouse. Issue 04 (2021-01-05) Copyright © Huawei Technologies Co., Ltd.
- Page 90 Rated voltage 200–240 V AC Voltage range 85–300 V AC Input frequency 45–65 Hz (rated frequency: 50 Hz/60 Hz) DC input Input system HVDC (HV+, HV–) input Rated voltage 380 V DC Issue 04 (2021-01-05) Copyright © Huawei Technologies Co., Ltd.
- Page 91 15 kV (criterion R); signal port: contact discharge 2 kV (criterion R) Electrical fast transient Signal port: 1 kV; power port: 2 kV (criterion B) (EFT) Radiated susceptibility 10 V/m field strength (criterion A) (RS) Issue 04 (2021-01-05) Copyright © Huawei Technologies Co., Ltd.
- Page 92 Free cooling NO TE 1: This is a class A product and may cause radio interference in residential areas. Therefore, you may need to take adequate safety measures to prevent radio interference. Issue 04 (2021-01-05) Copyright © Huawei Technologies Co., Ltd.
- Page 93 ETP4860-B1A2 Embedded Power User Manual B Electrical Conceptual Diagram Electrical Conceptual Diagram Figure B-1 Electrical conceptual diagram Issue 04 (2021-01-05) Copyright © Huawei Technologies Co., Ltd.
- Page 94 Acronyms and Abbreviations ACDB alternating current distribution box conducted susceptibility digital input digital output electrical fast transient electromagnetic compatibility electrostatic discharge Internet Protocol MTBF mean time between failures power factor radiated susceptibility Issue 04 (2021-01-05) Copyright © Huawei Technologies Co., Ltd.
- Page 95 ETP4860-B1A2 Embedded Power User Manual C Acronyms and Abbreviations site monitoring unit total harmonic distortion Issue 04 (2021-01-05) Copyright © Huawei Technologies Co., Ltd.