Table of Contents

Related Manuals for Hitachi RC-AGU1EA0A


Summary of Contents for Hitachi RC-AGU1EA0A
- Page 1 Remote Controller Manual MODEL RC-AGU1EA0A Remote Controller manual Page 1~24 To obtain the best performance and ensure years of trouble free use, please read this instruction manual completely. EE0024394F rev.0-08/2022 - 1 -...
-
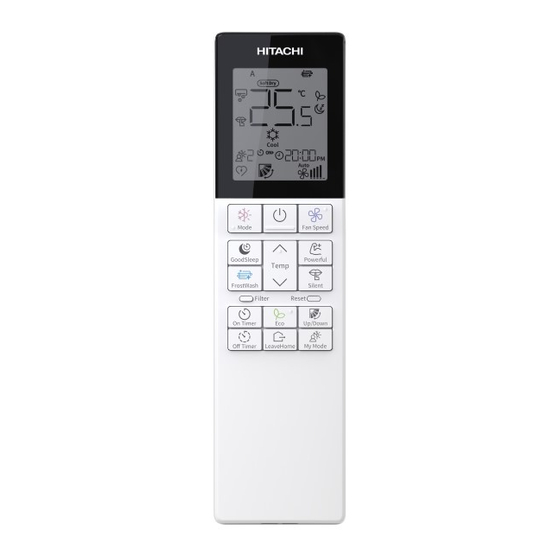
Page 2: Names And Functions Of Remote Controller
Names and Functions of Remote Controller This controls the operation function and timer setting of the room air conditioner. The range of control is about 7 meters. lf indoor lighting is controlled electronically, the range of control may be shorter. Signal Transmission Invalid Operation Sign Off Mode Sign... -
Page 3: How To Set Clock
How to Install the Batteries in the Remote Controller Push and pull to the Remove the cover as shown in the figure and take out the old batteries. dirction of arrow Batteries Install the new batteries. The direction of the batteries should match the marks in the case. CAUTION Cover 1. -
Page 4: Various Functions
Various Functions Auto Restart Control If there is a power failure, operation will be automatically restarted when the power is resumed with previous operation mode and airflow direction. (As the operation is not stopped by remote controller.) If you intend not to continue the operation when the power is resumed, switch off the power supply. When you switch on the circuit breaker, the operation will be automatically restarted with previous operation mode and airflow direction. -
Page 5: Dry Mode
Dry Mode Use the device for dehumidifying when the room temperature is over 16°C. When it is under 15°C, the dehumidifying function will not work. Press the Mode Selector Button so that the display indicates (Dry). The fan speed is set at Auto. Press (Fan Speed) button to select Silent, Low or Auto fan speed. -
Page 6: Cool Mode
Cool Mode Use the device for cooling when the outdoor temperature is -10 to 46°C. If humidity is very high (over 80%) indoors, some dew may form on the air outlet grille of the indoor unit. Press the Mode Selector Button so that the display indicates (Cool). - Page 7 The dust and dirt adhering to indoor heat exchanger which is the cause of the smell. They are washed away by freezing and thawing of the heat exchanger. FrostWash function can work when the outdoor temperature is 1℃ to 43℃ and indoor humidity is 30% to 70%. The process of FrostWash is pressed Operation is started...
- Page 8 FrostWash (Auto Mode) and Fan Reverse (Auto Mode) How to enable indoor FrostWash (Auto) and Fan Reverse (Auto) FrostWash (Auto) and Fan Reverse (Auto) enable. If FrostWash (Auto) and Fan Reverse (Auto) ● ● How to disable indoor FrostWash (Auto) and Fan Reverse (Auto) ●...
- Page 9 Fan Reverse (Auto Mode) By rotating the fan of the outdoor in the reverse direction when the unit is stopped, dust on the outdoor heat exchanger is blown away. Fan Reverse auto start conditions Unit normal operation Waiting for the outdoor Waiting for the Fan Fan Reverse (Outdoor fan normal...
- Page 10 Smart Eco operation • The sensor detects the presence of people in the room. When nobody is detected, the unit automatically starts energy saving operation by shifting the set temperature in two steps. • Smart Eco button is scrolling button , First Press of button , it will start Eco operation , on second Press of button it will start Eco with Auto-Off operation and on Third press of button , it will cancel Eco and Eco with Auto-Off function.
- Page 11 Smart Eco Logic When the presence of people is not detected for 20 minutes, the set temperature is automatically shifted for energy saving. If nobody is in the room for 60 minutes, the set temperature is shifted further. Cooling operation [diagram representation for illustrative purpose only] Setting temperature...
- Page 12 Power Safe (Max Current Switching ) • This function limit the maximum current during the operation of Air conditioner so it will help to avoid breaker trips if maximum current reaches to breaker limit. it limits the electrical current during operation.
- Page 13 Auto Clean Operation After the cooling operation is stopped, the fan of the indoor unit is dried by fan mode to suppress the generation of mold inside the indoor unit. - Auto Clean Operation period is about 60 minutes. - It can't remove mold or sterilize.
- Page 14 SleepSense Operation • With motion sensor, the room air conditioner detects movements, its location and temperature around people to control set temperature and control fan speed to provide comfortable and energy saving operation as well as to achieve comfortable sleep environment. To Start SleepSense operation ●...
- Page 15 SleepSense Operation LOGIC ( SleepSense) ● At First the Unit will operate at Cooling mode for 20 minutes at setting condition. ● With the motion sensor, the room air conditioner can monitor human movement. If no human movement is detected, then the temperature will increase ( in case of cooling operation ) automatically and unit continues running for 1 hour.
-
Page 16: Silent Mode
Silent Mode (Silent) button during Dry, Cool or Fan operation, the fan speed changes (Silent) (On/Off) (Silent) (Fan Speed) Silent Silent Powerful Silent Silent Silent Silent (Silent) By Pressing Mode button or My Mode button , Silent operation is cancelled. - 16 -... - Page 17 User can use the device simply as an air circulator. Press the M selector button so that the display indicates Press the button. Fan Speed (High) (Super High) START Press the button. Fan operation starts with a beep. STOP Press the button again to stop operation. Adjusting the Airflow Direction(upward and downward) Adjust the airflow upward and downward.
- Page 18 Adjust the Airflow Direction(leftward and rightward) Adjusting the airflow leftward and rightward parallelly. Adjustment of airflow in Left and Right direction. Press the Left/Right button . The deflector(s) will start to swing Left and Right side parallely. is display on LCD screen. Press the Left/Right button again.
-
Page 19: Timer Reservation
Timer Reservation 1. Off Timer Setting The device can be set to turn off at a preset time. Press ( Timer OFF) Button to select OFF timer. Symbol start blinking and 12:00 or Previously set time will be display on LCD screen. Set up desire Turn off time by pressing Temperature Up /Down button After setting , point the remote controller towards the indoor unit... - Page 20 Initialization of the Built-in airCloud Home Module You can reset the internal settings (restore the factory settings) by remote controller. How to restore factory setting Please make this setting with the remote control in off mode. Press button (Mode) and button (On Timer) 3 seconds ...
- Page 21 My Mode(Programming) Use this mode for personalized comfortable settings. The My Mode can be set by using the remote controller. Up to 3 programs can be set. Programming of My Mode Default Setting of My Mode My Mode Mode Temperature Fan Speed ON Timer / Silent OFF Timer...
- Page 22 My Mode(Programming) Programming of My Mode On Timer Setting Press ( Timer ON) Button to select ON timer. Symbol start blinknig on LCD screen. ON Timer time will be display on clock time segment on LCD. Press button to set desire ON timer. Press button .
- Page 23 My Mode(Start or Stop of My Mode Operation) Start of My Mode Operation Start of My Mode Operation Press (My Mode) button at room air conditioner operation. Room air conditioner starts with My Mode 1 registered to remote controller. Press (My Mode) button again in order to change to the operation of My mode 2, My mode 3.
- Page 24 How to Reset Filter Sign on the indoor unit Filter Sign on the indoor unit will show with “ ” lamp by blinking with 1 second on and 4 seconds off. Because cleaning of Air filter has not been done for a long time. Clean the Air filter.