Silvercrest 90249 Operating Instructions Manual
Electric all-purpose sharpener
Hide thumbs
Also See for 90249:
- Operating instructions manual (34 pages) ,
- Operating instructions manual (54 pages)
Table of Contents
Advertisement
Available languages
Available languages
Quick Links
Advertisement
Chapters
Table of Contents

Related Manuals for Silvercrest 90249


Summary of Contents for Silvercrest 90249
- Page 1 ELEKTRISCHER ALLESSCHÄRFER SEAS 20 A1 ELEKTRISCHER ALLESSCHÄRFER AIGUISEUR ÉLECTRIQUE Bedienungsanleitung Mode d’emploi ELEKTRISCHE ALLESSLIJPER AFFI LACOLTELLI ELETTRICO Gebruiksaanwijzing Istruzioni per l’uso ELECTRIC ALL-PURPOSE SHARPENER Operating instructions IAN 90249...
- Page 2 Klappen Sie vor dem Lesen die Seite mit den Abbildungen aus und machen Sie sich anschließend mit allen Funktionen des Gerätes vertraut. Avant de lire le mode d‘emploi, ouvrez la page contenant les illustrations et familiarisez-vous ensuite avec toutes les fonctions de l‘appareil. Prima di leggere aprire la pagina con le immagini e prendere confi...
-
Page 4: Table Of Contents
I I N N H H A A L L T T S S V V E E R R Z Z E E I I C C H H N N I I S S S S E E I I T T E E Einleitung Verwendungszweck Lieferumfang... -
Page 5: Einleitung
Einleitung Herzlichen Glückwunsch zum Kauf Ihres neuen Gerätes. Sie haben sich damit für ein hochwertiges Produkt entschieden. Die Bedie- nungsanleitung ist Bestandteil dieses Produkts. Sie enthält wichtige Hinweise für Sicherheit, Gebrauch und Entsorgung. Machen Sie sich vor der Benut- zung des Produkts mit allen Bedien- und Sicherheitshinweisen vertraut. Benut- zen Sie das Produkt nur wie beschrieben und für die angegebenen Einsatz- bereiche. -
Page 6: Gerätebeschreibung
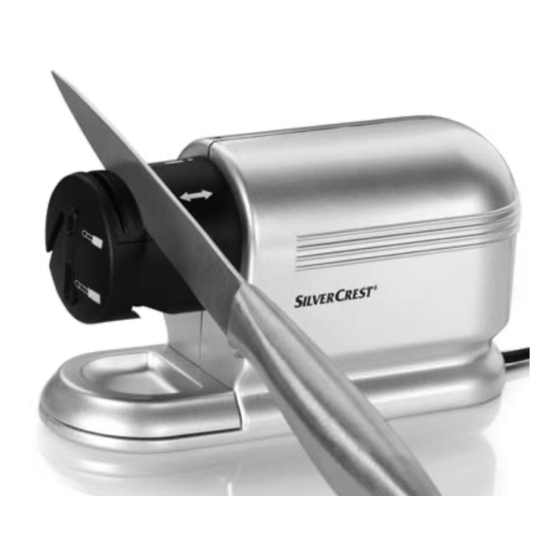
Die KB-Zeit (Kurzzeitbetrieb) gibt an, wie lange man ein Gerät betreiben kann, ohne dass der Motor überhitzt und Schaden nimmt. Nach der angege- benen KB-Zeit muss das Gerät solange ausgeschaltet werden, bis sich der Motor auf Raumtemperatur abgekühlt hat (ca. 30 Minuten). Gerätebeschreibung Funktion “Messer mit glattem Schliff”... -
Page 7: Auspacken
• Ziehen Sie nach Gebrauch oder bei Abwesenheit immer den Netzstecker aus der Steckdose. Es liegt Netzspannung im Produkt an, solange der Netzstecker in der Steckdose steckt. • Sorgen Sie dafür, dass der Stecker jederzeit erreichbar ist, um ihn bei Gefahr schnell aus der Steckdose ziehen zu können. -
Page 8: Aufstellen
• Heben Sie die Verpackung auf, um das Gerät darin bei Nichtgebrauch aufbewahren oder bei Reparaturen zurücksenden zu können. • Reinigen Sie alle Teile vor dem ersten Gebrauch, wie im Kapitel “Reinigung und Pflege” beschrieben. Aufstellen • Stellen Sie das Gerät auf eine stabile rutschfeste Unterlage. •... - Page 9 • Entfernen Sie nach dem Schleifen eventuelle Schleifstaubrückstände auf den Klingen mit einen feuchten Tuch. Messer mit glattem Schliff Wenn Sie die Stellung “Messer mit glattem Schliff” gewählt haben (Abb.B): • Schärfen Sie Messer mit glattem Schliff stets beidseitig – hierfür stehen eine linke und eine rechte Schleifführung zur Verfügung.
-
Page 10: Reinigung Und Pflege
Schleifen direkt am Schleifstein Bestimmte Schneiden kann man evtl. besser ohne Funktions- und Schutzkappe direkt am Schleifstein schleifen. Hierzu ist die Funktions- und Schutzkap- abnehmbar (Abb.F): • Drehen Sie die Funktions- und Schutzkappe , bis der Pfeil oben steht. Nun können Sie die Funktions- und Schutzkappe abnehmen. -
Page 11: Wartung
• Um die Funktions- und Schutzkappe wieder aufzusetzen, halten Sie diese so, dass der Pfeil wieder oben steht. Nun können Sie die Funktions- und Schutzkappe aufschieben und durch Drehen nach links oder rechts verriegeln. Schieben Sie zum Schluss auch die Staubmulde wieder in das Gerät. -
Page 12: Importeur
Importeur KOMPERNASS GMBH BURGSTRASSE 21 44867 BOCHUM, DEUTSCHLAND www.kompernass.com Garantie und Service Sie erhalten auf dieses Gerät 3 Jahre Garantie ab Kaufdatum. Das Gerät wurde sorgfältig produziert und vor Anlieferung gewissenhaft geprüft. Bitte bewahren Sie den Kassenbon als Nachweis für den Kauf auf. Bitte set- zen Sie sich im Garantiefall mit Ihrer Servicestelle telefonisch in Verbindung. - Page 13 Service Deutschland Tel.: 01805 772 033 (0,14 EUR/Min. aus dem dt. Festnetz, Mobilfunk max. 0,42 EUR/Min.) E-Mail: kompernass@lidl.de IAN 90249 Service Österreich Tel.: 0820 201 222 (0,15 EUR/Min.) E-Mail: kompernass@lidl.at IAN 90249 Service Schweiz Tel.: 0842 665566 (0,08 CHF/Min., Mobilfunk max. 0,40 CHF/Min.) E-Mail: kompernass@lidl.ch...
- Page 14 SOMMAIRE PAGE Introduction Destination de l'appareil Accessoires fournis Caractéristiques techniques Description de l'appareil Instructions relatives à la sécurité Déballage Installation Réglage Affûtage Nettoyage et entretien Entretien Mise au rebut Importateur Garantie et service après-vente - 11 -...
-
Page 15: Introduction
Introduction Toutes nos félicitations pour l'achat de votre nouvel appareil. Vous avez choisi un produit de grande qualité. Le mode d'emploi fait partie de ce produit. Il contient des remarques importantes concernant la sécurité, l'utilisation et la mise au rebut. Veuillez vous familiariser avec l'ensemble des consignes d'opération et de sécurité... -
Page 16: Description De L'appareil
Le temps d'opération par intermittence indique pendant combien de temps l'appareil peut être opéré, sans que le moteur ne surchauffe ou subisse de dommages. Après le temps d'opération par intermittence indiqué, l'appareil doit rester éteint jusqu'à ce que le moteur se soit refroidi à température am- biante (env. -
Page 17: Déballage
• Après usage ou en cas d'absence, retirez toujours la fiche secteur de la prise secteur. Il y a présence de tension électrique tant que la fiche secteur reste branchée dans la prise secteur. • Assurez-vous que la fiche secteur reste accessible en permanence afin de permettre le débranchement rapide de l'appareil en cas de danger. -
Page 18: Installation
• Conservez l'emballage pour pouvoir y ranger l'appareil lorsque vous ne l'utilisez pas ou pour le retourner en cas de réparations. • Nettoyez toutes les pièces avant le premier usage, conformément à la description dans le chapitre "Nettoyage et entretien". Installation •... - Page 19 • Après la fin de l'opération d'affûtage, retirez d'éventuels restes de poussières d'affûtage se trouvant sur la lame à l'aide d'un chiffon humide. Lame lisse Si vous avez choisi la position "Lame lisse" (Fig. B) : • Affûtez les lames lisses toujours des deux côtés – une rainure d'affûtage gauche et droite sont disponibles à...
-
Page 20: Nettoyage Et Entretien
Affûter directement sur la pierre à affûter Certains tranchants peuvent évtl. être mieux affûtés sans capuchon fonctionnel et de protection directement au niveau de la pierre à affûter : pour ce faire, le capuchon fonctionnel et de protection peut être retiré (Fig. F) : •... -
Page 21: Entretien
• Pour replacer le capuchon fonctionnel et de protection tenez-le de telle manière que la flèche se trouve à nouveau en haut. Vous pouvez à présent replacer le capuchon fonctionnel et de protection et le verrouiller en tournant vers la gauche ou vers la droite. Pour finir, replacez également le recueille poussière dans l'appareil. -
Page 22: Importateur
Importateur KOMPERNASS GMBH BURGSTRASSE 21 44867 BOCHUM, GERMANY www.kompernass.com Garantie et service après-vente Cet appareil bénéficie de 3 ans de garantie à compter de la date d'achat. L'appareil a été fabriqué avec soin et consciencieusement contrôlé avant sa distribution. Veuillez conserver le ticket de caisse en guise de preuve d'achat. Si la garantie devait s'appliquer, contactez par téléphone votre interlocuteur du service après-vente. - Page 23 Service France Tel.: 0800 919270 E-Mail: kompernass@lidl.fr IAN 90249 Service Suisse Tel.: 0842 665566 (0,08 CHF/Min., mobile max. 0,40 CHF/Min.) E-Mail: kompernass@lidl.ch IAN 90249 - 20 -...
- Page 24 INDICE PAGINA Introduzione Destinazione d'uso Fornitura Dati tecnici Descrizione dell'apparecchio Avvertenze di sicurezza Disimballaggio Montaggio Impostazione Molatura Pulizia e cura Manutenzione Smaltimento Importatore Garanzia e assistenza - 21 -...
-
Page 25: Introduzione
Introduzione Congratulazioni per l'acquisto del nuovo apparecchio. Lei ha scelto un prodotto di alta qualità. Il manuale di istruzioni è parte inte- grante del presente prodotto. Esso contiene importanti indicazioni per la sicu- rezza, l'uso e lo smaltimento. Prima di utilizzare il prodotto, si familiarizzi con tutte le indicazioni relative ai comandi e alla sicurezza.Utilizzi il prodotto solo come descritto e per i campi di impiego indicati. -
Page 26: Descrizione Dell'apparecchio
Il tempo di funzionamento continuato indica il tempo di funzionamento del- l'apparecchio senza pericolo di surriscaldamento e di guasti al motore. Trascorso questo periodo di tempo, spegnere l'apparecchio fino al raffredda- mento del motore a temperatura ambiente (per circa 30 minuti). Descrizione dell'apparecchio Funzione “Coltello con lama piatta”... -
Page 27: Disimballaggio
• Dopo l'uso o in caso di assenza, staccare sempre la spina dalla presa di rete. La tensione di rete è presente nel prodotto fino a quando la spina è collegata alla presa di rete. • Fare in modo che la spina sia sempre raggiungibile per consentirne la rapida estrazione dalla presa in caso di pericolo. -
Page 28: Montaggio
• Conservare l'imballaggio, per potervi riporre l'apparecchio in caso di non utilizzo o restituirlo in caso di necessità di riparazioni. • Pulire tutti gli elementi prima del primo impiego, così come descritto al capitolo “Pulizia e cura”. Montaggio • Collocare l'apparecchio su una base stabile e antisdrucciolevole. •... - Page 29 • Dopo la molatura, rimuovere eventuali resti di lavorazione dalla lama con un panno umido. Coltello con lama piatta Se è stata selezionata la posizione “Coltello con lama piatta” (ill. B): • Affilare il coltello con lama piatta sempre da entrambi i lati; a tale scopo sono a disposizione una guida a destra e una a sinistra.
-
Page 30: Pulizia E Cura
Molare direttamente sulla mola Determinate punte possono essere affilate meglio senza cappuccio di funzio- ne e di protezione , direttamente sulla mola : a tale scopo è possibile rimuo- vere il cappuccio di funzione e di protezione (ill. F): • Ruotare il cappuccio di funzione , fino a rivolgere la freccia verso l'alto. -
Page 31: Manutenzione
• Per ricollocare il cappuccio di funzione e di protezione , orientarlo in modo che la freccia sia nuovamente rivolta verso l'alto. Ora è pos- sibile inserire il cappuccio di funzione e di protezione e bloccarlo, ruotandolo verso sinistra o destra. Per finire, spingere nuovamente la va- schetta per la polvere nell'apparecchio. -
Page 32: Importatore
Importatore KOMPERNASS GMBH BURGSTRASSE 21 44867 BOCHUM, GERMANY www.kompernass.com Garanzia e assistenza Questo apparecchio è garantito per 3 anni a partire dalla data di acquisto. L'apparecchio è stato prodotto con cura e debitamente collaudato prima del- la consegna. Conservare lo scontrino come prova d'acquisto. In caso di inter- venti in garanzia, contattare telefonicamente il proprio centro di assistenza. - Page 33 Assistenza Italia Tel.: 02 36003201 E-Mail: kompernass@lidl.it IAN 90249 Assistenza Svizzera Tel.: 0842 665566 (0,08 CHF/Min., telefonia mobile max. 0,40 CHF/Min.) E-Mail: kompernass@lidl.ch IAN 90249 - 30 -...
- Page 34 INHOUDSOPGAVE PAGINA Inleiding Gebruiksdoel Inhoud van het pakket Technische gegevens Apparaatbeschrijving Veiligheidsvoorschriften Uitpakken Plaatsen Instellen Slijpen Reiniging en onderhoud Onderhoud Milieurichtlijnen Importeur Garantie en service - 31 -...
-
Page 35: Inleiding
Inleiding Gefeliciteerd met de aankoop van uw nieuwe apparaat. U hebt hiermee gekozen voor een hoogwaardig product. De bedienings- handleiding maakt deel uit van dit product. Deze bevat belangrijke aanwij- zingen voor veiligheid, gebruik en afvoeren. Maak uzelf voorafgaand aan het gebruik van het product vertrouwd met alle bedienings- en veiligheidsvo- orschriften. -
Page 36: Apparaatbeschrijving
De KB-tijd (kort bedrijf) geeft aan hoe lang een apparaat kan worden be- diend, zonder dat de motor oververhit raakt en schade hieraan ontstaat. Na de aangegeven KB-tijd moet het apparaat zo lang uitgeschakeld worden, totdat de motor op kamertemperatuur is afgekoeld (ca. 30 minuten). Apparaatbeschrijving Functie “Messen met glad lemmet”... -
Page 37: Uitpakken
• Na gebruik en in geval van afwezigheid altijd de stekker uit het stop- contact halen. Er staat netspanning op het product zo lang de stekker in het stopcontact steekt. • Zorg ervoor dat de stekker te allen tijde bereikbaar is, om deze bij gevaar snel uit het stopcontact te kunnen halen. -
Page 38: Plaatsen
• Bewaar de verpakking om het apparaat erin te bewaren als het niet wordt gebruikt en om het in geval van reparatie retour te kunnen sturen. • Vóór het eerste gebruik alle delen reinigen zoals beschreven in het hoofd- stuk “Reiniging en onderhoud”. Plaatsen •... - Page 39 • Na het slijpen eventuele stofresten van het slijpen op de messen met een vochtige doek verwijderen. Messen met glad lemmet Als u de stand “Messen met glad lemmet” heeft gekozen (afb. B): • Slijp de messen met een glad lemmet altijd aan beide kanten – hiervoor staat een linker en een rechter slijpopening ter beschikking.
-
Page 40: Reiniging En Onderhoud
Direct aan de slijpsteen slijpen Bepaalde lemmeten kan men eventueel beter zonder functie- en bescher- mingskap direct op de slijpsteen slijpen: Hiertoe kan functie- en be- schermingskap afgenomen worden (afb. F): • Draai de functie- en beschermingskap totdat de pijl boven staat. -
Page 41: Onderhoud
• Om de functie- en beschermingskap er weer op te zetten, houdt u deze zo, dat de pijl weer boven staat. Nu kunt u de functie- en be- schermingskap erop schuiven en vergrendelen door naar links of rechts te draaien. Schuif de stofbak tot slot ook weer in het apparaat. -
Page 42: Importeur
Importeur KOMPERNASS GMBH BURGSTRASSE 21 44867 BOCHUM, GERMANY www.kompernass.com Garantie en service U heeft op dit apparaat 3 jaar garantie vanaf de aankoopdatum. Het appa- raat is met de grootst mogelijke zorg vervaardigd en voorafgaand aan de levering nauwkeurig gecontroleerd. Bewaar a.u.b. - Page 43 Service Nederland Tel.: 0900 0400223 (0,10 EUR/Min.) E-Mail: kompernass@lidl.nl IAN 90249 - 40 -...
- Page 44 INDEX PAGE Introduction Intended use Items supplied Technical data Appliance description Safety instructions Unpacking Placement Adjustment Sharpening Cleaning and Care Maintenance Disposal Importer Warranty and Service - 41 -...
-
Page 45: Introduction
Introduction Congratulations on the purchase of your new appliance. You have clearly decided in favour of a quality product. These operating in- structions are a part of this product. They contain important information in re- gard to safety, use and disposal. Before using the product, familiarise yourself with all of these operating and safety instructions. -
Page 46: Appliance Description
The C.O. Time (Continuous Operation) details how long an appliance may be used without the motor overheating and being damaged. When the specified C.O. Time has been reached, the appliance must be switched off until the motor has cooled itself down to room temperature (approx. 30 minutes). Appliance description Function “Knife with smooth edge”... -
Page 47: Unpacking
• After use or during extended absences, ALWAYS remove the plug from the power socket. For as long as the plug is inserted in the wall socket the appliance itself is under electrical power. • Ensure that the power plug is at all times easily accessible, so that it can be quickly and easily removed in the event of potential danger or risk. -
Page 48: Placement
• Retain the packaging, either for storing the appliance or for reuse in the event of posting it to Customer Services for repair. • Before the first usage thoroughly clean all component parts as described in the section "Cleaning and care". Placement •... - Page 49 • After sharpening, remove any possible grinding remnants that may be on the blade with a moist cloth. Knife with smooth edge If you have selected the setting "Knife with smooth edge" (Fig. B): • Always sharpen knives with a smooth edge on both sides – for this, left and right side sharpening guides are available.
-
Page 50: Cleaning And Care
Grinding directly on the grindstone Certain edges can possibly be more easily sharpened directly on the grind- stone , without the function and protective cap : For these cases, the function and protective cap is removable (Fig. F): • Turn the function and protective cap until the arrow is at the top. -
Page 51: Maintenance
• To replace the function and protective cap , hold it so that the arrow is once again at the top. You can now push the function and protective cap cap on and secure it by turning it to the left or right. To conclude, reassem- ble the abrade collector into the appliance. -
Page 52: Importer
Repairs made after the expira- tion of the warranty period are subject to payment. Service Great Britain Tel.: 0871 5000 720 (£ 0.10/Min.) E-Mail: kompernass@lidl.co.uk IAN 90249 - 49 -... - Page 53 KOMPERNASS GMBH BURGSTRASSE 21 44867 BOCHUM DEUTSCHLAND / GERMANY www.kompernass.com Stand der Informationen · Version des informations Versione delle informazioni · Stand van de informatie Last Information Update: 02 / 2013 · Ident.-No.: SEAS20A1022013-1 IAN 90249...