Table of Contents
Advertisement
Quick Links
Download this manual
See also:
Cli Reference Manual
Advertisement
Chapters
Table of Contents
Troubleshooting

Related Manuals for D-Link NetDefend DFL-CP310


Summary of Contents for D-Link NetDefend DFL-CP310
- Page 1 D-Link NetDefend firewall Security VPN Firewall NetDefend secured by Check Point User Guide Version 1.0 Revised: 01/17/2006...
- Page 2 We protect your rights with two steps: (1) copyright the software, and COPYRIGHT & TRADEMARKS (2) offer you this license which gives you legal permission to copy, Copyright © 2005 SofaWare, All Rights Reserved. No part of this distribute and/or modify the software. document may be reproduced in any form or by any means without Also, for each author's protection and ours, we want to make certain written permission from SofaWare.
- Page 3 running for such interactive use in the most ordinary way, If distribution of executable or object code is made by offering access to print or display an announcement including an to copy from a designated place, then offering equivalent access to appropriate copyright notice and a notice that there is no copy the source code from the same place counts as distribution of the warranty (or else, saying that you provide a warranty) and...
- Page 4 countries not thus excluded. In such case, this License incorporates the When installing the appliance, ensure that the vents are not limitation as if written in the body of this License. blocked. 9. The Free Software Foundation may publish revised and/or new Do not place this product on an unstable surface or support.
-
Page 5: Table Of Contents
Contents Contents About This Guide ..........................xi Introduction............................1 About Your D-Link NetDefend firewall .....................1 NetDefend Secured by Check Point Product Family ................2 NetDefend Features and Compatibility....................2 Connectivity............................2 Firewall ............................3 VPN ..............................4 Management............................4 Optional Security Services......................5 Power Pack Features ........................5 Package Contents ..........................6 Network Requirements ........................7... - Page 6 Using a PPTP or PPPoE Dialer Connection..................59 Using PPPoE..........................60 Using PPTP...........................61 Using Internet Setup..........................63 Using a LAN Connection......................65 Using a Cable Modem Connection ....................67 Using a PPPoE Connection......................69 Using a PPTP Connection......................71 Using a Telstra (BPA) Connection ....................73 D-Link NetDefend firewall User Guide...
- Page 7 Contents Using a Dialup Connection ......................75 Using No Connection........................77 Setting Up a Dialup Modem ......................84 Viewing Internet Connection Information ..................87 Enabling/Disabling the Internet Connection ..................88 Using Quick Internet Connection/Disconnection................90 Configuring a Backup Internet Connection..................90 Setting Up a LAN or Broadband Backup Connection ..............91 Setting Up a Dialup Backup Connection ..................92 Managing Your Network........................93 Configuring Network Settings ......................93...
- Page 8 No Security ..........................181 Preparing the Wireless Stations.......................182 Troubleshooting Wireless Connectivity..................183 Viewing Reports ..........................187 Viewing the Event Log ........................187 Using the Traffic Monitor .......................191 Viewing Traffic Reports ......................191 Configuring Traffic Monitor Settings ..................193 Exporting General Traffic Reports....................194 D-Link NetDefend firewall User Guide...
- Page 9 Contents Viewing Computers ........................194 Viewing Connections ........................197 Viewing Wireless Statistics......................198 Setting Your Security Policy ......................203 Default Security Policy ........................203 Setting the Firewall Security Level....................204 Configuring Servers ........................207 Using Rules .............................209 Adding and Editing Rules ......................213 Enabling/Disabling Rules ......................218 Changing Rules' Priority ......................219 Deleting Rules..........................219 Using SmartDefense ........................220 Configuring SmartDefense......................221...
- Page 10 Configuring the Remote Access VPN Server ................305 Configuring the Internal VPN Server..................306 Installing SecuRemote ........................307 Adding and Editing VPN Sites .......................308 Configuring a Remote Access VPN Site..................311 Configuring a Site-to-Site VPN Gateway ...................324 Deleting a VPN Site ........................340 D-Link NetDefend firewall User Guide...
- Page 11 Contents Enabling/Disabling a VPN Site.......................340 Logging on to a Remote Access VPN Site..................341 Logging on through the NetDefend Portal..................342 Logging on through the my.vpn page ..................343 Logging off a Remote Access VPN Site ..................345 Installing a Certificate ........................345 Generating a Self-Signed Certificate...................346 Importing a Certificate ........................350 Uninstalling a Certificate ........................352 Viewing VPN Tunnels ........................353...
- Page 12 Configuring Computers to Use Network Printers ................425 Windows 2000/XP ........................425 MAC OS-X ..........................431 Viewing Network Printers.......................435 Changing Network Printer Ports .....................435 Resetting Network Printers ......................436 Troubleshooting ..........................437 Connectivity ............................438 Service Center and Upgrades ......................442 viii D-Link NetDefend firewall User Guide...
- Page 13 Contents Other Problems ..........................443 Specifications .............................445 Technical Specifications .........................445 CE Declaration of Conformity ......................449 Federal Communications Commission Radio Frequency Interference Statement ......451 Glossary of Terms ..........................453 Index..............................461 Contents...
-
Page 15: About This Guide
If this icon appears... You can perform the task using these products... DFL-CP310 or DFL-CPG310, with or without the Power Pack DFL-CPG310 only, with or without the Power Pack DFL-CP310 or DFL-CPG310, with the Power Pack only... -
Page 17: Introduction
Contacting Technical Support ..............14 About Your D-Link NetDefend firewall The D-Link NetDefend firewall is a unified threat management (UTM) appliance that enables secure high-speed Internet access from the office. Incorporating software by SofaWare Technologies, an affiliate of Check Point Software Technologies, the worldwide leader in securing the Internet, the NetDefend Secured by Check Point Product Family includes both wired and wireless models. -
Page 18: Netdefend Secured By Check Point Product Family
• DFL-CPG310 Wireless Security VPN Firewall You can upgrade your NetDefend firewall to include additional features without replacing the hardware by installing the DFL-CP310 Power Pack, and you can increase the number of licensed users by installing node upgrades. Contact your reseller for more details. -
Page 19: Firewall
NetDefend Features and Compatibility • Static NAT • Static routes and source routes • Ethernet cable type recognition • Backup Internet connection • Dead Internet Connection Detection (DCD) • Traffic Monitoring • Traffic Shaping • VLAN Support (requires Power Pack) •... -
Page 20: Vpn
• Management via HTTP, HTTPS, SSH, SNMP, Serial CLI • Central Management: SMP • NTP automatic time setting • TFTP Rapid Deployment • Local diagnostics tools: Ping, WHOIS, Packet Sniffer, VPN Tunnel Monitor, Connection Table Monitor, Wireless Monitor, Active Computers Display, Local Logs D-Link NetDefend firewall User Guide... -
Page 21: Optional Security Services
• VStream Embedded Antivirus Updates • VPN Management • Security Reporting • Vulnerability Scanning Service Power Pack Features The table below describes the differences between the standard DFL-CP310 and DFL-CPG310 with the Power Pack installed. DFL-CP310/CPG310 with Feature DFL-CP310/CPG310 Power Pack High Availability —... -
Page 22: Package Contents
Licenses * When managed by SofaWare Security Management Portal (SMP). Package Contents The NetDefend series package includes the following: • D-Link NetDefend firewall VPN Firewall • Power adapter • CAT5 Straight-through Ethernet cable • Getting Started Guide • This User Guide... -
Page 23: Network Requirements
NetDefend Features and Compatibility The DFL-CPG310 also includes: • Two antennas • Wall mounting kit, including two plastic conical anchors and two cross- head screws • USB extension cable Network Requirements • A broadband Internet connection via cable or DSL modem with Ethernet interface (RJ-45) •... -
Page 24: Getting To Know Your Netdefend Firewall
The following table lists the NetDefend firewall 's rear panel elements. Table 1: NetDefend firewall Rear Panel Elements Label Description A power jack used for supplying power to the unit. Connect the supplied power adapter to this jack. D-Link NetDefend firewall User Guide... - Page 25 Getting to Know Your NetDefend firewall Label Description RESET A button used for rebooting the NetDefend firewall or resetting the NetDefend firewall to its factory defaults. You need to use a pointed object to press this button. • Short press. Reboots the NetDefend firewall •...
-
Page 26: Front Panel
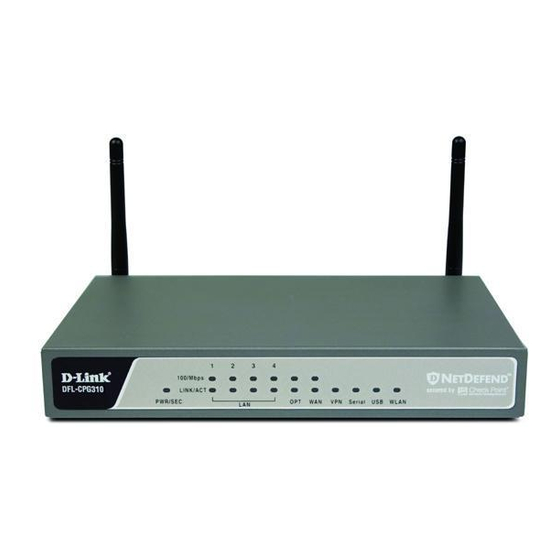
On (Green) Normal operation Flashing (Red) Hacker attack blocked On (Red) Error LINK/ACT Off, 100 Off LAN 1-4/ Link is down WAN/ DMZ/WAN2 LINK/ACT On, 100 Off 10 Mbps link established for the corresponding port D-Link NetDefend firewall User Guide... -
Page 27: Getting To Know Your Netdefend Firewall
Getting to Know Your NetDefend firewall State Explanation LINK/ACT On, 100 On 100 Mbps link established for the corresponding port LNK/ACT Flashing Data is being transmitted/received Flashing (Green) VPN port in use Serial Flashing (Green) Serial port in use Getting to Know Your NetDefend firewall ear Panel All physical connections (network and power) to the NetDefend firewall are made... - Page 28 Alternatively, can serve as a secondary WAN port , or as a VLAN trunk. LAN 1-4 Local Area Network switch: Four Ethernet ports (RJ-45) used for connecting computers or other network devices ANT 1/ Antenna connectors, used to connect the supplied wireless antennas ANT 2 D-Link NetDefend firewall User Guide...
-
Page 29: Front Panel
Getting to Know Your NetDefend firewall Front Panel The NetDefend firewall appliance includes several status LEDs that enable you to monitor the appliance’s operation. Figure 5: NetDefend firewall Front Panel For an explanation of the NetDefend firewall appliance’s status LEDs, see the table below. -
Page 30: Contacting Technical Support
USB port in use WLAN Flashing (Green) WLAN in use Contacting Technical Support If there is a problem with your NetDefend firewall, see http://support.dlink.com/. You can also download the latest version of this guide from the site. D-Link NetDefend firewall User Guide... -
Page 31: Installing And Setting Up The Netdefend Firewall
Before You Install the NetDefend firewall Chapter 2 Installing and Setting up the NetDefend firewall This chapter describes how to properly set up and install your NetDefend firewall in your networking environment. This chapter includes the following topics: Before You Install the NetDefend firewall..........15 Wall Mounting the Appliance ..............30 Securing the Appliance against Theft............32 Network Installation ...................35... -
Page 32: Windows 2000/Xp
NetDefend firewall, since the NetDefend firewall offers better protection. Checking the TCP/IP Installation 1. Click Start > Settings > Control Panel. The Control Panel window appears. 2. Double-click the Network and Dial-up Connections icon. D-Link NetDefend firewall User Guide... - Page 33 Before You Install the NetDefend firewall The Network and Dial-up Connections window appears. icon and select Properties from the pop-up menu that 3. Right-click the opens. Chapter 2: Installing and Setting up the NetDefend firewall...
- Page 34 Ethernet card, installed on your computer. If TCP/IP does not appear in the Components list, y ou must install it as described in the next section. D-Link NetDefend firewall User Guide...
- Page 35 Before You Install the NetDefend firewall Installing TCP/IP Protocol 1. In the Local Area Connection Properties window click Install…. The Select Network Component Type window appears. 2. Choose Protocol and click Add. The Select Network Protocol window appears. 3. Choose Internet Protocol (TCP/IP) and click OK. TCP/IP protocol is installed on your computer.
- Page 36 (Note that 192.168.10 is the default value, and it may vary if you changed it in the My Network page.) 3. Click the Obtain DNS server address automatically radio button. 4. Click OK to save the new settings. Your computer is now ready to access your NetDefend firewall. D-Link NetDefend firewall User Guide...
-
Page 37: Windows 98/Millennium
Before You Install the NetDefend firewall dows 98/Millennium Checking the TCP/IP Installation 1. Click Start > Settings > Control Panel. The Control Panel window appears. 2. Double-click the icon. Chapter 2: Installing and Setting up the NetDefend firewall... - Page 38 Ethernet card, installed on your computer. Installing TCP/IP Protocol Note: If TCP/IP is already installed and configured on your co mputer skip this section and mo ve directly to TCP/IP Settings. 1. In the Network window, click Add. D-Link NetDefend firewall User Guide...
- Page 39 Before You Install the NetDefend firewall The Select Network Component Type window appears. 2. Choose Protocol and click Add. The Select Network Protocol window appears. Manufacturers list choose Microsoft, and in the Network Protocols list 3. In choose TCP/IP. 4. Click OK. If Windows asks for original Windows installation files, provide the installation CD and relevant path when required (e.g.
- Page 40 1. In the Network window, double-click the TCP/IP service for the Ethernet card, which has been installed on your computer (e.g. The TCP/IP Properties window opens. 2. Click the Gateway tab, and remove any installed gateways. D-Link NetDefend firewall User Guide...
- Page 41 Before You Install the NetDefend firewall 3. Click the DNS Configuration tab, and click the Disable DNS radio button. Chapter 2: Installing and Setting up the NetDefend firewall...
-
Page 42: Mac Os
“Do you want to restart your computer?”. Your computer restarts, and the new settings to take effect. Your computer is now ready to access your NetDefend firewall. ac OS Use the following pro cedure for setting up the TCP/IP Protocol. D-Link NetDefend firewall User Guide... - Page 43 Before You Install the NetDefend firewall 1. Choose Apple Menus -> Control Panels -> TCP/IP. The TCP/IP window appears. 2. Click the Connect via drop-down list, and select Ethernet. 3. Click the Configure drop-down list, and select Using DHCP Server. 4.
-
Page 44: Mac Os-X
Before You Install the NetDefend firewall Mac OS-X Use the following procedure for setting up the TCP/IP Protocol. 1. Choose Apple -> System Preferences. The System Preferences window appears. 2. Click Network. The Network window appears. D-Link NetDefend firewall User Guide... - Page 45 Before You Install the NetDefend firewall 3. Click Configure. Chapter 2: Installing and Setting up the NetDefend firewall...
-
Page 46: Wall Mounting The Appliance
To mount the NetDefend firewall on the wall 1. Decide where you want to mount your NetDefend firewall. 2. Decide on the mounting orientation. You can mount the appliance on the wall facing up, down, left, or right. D-Link NetDefend firewall User Guide... - Page 47 Wall Mounting the Appliance Note: Mounting the appliance facing downwards is not recommended, as dust might accumulate in unused ports. 3. M ark two drill holes on the wall, in accordance with the following sk etch: 4. Drill two 3.5 mm diameter holes, approximately 25 mm deep. 5.
-
Page 48: Securing The Appliance Against Theft
This procedure explains how to install a looped security cable on your appliance. A looped security cable typically includes the parts shown in the diagram below. Figure 6: Looped Security Cable D-Link NetDefend firewall User Guide... - Page 49 Securing the Appliance against Theft While these parts may differ between devices, all looped security cables include a bolt with knobs, as shown in the diagram below: Figure 7: Looped Security Cable Bolt The bolt has two states, Open and Closed, and is used to connect the looped security cable to the appliance's security slot.
- Page 50 Closed position until the bolt holes are aligned. 5. Thread the anti-theft device's pin through the bolt’s holes, and insert the pin into the main body of the anti-theft device, as described in the documentation that came with your device. D-Link NetDefend firewall User Guide...
-
Page 51: Network Installation
Network Installation Network Installation 1. Verify that you have the correct cable type. For information, see Network Requirements. 2. Connect the LAN cable: • Connect one en d of the Ethernet cable to one of the LAN ports at the back of the unit. -
Page 52: Setting Up The Netdefend Firewall
Internet connection. After you have configured your Internet connection, the Setup Wizard automatically displays the dialog boxes for regist ering your NetDefend firewall. If desired, you can exit the Setup Wizard an perfo rm each of these steps separately. D-Link NetDefend firewall User Guide... - Page 53 Setting Up the NetDefend firewall Logging on to the NetDefend Portal and setting up your password Initial Login to the NetDefend Portal on page 39 Configuring an Internet connection Using the Internet Wizard on page 54 Setting the Time on your NetDefend firewall Setting the Time on the Appliance on page 397 Setting up a wireless network (DFL-CPG310 only)
- Page 54 To access the Setup Wizard 1. Click Setup in the main menu, and click the Firmware t The Firmware page appears. NetDef end Setup Wizard. 2. Click The NetDefend Setup Wizard opens with the Welcome page displayed. D-Link NetDefend firewall User Guide...
-
Page 55: Getting Started
Initial Login to the NetDefend Portal Chapter 3 Getting Started This chapter contains all the information you need in order to get started using your NetDefend firewall. This chapter includes the following topics: Initial Login to the NetDefend Portal ............39 Logging on to the NetDefend Portal............42 Accessing the NetDefend Portal Remotely Using HTTPS......44 Using the NetDefend Portal................46... - Page 56 Type a password both in the Password and the Confirm Password fields. Note: The password must be five to 25 characters (letters or numbers). Note: You can change your password at any time. For further information, see Changing Your Password. 3. Click OK. D-Link NetDefend firewall User Guide...
- Page 57 Initial Login to the NetDefend Portal e NetDefend Setup Wizard opens, with the Welcome page displayed. 4. Configure y our Internet connection using one of the following ways: • Internet Wizard e Inte rnet Wizard is the first part of the Setup Wizard, and it takes y through basic Internet connection setup, step by step.
-
Page 58: Logging On To The Netdefend Portal
To log on to the NetDefend Portal 1. Do one of the following: • Browse to http://my.firewall. • T o log on through HTTPS (locally or remotely), follow the procedure Accessing the NetDefend Portal Remotely on page 44. D-Link NetDefend firewall User Guide... - Page 59 Logging on to the NetDefend Portal The login page appears. 2. Type your username and password. 3. Click OK. Chapter 3: Getting Started...
-
Page 60: Accessing The Netdefend Portal Remotely Using Https
Note: In order to access the NetDefend Portal remotely using HTTPS, you must first do both of the following: • Configure your password, using HTTP. See Initial Login to the NetDefend Portal on page 39. • Configure HTTPS Remote Access. See Configuring HTTPS on page 390. D-Link NetDefend firewall User Guide... - Page 61 Accessing the TNetDefendT Portal Remotely Using HTTPS Note: Your browser must support 128-bit cipher strength. To check your browser's cipher strength, open Internet Explorer and click Help > About Internet Explorer. To ac cess the NetDefend Portal from your internal network •...
-
Page 62: Using The Netdefend Portal
Displays information and controls related to the selected topic. The main frame may also contain tabs that allow you to view different pages related to the selected topic. Status bar Shows your Internet connection and managed services status. D-Link NetDefend firewall User Guide... -
Page 63: Main Menu
Using the NetDefend Portal Figure 9: NetDefend Portal Main Menu The main menu includes the following submenus. able 6: Main Menu Submenus This Does this… ubmenu… Welcome Displays general welcome information. eports Provides reporting capabilities in terms of event logging, traffic monitoring , active computers, and established connections. -
Page 64: Main Frame
These elements sometimes differ depending on what model you using. The differences are described throughout this guide. Status Bar The status bar is located at the bottom of each page. It displays the fields below, as ll as the date and time. D-Link NetDefend firewall User Guide... - Page 65 Using the NetDefend Portal Tabl e 7: Status Bar Fields This field… Displays this… Internet Your Internet connection status. The connection status may be one of the following: • Connected. The NetDefend firewall is connected to the Internet. • Connected – Probing OK. Connection probing is enabled and has detected that the Internet connectivity is OK.
- Page 66 Connection Failed. The NetDefend firewall failed to connect to the Service Center. • Connecting. The NetDefend firewall is connecting to the Service Center. • onnected. You are connected to the Service Center, and security ervices are active. D-Link NetDefend firewall User Guide...
-
Page 67: Logging Off
Logging off Logging off Logging off terminates your administration session. Any subsequent attempt to connect to the NetDefend Portal will require re-entering of the administration ssword. log off of the NetDefend Porta • Do one of the following: • If you are connected through HTTP, click Logout in the main menu. Logout page appears. -
Page 69: Configuring The Internet Connection
Overview Chapter 4 Configuring the Internet Connection This chapter describes how to configure and work with an Internet connection. This chapter includes the following topics: Overview ....................53 Using the Internet Wizard ................54 Using Internet Setup ...................63 Setting Up a Dialup Modem...............84 Viewing Internet Connection Information..........87 Enabling/Disabling the Internet Connection..........88 Using Quick Internet Connection/Disconnection ........90... -
Page 70: Using The Internet Wizard
To set up the Int ernet connection using the Internet Wizard 1. Click Network in the main menu, and click the Internet tab. The Internet page appears. Internet Wizard. 2. Click D-Link NetDefend firewall User Guide... - Page 71 Using the Internet Wizard The Internet Wizard opens with the Welcome page displayed. 3. Click Next. The Internet Connection Method dialog box appears. 4. Select the Internet connection method you want to use for connecting to the Internet. Chapter 4: Configuring the Internet Connection...
-
Page 72: Using A Direct Lan Connection
No further settings are required for a direct LAN (Local Area Network) connection. The Confirmation screen appears. 1. Click Next. he system attempts to connect to the Internet via the selected connection. The Connecting… screen appears. D-Link NetDefend firewall User Guide... - Page 73 Using the Internet Wizard At the end of the connection process the Connected screen appears. 2. Click Finish. Chapter 4: Configuring the Internet Connection...
-
Page 74: Using A Cable Modem Connection
• Click This Computer to automatically "clone" the MAC address of your computer to the NetDefend firewall. • If the ISP requires authentication using the MAC address of a different computer, enter the MAC address in the MAC cloning field. D-Link NetDefend firewall User Guide... -
Page 75: Using A Pptp Or Pppoe Dialer Connection
Using the Internet Wizard 3. Click Next. The Confirmation screen appears. 4. Click Next. The system attempts to connect to the Internet. The Connecting… screen appears. At the end of the connection process the Connected screen appears. 5. Click Finish. Using a PPTP or PPPoE Dialer Connection If you selected the PPTP or PPPoE dialer connection method, the DSL Connection Type dialog box appears. -
Page 76: Using Pppoe
The Confirmation screen appears. 3. Click Next. The system attempts to connect to the Internet via the DSL connection. The Connecting… screen appears. At the end of the connection process the Connected screen appears. 4. Click Finish. D-Link NetDefend firewall User Guide... -
Page 77: Using Pptp
Using the Internet Wizard Table 8: PPPoE Connection Fields In this field… Do this… Username Type your user name. Password Type your password. Confirm password Type your password again. Service Type your service name. This field can be left blank. Using PPTP If you selected the PPTP connection method, the DSL Configuration dialog box appears. - Page 78 IP Type the IP address of the PPTP modem. Intern al IP Type the local IP address required for accessing the PPT P modem. Subnet Mask Type the subnet mask of the PPTP modem. D-Link NetDefend firewall User Guide...
-
Page 79: Using Internet Setup
Using Internet Setup Using Internet Setup Internet Setup allows you to manually configure your Internet connection. To conf igure the Internet connection using Internet Setup 1. Click Network in the main menu, and click the Internet tab. 2. Next to the desired Internet connection, click Edit. Chapter 4: Configuring the Internet Connection... - Page 80 Type drop-down list, select the Internet connection ty you are using/intend to use. The display hanges according to the connection type you selected. The follow ing steps should be performed in accordance with the connection type you have chosen. D-Link NetDefend firewall User Guide...
-
Page 81: Using A Lan Connection
Using Internet Setup Using a LAN Connection 1. Complete the fields using the relevant information in Internet Setup Fields on page 77. Chapter 4: Configuring the Internet Connection... - Page 82 Internet, and the Status B displays the Internet status “Connecting”. This may take several seconds. Once the connection is made, the Status Bar displays the Internet status “Connected”. D-Link NetDefend firewall User Guide...
-
Page 83: Using A Cable Modem Connection
Using Internet Setup Using a Cable Modem Connection 1. Complete the fields using the relevant information in Internet Setup Fields on page 77. Chapter 4: Configuring the Internet Connection... - Page 84 The NetDefend firewall attempts to connect to the Internet, and the Status Bar displays the Internet status “Connecting”. This may take several seconds. Once the connection is made, the Status Bar displays the Internet status “Connected”. D-Link NetDefend firewall User Guide...
-
Page 85: Using A Pppoe Connection
Using Internet Setup Using a PPPoE Connection 1. Complete the e fi lds using the relevant information in Internet Setup Fields page 77. Chapter 4: Configuring the Internet Connection... - Page 86 The NetDefend firewall attempts to connect to the Interne t, and the Status Bar displays the Internet statu s “Connecting”. This may take several seconds. Once the connection is made, the Status Bar displays the Internet status “Connected”. D-Link NetDefend firewall User Guide...
-
Page 87: Using A Pptp Connection
Using Internet Setup Using a PPTP Connection 1. Comp lete the fields using the relevant information in Internet Setup Fields page 77. Chapter 4: Configuring the Internet Connection... - Page 88 New fields appear, depending on the check boxes you selected. 2. Click Apply. The NetDefend firewall attempts to connect to the Internet, and the Status Bar displays the Internet status “Connecting”. This may take several seconds. D-Link NetDefend firewall User Guide...
-
Page 89: Using A Telstra (Bpa) Connection
Using Internet Setup Once the connection is made, the Status Bar displays the Internet status “Connected”. Usin g a Tels tra (BPA ) Connection this Internet connection type only if you a re subscribed to Telstra® BigPond™ Internet. Telstra BigPond is a trademark of Telstra Corporation Limited. 1. - Page 90 The NetDefend firewall attempts to connect to the Internet, and the Status Bar displays the Internet status “Connecting”. This may take several seconds. Once the connection is made, the Status Bar displays the Internet status “Connected”. D-Link NetDefend firewall User Guide...
-
Page 91: Using A Dialup Connection
Using Internet Setup Using a Dialup Connection To use this connection type, you must first set up the dialup modem. For information, see Setting Up a Dialup Modem on page 84. 1. Complete the fields using the relevant information in Internet Setup Fields on page 77. - Page 92 The NetDefend firewall attempts to connect to the Internet, and the Status Bar displays the Internet status “Connecting”. This m ay take several seconds. ce the connection is made, the Status Bar displays the In ternet status “Connected”. D-Link NetDefend firewall User Guide...
-
Page 93: Using No Connection
Using Internet Setup Using No Connection If you do not have an Internet connection, set the connection type to None. • Click Apply. Table 10 : Internet Setup Fields this field… Do this… Username Type your user name. Pass word Type your password. - Page 94 DHCP. (using DHCP) IP Address Type the static IP address of your NetDefend firewall. Subnet Mask Select the subnet mask that applies to the static IP address of your NetDefend firewall. D-Link NetDefend firewall User Guide...
- Page 95 Using Internet Setup In this field… Do this… Default Gateway Type the IP address of your ISP’s default gateway. Name Servers btain Domain Clear this option if you want the NetDefend firewall to obtain an IP ame Servers address automatically using DHCP, but not to automatically configure auto matically DNS servers.
- Page 96 As a general recommendation you should leave this field empty. If however you wish to modify the default MTU, it is recommended that you consult with your ISP first and use MTU values between 1300 and 1500. D-Link NetDefend firewall User Guide...
- Page 97 Using Internet Setup In this field… Do this… MAC Cloning A MAC address is a 12-digit identifier assigned to every network device. If your ISP restricts connections to specific, recognized MAC addresses, you must select this option to clone a MAC address. Note: When configuring MAC cloning for the secondary Internet conn ection, the DMZ/WAN2 port must be configured as WAN2;...
- Page 98 If it is deter mined that the Internet connection is down, and two Internet connections are defined, a failover will be performed to the second Internet connection, ensuring continuous Internet connectivity. This option is selected by default. D-Link NetDefend firewall User Guide...
- Page 99 Using Internet Setup In this field… Do this… While the Probe Next Hop option checks the availability of the next hop Connection Probing Method router, which is usually at your ISP, connectivity to the next hop router does not always indicate that the Internet is accessible. For example, if there is a problem with a different router at the ISP, the next hop will be reachable, but the Internet might be inaccessible.
-
Page 100: Setting Up A Dialup Modem
1. Connect a r egular or ISDN dialup modem to your NetDefend firewall's serial port. For information on locating the serial port, see Rear Panel. Click Network in the main menu, and click the Ports tab. D-Link NetDefend firewall User Guide... - Page 101 Setting Up a Dialup Modem The Ports page appears. In the RS232 drop-down list, select Dialup. Click App 5. Next to the RS232 drop-down list, click Setup. Chapter 4: Configuring the Internet Connection...
- Page 102 Initialization String Type the installation string for the custom modem type. If you selected a standard modem type, this field is read-only. D-Link NetDefend firewall User Guide...
-
Page 103: Viewing Internet Connection Information
Viewing Internet Connection Information In this field… Do this… Dial Mode Select the dial mode the modem uses. Port Speed Select the modem's port speed (in bits per second). Viewing Internet Connection Information You can view information on your Internet connection(s) in terms of status, duration, and activity. -
Page 104: Enabling/Disabling The Internet Connection
Internet. If you have two Internet connections, you can force the NetDefend firewall to use a particular connection, by disabling the other connection. The Internet connection’s Enabled/Disabled status is persistent through reboots. D-Link NetDefend firewall User Guide... - Page 105 Enabling/Disabling the Internet Connection To enable/disable an Internet connection 1. Click Network in the main menu, and click the Internet tab. The Int ernet pag e appears. 2. Next to the Internet connection, do one of the following: • To enable the connection, click The button changes to and the connection is enabled.
-
Page 106: Using Quick Internet Connection/Disconnection
Note: You can configure different DNS servers for the primary and seco ndary connections. The NetDefend firewall acts as a DNS relay and ro utes requests from computers within the network to the appropriate DNS server for the active Internet connection. D-Link NetDefend firewall User Guide... -
Page 107: Setting Up A Lan Or Broadband Backup Connection
Configuring a Backup Internet Connection Setting Up a LAN or Broadband Backup Connection Using the NetDefend firewall's WAN Port To set up a LAN or broadband backup Internet connection 1. Connect a hub or switch to the WAN port on your appliance's rear panel. 2. -
Page 108: Setting Up A Dialup Backup Connection
84. Configure a LAN or broadband primary Internet connection. For instructions, see Using Internet Setup on page 63. 3. Configure a Dialup secondary Internet connection. For instructions, see Usin g Internet Setup on page 63. D-Link NetDefend firewall User Guide... -
Page 109: Managing Your Network
Configuring Network Settings Chapter 5 Managing Your Network This chapter describes how to manage and configure your network connection and tings. This chapter includes the following topics: onfiguring Network Settings ..............93 onfiguring High Availability ..............119 Using Static Routes ..................139 Managing Ports.................. -
Page 110: Configuring A Dhcp Server
NetDefend firewall relay s information from the desired DHCP server to devices on your network. Note: You can perform DHCP reservation u sing network objects. For information, see Using Network Objects on page 129 D-Link NetDefend firewall User Guide... -
Page 111: Dhcp Server
Configuring Network Settings Enabling/Disabling the NetDefend DHCP Server You can enable and disable the NetDefend DHCP Server for internal networks. Note: E nabling and disabling the DHCP Server is not available for the OfficeMode network. To enable/disable the NetDefend DHCP server 1. - Page 112 If your computer is configured to obtain its IP address automatically (using DHCP), and either the NetDefend DHCP server or another DHCP server is enabled, restart your computer. If you enabled the DHCP server, your computer obtains an IP address in the DHCP address range. D-Link NetDefend firewall User Guide...
- Page 113 Configuring Network Settings Configuring the D HCP Address Range By default, the NetDefend DHCP server automatically sets the DHCP address range. The DHCP address range is the range of IP addresses that the DHCP server can assign to network devices. IP addresses outside of the DHCP address range are reserved for statically addressed computers.
- Page 114 7. If your computer is configured to obtain its IP address automatically (using DHCP), and either the NetDefend DHCP server or another DHCP server is enabled, restart your computer. Your computer obtains an IP address in the new DHCP address range. D-Link NetDefend firewall User Guide...
-
Page 115: Configuring Dhcp Relay
Configuring Network Settings Configuring DHCP Relay You can configure DHCP relay for internal networks. Note: DHCP relay will not work if the appliance is located behind a NAT device. Note: Configuring DHCP options are not available for the OfficeMode network. To configure DH CP relay Click Network in the main me... - Page 116 IP address automatically (using DHCP ), and either the NetDefend DHCP server or ano ther DHCP server is enabled, restart your computer. Your computer obtains an IP address in the DHCP address range. D-Link NetDefend firewall User Guide...
- Page 117 Configuring Network Settings nfiguring DHCP Server O ptions If desired, you can configure the following custom DHCP options for an internal network: • Domain suffix • DNS servers • WINS servers • NTP servers • VoIP call managers • TFTP server and boot filename Note: Configuring DHCP options are not available for the DMZ or VLANs.
- Page 118 Configuring Network Settings The DHCP Server Options page appears. Complete the fields using the re levant information in the table below. D-Link NetDefend firewall User Guide...
- Page 119 Configuring Network Settings New fields appear, depending on the check boxes you selected. Click Apply. If your computer is configured to obtain its IP address automa tically (using DHCP), restart your computer. Your computer obtains an IP a ddress in the DHCP address range. Tabl e 13: DHCP Server Options Field In th...
- Page 120 DHCP clients, type the IP address of the Primary and Secondary NTP servers. Call Manager 1, 2 To assign Voice over Internet Protocol (VoIP) call managers to the DHCP clients, type the IP address of the Primary and Secondary VoIP servers. D-Link NetDefend firewall User Guide...
-
Page 121: Changing Ip Addresses
Configuring Network Settings In this field… Do this… FTP Server Trivial File Transfer Protocol (TFTP) enables booting diskless computers over the network. To assign a TFTP server to the DHCP clients, type the IP address of the TFTP server. TFTP Boot File Type the boot file to use for booting DHCP clients via TFTP Changing IP Addresses... - Page 122 Your computer obtains an IP address in the new range. • Ot herwise, manually reconfigure your computer to use the new address range using the TCP/IP settings. For information on configuring TCP/IP, see TCP/IP Settings on page 24, on page 20. D-Link NetDefend firewall User Guide...
-
Page 123: Enabling/Disabling Hide Nat
Configuring Network Settings Enabling/Disabling Hide NAT Hide Network Address Translation (Hide NAT) enables you to share a single public Internet IP address among several computers, by “hiding” the private IP dresses of the internal computers behind the NetDefend firewall’s single Intern address. -
Page 124: Configuring A Dmz Network
DMZ network, connect a hub or switch to the DMZ port, and connect the DMZ computers to the hub. 2. Click Network in the main menu, and click the Ports tab The Ports page a ppears. D-Link NetDefend firewall User Guide... - Page 125 Configuring Network Settings 3. In the DMZ drop-down list, select DMZ. 4. Click Apply. 5. Click Network in the main menu, and click the My Network tab. The My Network page appears. 6. In the DMZ network's row, click Edit. The Edit Network Settings page appears.
-
Page 126: Configuring The Officemode Network
Click Network in the main menu, and cl ick the My Network tab. e My Network page appears. In the OfficeMode network's row, click Edit. e Edit Network Settings page appears. In the Mode drop-down list, select Enabled. The fields are enabled. D-Link NetDefend firewall User Guide... -
Page 127: Configuring Vlans
Configuring Network Settings the IP Address field, type the IP address to use as the OfficeMode network's 4. In default gateway. Note: The Of ficeMode network must not overlap other networks. 5. In the Subnet Mask text box, type the OfficeMode internal network range. If desired, enable or disable Hide NAT. - Page 128 VLAN's tag in the packet headers. Incoming traffic to the VLAN must contain the VLAN's tag as well, or the packets are dropped. Tagging ensures that traffi is directed to the correct VLAN. Figure 10: Tag-based VLAN D-Link NetDefend firewall User Guide...
- Page 129 Configuring Network Settings • Port-based Port-based VLAN allows assigning the appliance's LAN ports to VLANs, effectively transforming the appliance's four-port switch into up to four firewall- isolated security zones. You can assign multiple ports to the same VLAN, or each port to a separate VLAN. Figure 11: Port-based VLAN Port-based VLAN does not require an external VLAN -capable switch, and is...
- Page 130 The Edit Network Settings page for VLAN networks appears. Network Name field, type a name for the VLAN. 3. In 4. In the Type drop-down list, select Port Based VLAN. The VLAN Tag field disappears. D-Link NetDefend firewall User Guide...
- Page 131 Configuring Network Settings In the IP Address field, type the IP address of the VLAN network's default gateway. Note: The VLAN network must not overlap other networks. 6. In the Subnet Mask field, type the VLAN's internal network range. 7. If desired, enable or disable Hide NAT. See Enabling/Disabling Hide NAT on page 107.
- Page 132 Subnet Mask field, type the VLAN's internal network range. 7. In If desired, enable or disable Hide NAT. See Enabling/Disabling Hide NAT on page 107. 9. If desired, configure a DHCP server. See Configuring a DHCP Server on page 94. D-Link NetDefend firewall User Guide...
- Page 133 Configuring Network Settings . Click Apply. A warning message appears. 11. Click OK. A success message appears. . Click Network in the main menu, and click the Ports tab. The Ports page appears. 13. In the DM Z/WAN2 drop-down list, select VLAN Trunk. .
- Page 134 My Network tab. the main The My Netw page appears. 3. In the desired VLAN’s row, click the Erase icon. A confirmation m essage appears. 4. Click The VLAN is deleted. D-Link NetDefend firewall User Guide...
-
Page 135: Configuring High Availability
Configuring High Availability Configuring High Availability You can create a High Availability (HA) cluster consisting of two or more NetDefend firew alls . For example, you can install two NetDefend firewalls on your network, one a cting as the “Master”, the default gatew ay through which all network t raffic is routed, and one acting as the “Backup”. - Page 136 IP address conflict. WAN HA avoids an IP address change, and thereby ensures virtually uninterrupted access from the Internet to internal servers at your netwo Before configuring HA, the following requirements m ust be met: D-Link NetDefend firewall User Guide...
- Page 137 Configuring High Availability • You must have at least two identical NetDefend firewalls. • The appliances must have identical firmware versions and firewall rules. • The appliances' internal networks must be the same. • The appliances must have different real internal IP addresses, but share the same virtual IP address.
-
Page 138: Configuring High Availability On A Gateway
Each appliance must have a different internal IP address. See Changing IP Addresses on page 105. 2. Click Setup in the main menu, and click the High Availability tab. The High Availability page appears. 3. Select the Gateway High Availability check box. D-Link NetDefend firewall User Guide... - Page 139 Configuring High Availability The fields are enabled. 4. Next to each network for which you want to enable HA, select the HA check box. Virtual IP field, type the default gateway IP address. 5. In This can be any unused IP address in the network , and must be the same for all gateways.
- Page 140 This must be an integer between 1 and 255. Interface Tracking Internet - Primary Type the amount to reduce the gateway's priority if the primary Internet connection goes down. This must be an integer between 0 and 255. D-Link NetDefend firewall User Guide...
- Page 141 Configuring High Availability In this field… Do this… Internet - Secondary Type the amount to reduce the gateway's priority if the secondary Internet connection goes down. This must be an integer between 0 and 255. Note: This value is only relevant if you configured a backup connection.
-
Page 142: Sample Implementation On Two Gateways
192.168.100.3, and the DMZ virtual IP address is 192.168.101.3. Gateway A is the Active Gateway. configure HA for Gateway A and Gateway B 1. Connect the LAN port of Gateways A and B to hub 1. D-Link NetDefend firewall User Guide... - Page 143 Configuring High Availability Connect the DMZ port of Gateways A and B to hub 2. 3. Co nnect the LAN network computers of Gateways A and B to hub 1. Connect the DMZ network computers of Gateways A and B to hub 2. 5.
- Page 144 The low priority means that Gateway B will be the Passive Gateway. j. In the Internet - Primary field, type "20". Gateway B will reduce its priority by 20, if its Internet connection goes down. k. Click Apply. A success message appears. D-Link NetDefend firewall User Guide...
- Page 145 Configuring High Availability Gateway A's priority is 100, and Gateway B' s priority is 60. So long as one of Gateway A's Internet connections is up, Gate way A is the Active Gateway, because its priority is higher than that of Gateway B. If both of Gateway A's Internet connections are down, it deducts from its priority 20 (for the primary connection) and 30 (for the secondary connection), reducin g its...
-
Page 146: Adding And Editing Network Objects
The computer's details are filled in automatically in the wizard. add or edit a network object via the Network Objects page Click Network in the main menu, and click the Network Objects tab. D-Link NetDefend firewall User Guide... - Page 147 Configuring High Availability The Network Objects page appears with a list of network objects. 2. Do one of the following: • To add a network object, click New. • To edit an existing network object, click Edit next to the desired computer in the list.
- Page 148 Do one of the following: • To specify that the network object should represent a single compute r or device, click Single Computer. • To specify that the network object should represent a network, click Network. Click Next. D-Link NetDefend firewall User Guide...
- Page 149 Configuring High Availability The Step 2: Computer Details dialog bo x appears. If you chose Single Computer, the dialog box includes the Perform St atic NAT option. If you chose Network, the dialog box does not include this option. 5. Comp lete the fields using the information in the tables below.
- Page 150 7. Type a name for the network object in the field. 8. Click Finish. To add or edit a network object via the Active Computers page 1. Click Repo rts in the main menu, and click the Active Computers tab. D-Link NetDefend firewall User Guide...
- Page 151 Configuring High Availability The Active Computers page appears. If a computer has not yet been added as a network object, the Add button appears next to it. If a computer has already been added as a network object, the Edit button appears next to it. 2.
- Page 152 7. To change the network object name, type the desired name in the field. 8. Click Finish. The new object appears in the Network Objects page. D-Link NetDefend firewall User Guide...
- Page 153 Configuring High Availability Table 16: Network Object Fields for a Single Computer In this field… Do this… Type the IP address of the local computer, or click This Computer to IP Address specify your computer. Reserve a fixed IP Select this option to assign the network object's IP address to a MAC address for this address, and to allow the network object to connect to the WLAN computer...
-
Page 154: Viewing And Deleting Network Objects
2. To delete a network object, do the following: a. In t he desi red network object's row, click the Erase icon. A confirma tion me ssage appears. b. Click OK. The network object is deleted. D-Link NetDefend firewall User Guide... -
Page 155: Using Static Routes
Using Static Routes Using Stati c Route A static route is a setting that explicitly specifies the route for packets originati in a certain subnet and/or destined for a certain subnet. Packets with a source and destination that does not match any defined static route will be routed to the de fault gateway. - Page 156 The Static Routes page appears, with a list of existing static routes. 2. Do one of the following: • To add a static route, click New Route. • To edit an existing st atic route, click Edit next to the desired route in the list. D-Link NetDefend firewall User Guide...
- Page 157 Using Static Routes The Static Route Wizard opens displaying the Step 1: Source and Destination dialog box. 3. To select a specific source network (source routing), do the following: a) In the Sou rce drop-down list, select Specified Network. New fields appear. he Network field, type the IP address of the source network.
- Page 158 In the Destination drop-down list, select Specified Network. New fields appear. b) In the Network field, type the IP address of the destination network. c) In the Netmask drop-down list, select the subnet mask. 5. Click Next. D-Link NetDefend firewall User Guide...
- Page 159 Using Static Routes The Step 2: Next Hop and Metric dialog box appears. 6. In the Next Hop IP field, type the IP address of the gateway (next hop router) to which to r te the packets destined for this network. 7.
-
Page 160: Viewing And Deleting Static Routes
1. Click Network in the main menu, and click the Routes tab. The Static Routes page appears, with a list of existing static routes. 2. In the desired route row, click the Erase icon. A confirmati on message appears. 3. Click OK. The route is deleted. D-Link NetDefend firewall User Guide... -
Page 161: Managing Ports
Managing Ports Man g a ing Ports The NetDefend firewall enables you to quickly and easily assign its ports to different uses, as shown in the table below. Furthermore, you can restrict each port to a specific link speed and duplex setting. Table 18: Ports and Assignments You can assign this port... -
Page 162: Viewing Port Statuses
LEDs on front of the appliance. To view port statuses 1. Click Network in the main menu, and click the Ports tab. The Ports page appears. The following information is displayed for each enabled port: D-Link NetDefend firewall User Guide... -
Page 163: Modifying Port Assignments
Managing Ports • Assign To. The port's current assignment. For example, if the DMZ/WAN2 port is currently used for the DMZ, the drop-down list displays "DMZ". • Link Config uration. The configured link speed (10 Mbps or 100 Mbps) and Full Duplex Half Duplex) configured for the port. - Page 164 The Ports page appears. In the Assign ed To drop-down list to the right of the port, select the de sired port assignment. 2. Click Apply. The port is re assigned to the specified network or purpose. D-Link NetDefend firewall User Guide...
-
Page 165: Modifying Link Configurations
Managing Ports Modifying Link Configurations By default, the Net Defend automatically detects the link speed and duplex. If desired, you can m anually restrict the NetDefend firewall's ports to a specific link speed. To modify a por t's link configuration 1. -
Page 166: Resetting Ports To Defaults
For example, if you were using the DMZ/WAN2 port as WAN2, the port reverts to its DMZ assignment, and the secondary Internet connection moves to the WAN port. D-Link NetDefend firewall User Guide... -
Page 167: Using Traffic Shaper
Overview Chapter 6 Using Traffic Shap This chapter describes how to use Traffic Shaper to control the flow of communication to and from your network This chapte ncludes the following topics: Overview ....................151 Setting Up Tr affic Shaper.................153 Predefined QoS Classes................154 Adding and Ed ing Classes..............155 Deleting C... - Page 168 NetDefend with Power Pack. Note: Yo u can prioritize wireless traffic from WMM-compliant multimedia applicat ions, by enabling Wireless Multimedia (WMM ) for the WLAN network. See Manually Configuring a WLAN on page 165. D-Link NetDefend firewall User Guide...
-
Page 169: Setting Up Traffic Shaper
QoS classes. See Adding a nd Editing Classes on page 155. Note: If you are using DFL-CP310, you have Simplified Traffic Shaper, and you cannot add or modify the classes. T o add or modify classes, upgrade to DFL- CP310 with Power Pack, which supports Advanced Traffic Shaper. -
Page 170: Predefined Qos Classes
All traffic is assigned to this class b y default. Urgent High Traffic that is highly se nsitive to delay. For (Interactive Traffic) example, IP telephony, videoconferenc ing, and interactive protocols that require q uick user response, such as telnet. D-Link NetDefend firewall User Guide... -
Page 171: Adding And Editing Classes
Adding and Editing Classes Class Weight Delay Sensitivity Useful for Important Medium Normal traffic (Normal Traffic) ow Priority Traffic that i s not sensitive to long delays. For (Bulk Traffic) example, SMTP traffic (outgoing email). In Simplified Traffic Shaper, these classes cannot be changed. Adding and Editing Classes add or edit a QoS class 1. - Page 172 Complete the fields using the relevant information in the tab le below. Next. 4. Click e Step 2 of 3: Advanced Options dialog box appears. 5. Comp lete the fields using the relevant information in the table below. D-Link NetDefend firewall User Guide...
- Page 173 Adding and Editing Classes Note: Traffic Shaper may not enforce guaranteed rates and relative weights for incoming traffic as accurately as for outgoing traffic. This is because Traffic Shaper cannot control the number or type of packets it receives from the Internet; it can only affect the rate of incoming traffic by dropping received packets.
- Page 174 Incom ing Traffic: Select this option to guarantee a minimum bandwidth fo r incoming traffic Guarante e At belonging to this class. Then type the minimum bandwi dth (in Leas kilobits/second) in the field provided. D-Link NetDefend firewall User Guide...
-
Page 175: Deleting Classes
Deleting Classes In this field… Do this… coming Traffic: Select this option to limit the rate of incoming traffic belonging to this Limit rate to class. Then type the maximum rate (in kilobits/second) in the field provided. DiffServ Cod Select this option to mark packets belonging to this class with a DiffServ oint Code Point (DSCP), which is an integer between 0 and 63. -
Page 176: Restoring Traffic Shaper Defaults
To restore Traffic Shaper defaults Click Network in the main menu, and click the Traffic S haper tab. The Quality of Service Classes page appears. Restore Defaults. 2. Click A con firmation message a ppears. 3. Click OK. D-Link NetDefend firewall User Guide... -
Page 177: Configuring A Wireless Network
Overview Chapter 7 Configuring a Wireless Netw This chapter describes how to set up a wireless internal network. This chapter includes the following topics: verview ....................161 bout the Wireless Hardware in Your NetDefend firewall......162 ireless Security Protocols..............163 Manually Configuring a WLAN............... Using the Wireless Configuration Wizard..........176 Preparing the Wireless Stations..............182 roubleshoo... -
Page 178: About The Wireless Hardware In Your Netdefend Firewall
20 dB more than the 802.11 specification. This allows ra nges of up to 300 meters indoors, and up to 1 km (3200 ft) outdoors, with XR-enabled wireless stations (actual range depends on environment). D-Link NetDefend firewall User Guide... -
Page 179: Wireless Security Protocols
Wireless Security Protocols ireless Security Protocols The NetDefend wireless security appliance supports the following security protocols: Table 23: W ireless Security Protocols Security Description Protocol None No security method is used. This option is not recommended, because it allows unauthorized users to access your WLAN network, although you stil l limit access from the WLAN by creating firewall rules. - Page 180 When using WPA or WPA-PSK security methods, the NetDefend enables you to restrict access to the WLAN network to wireless stations that support the WPA2 security method. If this setting is not selected, the NetDefend firewall allows clients to connect using both WPA and WPA2. D-Link NetDefend firewall User Guide...
-
Page 181: Manually Configuring A Wlan
Manually Configuring a WLAN e: For increased se curity, it is recommended to enable the NetDefend internal N Server for users connecting from your internal networks, and to install SecuRemote on each computer in the WLAN. Th is ensures that all connections from the WLAN to the LAN are encrypted and au thenticated. - Page 182 5. In he The fields are enabled. 6. If desired, enable or disable Hide NAT. See Enabling/Disabling Hide NAT on page 107. 7. If desired, configure a DHCP server. See Configuring a DHCP Server on page 94. D-Link NetDefend firewall User Guide...
- Page 183 Manually Configuring a WLAN 8. Complete the fields using the information in Basic WLAN Settings Fields on page 168. 9. To configure advanced settings, click Show Advanced Settings and complete the fields using the information in Advanced WLAN Settings Fields on page 172. New fields appear.
- Page 184 Hide the Network Name (SSID) option. It can be up to 32 alphanumeric characters long and is case-sensitive. Country Select the country where you are located. Warning: Choosing an incorrect country may result in the violation of government regulations. D-Link NetDefend firewall User Guide...
- Page 185 Manually Configuring a WLAN In this field… Do this… Operation Mode Select an operation mode: • 802.11b (11Mbps). Operates in the 2.4 GHz range and offers a maximum theoretical rate of 11 Mbps. When using this mode, only 802.11b stations will be able to connect. •...
- Page 186 For the highest security, choose a long passphrase that is hard to guess, or use the Random button. Note: The wireless stations must be configured with this passphrase as well. D-Link NetDefend firewall User Guide...
- Page 187 Manually Configuring a WLAN In this field… Do this… Require WPA2 Specify whether you want to require wireless stations to connect using (802.11i) WPA2, by selecting one of the following: • Enable. Only wireless stations using WPA2 can access the WLAN network.
- Page 188 This is the default. Note: Hiding the SSID does not provide strong security, because by a determined attacker can still discover your SSID. Therefore, it is not recommended to rely on this setting alone for security. D-Link NetDefend firewall User Guide...
- Page 189 Manually Configuring a WLAN In this field… Do this… Address Specify w hether you want to enable MAC address filtering, by selecting one Filteri of the follo wing: • Yes. Enable MAC address filtering. Only MAC ad dresses that you added as network objects can connect to your network.
- Page 190 If you are experiencing significant radio interference, set the threshold to a low value (around 1000 ), to reduce error penalty and increase overall throughput. Other wise, set the thresho ld to a high value (around 2000), to reduce erhead. he default value is 2346. D-Link NetDefend firewall User Guide...
- Page 191 Manually Configuring a WLAN In this field… Do this… RTS Threshold ype the smallest IP packet si ze for which a station must send an RTS (Request To Send) before sending the IP packet. multiple wireless stati ons are in range of the access point, but not in range of each other, they might send data to the access point simultaneously, ereby causing data collisions and failures.
-
Page 192: Using The Wireless Configuration Wizard
The Edit Network Settings page appears. 4. Click Wireless Wizard. The Wireless Configuration Wizard opens, with the Wire less Configuration dialog box displayed. 5. Select the Enable wireless networking check box to enable the WLAN. D-Link NetDefend firewall User Guide... - Page 193 Using the Wireless Configuration Wizard The fields are enabled. 6. Complete the fields using the information in Basic WLAN Settings Fields on e 168. Next 7. Click Wireless Security dialog box appears. 8. The 9. Do one of the following: •...
-
Page 194: Wpa-Psk
1. In the text box, type the passphrase for ac to randomly generate a passphrase. This must be between 8 and 63 characters. It can contain spaces and special characters , and is case-sensitive. 2. Click Next D-Link NetDefend firewall User Guide... - Page 195 Using the Wireless Configuration Wizard The Wireless Security Confirmation dialog box appears. 3. Click Next. 4. The Wireless Security Complete dialog box appears. 5. Click Finish. The wizard closes. 6. Prepare the wireless stations. Chapter 7: Configuring a Wireless Network...
-
Page 196: Wep
2. In the text box, type the WEP key, or click Random to randomly generate a key matching the selected length. The key is composed of characters 0-9 and A-F, and is not case-sensitive. The wireless stations must be configured with this same key. D-Link NetDefend firewall User Guide... -
Page 197: No Security
Using the Wireless Configuration Wizard 3. Click Next. The Wire less Security Co nfirmation dialog box appears. 4. Click Next. The Wireless Security Complete dialog box appears. 5. Click Finish. The wizard closes. 6. Prepare the wireless stations. See Preparing the Wireless Stations on page 182. Security he Wireless Security Complete dialog box appears. -
Page 198: Preparing The Wireless Stations
Note: The wireless cards' region and the NetDefend firewall's region must both match the region of the world where you are located. If you purchased your NetDefend firewall in a different region, contact technica l support. D-Link NetDefend firewall User Guide... -
Page 199: Troubleshooting Wireless Connectivity
Troubleshooting Wireless Connectivity Troubleshooting Wireless Connectivity I cann ot conn ect to the WLAN fro m a wire less station. What should I do? • Che ck that the SSID configured on the station matches the NetDefend firewall's SSID. The SSID is case-sensitive. •... - Page 200 RTS Threshold parameter in the WLAN's advanced settings (see Manually Configuring a WLAN on page 165) to a lower value. This will cause stations to use RTS for smaller IP packets, thus decreasing the likeliness of collisions. D-Link NetDefend firewall User Guide...
- Page 201 Troubleshooting Wireless Connectivity In addition, try setting the Fragmentation Threshold parameter in the WLAN's advanced settings (see Manually Configuring a WLAN on page 165) to a lower value. This will cause stations to fragment IP packets of a certain size into smaller packets, thereby reducing the likeliness of collisions and increasing network speed.
-
Page 203: Viewing Reports
Viewing the Event Log Chapter 8 Viewing Reports This chapter describes the NetDefend Portal reports. This chapter includes the following topics: Viewing the Event Log................187 Using the Traffic Monitor ................191 Viewing Computers..................194 Viewing Connections ................197 Viewing Wireless Statistics ..............198 iewing the Event Log You can track network activity using the Event Log. - Page 204 Excel) file, and then store it for analysis purposes or send it to technical support. te: You can configure the NetDefend firewall to send event logs to a Syslog rver. For information, see Configuring Sy slog Logging on page 384. D-Link NetDefend firewall User Guide...
- Page 205 Viewing the Event Log To view the event log lick Re ports in the main menu, and click the E vent Log tab. 1. C The Eve L nt og page appears. 2. If an eve nt is highlighted in red, indicating a blocked attack on y our network, you can display the attacker’s details, by clicking on the IP address of the attacking...
- Page 206 Type a name fo The *.xls file is created and saved to the specified direc tory. To clear all displayed eve nts: a. Click Clear. A confirmation message appears. b. Click OK. All events are cleared. D-Link NetDefend firewall User Guide...
-
Page 207: Using The Traffic Monitor
Using the Traffic Monitor Using the Traffic Monitor You can view incoming and outgoing traffic for selected network interfaces and QoS classes using the Traffic Monitor. This enables you to identify network traffic trends and anomalies, and to fine-tune Traffic Shaper QoS class assignments. The Traffic Monitor displays separate bar charts for incoming traffic and outgoing traffic, and displays traffic rates in kilobits/second. - Page 208 This may lead to a certain amount of traffic of the type "Traffic blocke d by firewall" that appears under normal circumstances and usually do es not indica te an attack. D-Link NetDefend firewall User Guide...
-
Page 209: Configuring Traffic Monitor Settings
Using the Traffic Monitor Configuring Traffic Monitor Settings You can confi gure the interval at which the NetDefend firewall should colle traffic data for network traffic reports. To configure Traffic Monitor settings ick Repo rts in the main menu, and click the Traffic Monitor ta 1. -
Page 210: Exporting General Traffic Reports
The active computers are graphically displayed, each with its name, IP address, and settings (DHCP, Static, e tc.). You can also view node limit information. view the active computers 1. Click Reports in the main menu, and click the Active Computers tab. D-Link NetDefend firewall User Guide... - Page 211 Viewing Computers The Active Computers page pp a ears. If you configured High Availability, both the master and backup appliances are shown. If you configured OfficeMode, the OfficeMode network is shown. If you are using the DFL-CPG310, the wireless stations are shown. For information on viewing statistics for these computers, see Viewing Wireless Statistics on page 198.
- Page 212 3. To view node limit information, do the following: a. Click Node Limit. The Node Limit wind ow appears with installed software product and the number of nodes used. b. Click Close to close the window. D-Link NetDefend firewall User Guide...
-
Page 213: Viewing Connections
Viewing Connections Viewing Connections This option allows you to view the currently active connections between your network and the external world. To view the active connections 1. Click Reports in the main menu, and click the Active Connections tab. The Active Connections page appears. The page displays the information in the table below. -
Page 214: Viewing Wireless Statistics
If your WLAN is enabled, you can view wireless statistics for the WLAN or for individual wireless stations. To view statistics for the WLAN 1. Click Reports in the main menu, and click the Wireless tab. D-Link NetDefend firewall User Guide... - Page 215 Viewing Wireless Statistics The Wireless page appears. The page displays the information in the table below. To refresh the display, click Refresh. Tabl e 29: WLAN Statistics his field… Displays… Wireless The operation mode used by the WLAN, followed by the transmission rate in Mode Mbps MAC Address...
- Page 216 • The signal strength in dB • A bar chart representing the signal strength 2. Mouse-over the information icon next to the wireless station. A tooltip displays statistics for the wireless station, as described in the table below. D-Link NetDefend firewall User Guide...
- Page 217 Viewing Wireless Statistics 3. To refresh the display, click Refresh. able 30: Wireless Station Statistics is field… Displays… urrent Rate The curren t reception and transmission rate in Mbps rames OK The total number of frames that were successfully transmitted and received rrors The total n umber of transmitted and received frames for which an error...
- Page 218 Viewing Wireless Statistics This field… Displays… Cipher The security protocol used for the connection with the wireless client. For more information, see Wireless Security Protocols on page 163. D-Link NetDefend firewall User Guide...
-
Page 219: Setting Your Security Policy
Default Security Policy Chapter 9 Setting Your Security Policy This chapter escribes ho w to set up your NetDefend firewall security policy. can enhan ce your security policy by subscribing to services such as Web Filtering an d Em ail Filtering. For information on subscribing to services, see Using Subscription Services on page 281. -
Page 220: Setting The Firewall Security Level
Using Rules on page 209. Setting the Firewall Security Level The firewall security level can be controlled using a simple lever available on the Firewall page. You can set the lever to three states. D-Link NetDefend firewall User Guide... - Page 221 Setting the Firewall Security Level able 31: Firewall Security Levels This Does this… Further Details level… Enforces basic control on All inbound traffic is blocked to the external incoming connections, NetDefend firewall IP address, except for ICMP permitting all echoes ("pings"). outgo ing connections.
- Page 222 To change the firewall security le 1. Click Security in the m ain menu, and click the Firewall tab. The Firewall page appears. 2. Drag the security lever to the desired level. The NetDefend firewall security level changes accordingly. D-Link NetDefend firewall User Guide...
-
Page 223: Configuring Servers
Configuring Servers Configuring Servers Note: If you do not intend to h ost any public Internet servers (Web Server, Mail Server etc.) in yo ur network, you can skip this section. Using the NetDefend Portal, you can selectively allow incoming network conn ections in to your network. - Page 224 Clear. 2. In the de sire The Host IP field of the desired ser vice is cleared. Apply. 3. Click The service or application is not allowed on the specific host. D-Link NetDefend firewall User Guide...
-
Page 225: Using Rules
Using Rules Using Rules The NetDefend firewall checks the protocol used, the ports range, and the destination IP address, when deciding whether to allow or block traffic. User-defined rules have priority over the default security policy rules and provide you with greater flexibility in defining and customizing your security policy. For example, if you assign your company’s accounting department to the LAN network and the rest of the company to the DMZ network, then as a result of the default security policy rules, the accounting department will be able to connect to... - Page 226 1 first, allowing outgoing FTP tra ffic from the specified IP add ress, and only then it will process rule 2, blocking all outgoing FTP traffic. The following rul e types e xist: D-Link NetDefend firewall User Guide...
- Page 227 Using Rules Table 33: Firewall Rule Types Rule Description low and This rule type enables you to do the following: orward • Permit incoming access from the Internet to a specific service in your internal network. • Forward all such connections to a specific computer in your network.
- Page 228 This rule type enables you to do the following: • Block outgoing access from your internal network to a specific service on the Internet. • Block incoming access from the Internet to a specific service in your internal network. D-Link NetDefend firewall User Guide...
-
Page 229: Adding And Editing Rules
Using Rules Adding and Editin g Rules To add or edit a rule 1. Click Security in the main menu, and click the Rule s tab. The Rules p e ag appears. 2. Do one of the following: • To add a new rule, click Add Rule. •... - Page 230 4. Click Next. p 2: Service dialog box appears. The example below shows an Allo w rule. 5. Complete the fields using the relevant information in the table below. D-Link NetDefend firewall User Guide...
- Page 231 Using Rules 6. Click Next. The Step 3: Destination & Source dialog box appears. 7. Complete the fields using the relevant information in the table below. he Step 4: Done dialog box appears. 8. Click Finish. The new rule appears in the Firewall Rules page. Chapter 9: Setting Your Security Policy...
- Page 232 Specified IP and type the desired IP address To specify an IP address, select in the filed provided. To specify an IP address range, select Specif ied Range and type the desired IP address range in the fields provided. D-Link NetDefend firewall User Guide...
- Page 233 Using Rules In this field… Do this… estination Select the destination of the connections you want to allow or block. To specify an IP address, select Specified IP and type the desired IP address in the text box. To specify an IP address range, select Specified Range and type the desired IP address range in the fields provided.
-
Page 234: Enabling/Disabling Rules
2. Next to the desired rule, do one of the following: • To enable the rule, click The button changes to and the rule is enabled. • To disable the rule, click The button changes to and the rule is disabled. D-Link NetDefend firewall User Guide... -
Page 235: Changing Rules' Priority
Using Rules Changing Rules' P riority To change a ru le's priority 1. Click Secur ity in the main menu, and click the Rules tab. The Rules p age appears. 2. Do one of the following: • Click next to the desired rule, to move the rule up in the table. •... -
Page 236: Using Smartdefense
• Controlling application-layer operations In addition, Sm artDefense aids proper usage of Internet resources, such as F instant messag ing, Peer-to-Peer (P2P) file s haring, file-sharing operations, and File Transfer Protocol (FTP) uploading, among others. D-Link NetDefend firewall User Guide... -
Page 237: Configuring Smartdefense
Using SmartDefense Configuring SmartDefense For convenience, SmartDefen se is organized as a tree, in which each branch represents a category of setting When a category is expanded, the settings it contains appear as nodes. For information on each category and the nodes it contains, see SmartDefense Categories on page 224. - Page 238 The left pane displays a tree containing SmartDefense categories. • To expand a category, click the icon next to it. • To collapse a category, click the icon next to it. 2. Expand the relevant category, and click on the desired node. D-Link NetDefend firewall User Guide...
- Page 239 Using SmartDefense The right pane displays a description of the node, followed by fields. 3. To modify the node's current settings, do the following: a) Complete the fields using the relevant information in SmartDefense Categories on page 224. b) Click Apply. 4.
-
Page 240: Smartdefense Categories
• Non-TCP Flooding on page 22 Teardrop In a Teardrop att ack, the attacker sends two IP fragments, the latter entirely ntained within the former. This causes some computers to all ocate too much memory and crash. D-Link NetDefend firewall User Guide... - Page 241 Using SmartDefense You can configure how Teardrop attacks should be handled. able 35: Teardrop Fields this field… Do this… ction Specify what action to take when a Teardrop atta ck occurs, by selecting one of the following: • Block. Block the attack. This is the default. •...
- Page 242 In a LAND attack, the attacker sends a SYN packet, in which the source address and port are the same as the destination (the victim computer). The victim computer then tries to reply to itself and either reboots or crashes. D-Link NetDefend firewall User Guide...
- Page 243 Using SmartDefense You can configure how LAND attacks should be handled. Table 37: LAND Fie In this field… this… Action ecify what action to ta ke when a LAND attack occurs, by selecting one of fo owing: • Block. Block the attack. This is the default.
- Page 244 • None. Do not log the connections. This is the default. Max. Perc Type th e maximum percentage of state table capacity allowed for non-TCP Non-TCP Traffic conn ections. e d fault value is 0%. D-Link NetDefend firewall User Guide...
- Page 245 Using SmartDefense IP and ICMP This category allows you to enable various IP and ICMP protocol tests, and to configure various protections against IP and ICMP-related attacks. It includes the following: • Packet Sanity on page 229 • Max Ping Size on page 231 •...
- Page 246 UDP length verification check. • False. Do not disable relaxed UDP length verification. The NetDefend firewall will not drop packets that fail the UDP length verification check. This is the default. D-Link NetDefend firewall User Guide...
- Page 247 Using SmartDefense Max Ping Size PING (ICMP echo request) is a program that uses ICMP protocol to check whether a remote machine is up. The client sends a request, and the server responds with a reply echoing the client's data. An attacker can echo the client with a large amount of data, causing a buffer overflow.
- Page 248 NetDefend firewall always reassembles all the fragments of a given IP packet, before inspecting it to mak e sure there are no attacks or exploits in the packet. You can configure how fragmented packets should b e handled. D-Link NetDefend firewall User Guide...
- Page 249 Using SmartDefense Table 41: IP Fragments Fields In this field… Do this… orbid IP Fragments Specify whether all f ragmented packets should be dropped, by selecting one of the following: • True. Drop all fragme nted packets. • False. No action. This is the default.
- Page 250 Max. Connections/Second per Source IP threshold, by selecting one of the following: • Log. Log the connections. This is the default. • None. Do not log the connections. D-Link NetDefend firewall User Guide...
- Page 251 Using SmartDefense In this field… Do this… Max. Type the maximum number of network connections allowed per seco Connection s/Secon from the same source IP a ddress. from Same Source IP The default value is 100. Set a lower threshold for stronger protection against DoS attacks. Note: Setting thi s value too low can lead to false alarms.
- Page 252 IPv4 packets (with protocol type 53 - SWIPE, 55 - IP Mobility, 77 - Sun ND, or 103 - Protocol Independent Multicast - PIM), the router will stop processing inbou nd traffic on that interface. D-Link NetDefend firewall User Guide...
- Page 253 Using SmartDefense You can configure how Cisco IOS DOS attacks should be handled. le 44: Cisco IOS DOS In this field… Do this… Action Specify what action to take when a Cisco IOS DOS attack occurs, by selecting one of the following: •...
- Page 254 Action Specify wh at action to ta ke when null payload p ing packets are detected, by selecting one of the following: • Block. Block the packets. This is the default. • None. No action. D-Link NetDefend firewall User Guide...
- Page 255 Using SmartDefense In this field… Do this… Specify whether to log null payload pin g packets, by selecting one of the following: • Log. Log the packets. This is the default. • None. Do not log the packets. This catego ry allows you to configure various protections related to t he TCP protocol.
- Page 256 None. No action. This is the default. Track Specify whether to log null payload ping packets, by selecting one of the following: • Log. Log the packets. This is the default. • None. Do not log the packets. D-Link NetDefend firewall User Guide...
- Page 257 Using SmartDefense Small PMTU Small PMT U (P acket MTU) is a bandwidth attack in which the client fools the server into sendi ng large amounts of data using small packets. Each packet has a large overhead th at creates a "bottleneck" on the server. You can protect against this attack by specify ing a minimum packet size for data...
- Page 258 • Sweep S can. The attacker scans various hosts to determine where a speci port is o pen. You can configure how the NetDefend fire wall should react when a port scan is detected. D-Link NetDefend firewall User Guide...
- Page 259 Using SmartDefense Table 48: Port Scan Fields In this field… Do this… Number of ports SmartDefense detects ports scans by measuring the number of ports accessed accessed over a period of time. The number of ports accessed must exceed the Number of ports accessed value, within the number of seconds specified by the In a period of [seconds] value, in order for SmartDefense to consider the activity a scan.
- Page 260 Specify whether to detect only scans originating from the Internet, by from Internet only selecting one of the following: • False. Do not detect only scans from the Internet. This is the default. • True. Detect only scans from the Internet. D-Link NetDefend firewall User Guide...
- Page 261 Using SmartDefense This category allows you to configure various protections related to the FTP protocol. It includes the following: • FTP Bounce on page 245 • Block Known Ports on page 246 • Block Port Overflow on page 247 • Blocked FTP Commands on page 248 FTP Bounce When connecting to an FTP server, the client sends a PORT command specifying the IP address and port to which the FTP server should connect and send data.
- Page 262 (for example, SMTP is port 25). This provides a second layer of prot ection against FTP bounce attacks, by preventing suc h attacks from reaching well-known ports. D-Link NetDefend firewall User Guide...
- Page 263 Using SmartDefense Table 50: Block Known Ports Fields In this field… Do this… Action Specify what action to take when the FTP server attempts to connect to a well-known port, by selecting one of the following: • Block. Block the connection. •...
- Page 264 FTP command blocking • In the Actio n drop-down list, select Block. listed in the Blocked commands box will be blocked. The FTP commands FTP command blocking is enabled by default. D-Link NetDefend firewall User Guide...
- Page 265 Using SmartDefense To disable FTP command blocking • In the Action drop-down list, select None. All FTP commands are allowed, including those in the Blocked commands box. To block a specific FTP command 1. In the Allowed commands box, select the desired FTP comman 2.
- Page 266 Select the worm patterns to detect. CIFS worm patterns Patterns are matched against file names (including file list paths but excluding the disk shar e name) that the client is tryin g to read or write from the server. D-Link NetDefend firewall User Guide...
- Page 267 Using SmartDefense IGMP This category includes the IGMP protocol. IGMP is used by hosts and routers to dynamically register and discover multicast group membership. Attacks on the IGMP protocol usually target a vulnerability in the multicast routing so ftware/hardware used, by sending specially crafted IGMP packets.
- Page 268 This category includes the following nodes: • KaZaA • Gnutella • eMule • BitTorrent Note: SmartDefense can detect peer-to-peer traffic regardless of the TCP port being used to initiate the session. D-Link NetDefend firewall User Guide...
- Page 269 Using SmartDefense In each node, you can configure how peer-to-peer connections of the selected type should be handled, using the table below. le 54: Peer-to-Peer Fields In t his field… Do this… Acti Specify what action to take when a connection is atte mpted, by selecting one of the following: •...
- Page 270 Note: SmartDefense can detect instant messaging traffic regardless of the TCP port being used to initiate the session. In each node, you can configure how instant messaging connections of the selected type should be handled, using the table below. D-Link NetDefend firewall User Guide...
- Page 271 Using SmartDefense Table 5 5: Instant Messengers Fields this field… Do this… Actio Specify what action to take when a connection is attempted, by selecting one of the following: • Block. Block the connection. • None. N o action. This is the default. Track Specify whether to log instant messenger connections, by selecting one of the following:...
-
Page 272: Using Secure Hotspot
24 hours and granted HotSpot Access permissions only. For information on adding quick guest users, see Adding Quick Guest Users on page 365. D-Link NetDefend firewall User Guide... -
Page 273: Setting Up Secure Hotspot
Using Secure HotSpot You can choose to exclude specific network objects from HotSpot enforcement. For information, see Using Network Objects on page 129. Important: SecuRemote VPN software users who are authenticated by the Internal VPN Server are automatically exempt from HotSpot enforcement. This allows, for example, authenticated employees to gain full access to the corporate LAN, while guest users are permitted to access the Internet only. -
Page 274: Enabling/Disabling Secure Hotspot
• To enable Secure HotSpot for a specific network, select the check box next to the network. • To disable Secure HotSpot for a specific network, clear the check box next to the network. 3. Click Apply. D-Link NetDefend firewall User Guide... -
Page 275: Customizing Secure Hotspot
Using Secure HotSpot Customizing Secure HotSpot To customize Secure HotSpot 1. Click Security in the main menu, and click the My HotSpot tab. The My HotSpot page appears. 2. Complete the fields usin g the information in the table below. Additional fields may appear. - Page 276 Allow a user to Select this option to allow a single user to log on to My HotSpot from multiple login from more computers at the same time. than one computer at the same time D-Link NetDefend firewall User Guide...
-
Page 277: Defining An Exposed Host
Defining an Exposed Host Defining an Exposed Host The NetDefend firewall allows you to define an exposed host, which is a computer that is not protected by the firewall. This is useful for setting up a public server. It allows unlimited incoming and outgoing connections between the Internet and the exposed host computer. - Page 278 To clear the exposed host 1. Click Security in the main menu, and click the Exposed Host tab. The Exposed Host page appears. Clear. 2. Click ick Apply. 3. Cl No exposed host is defined. D-Link NetDefend firewall User Guide...
-
Page 279: Using Vstream Antivirus
Overview Chapter 10 Using VStream Antivirus This chapter explains how to use the VStream Antivirus engine to block security threats before they reach your network. This chapter includes the following topics: Overview ....................263 Enabling/Disabling VStream Antivirus............265 Viewing VStream Signature Database Information .........266 Configuring VStream Antivirus ...............267 Updating VStream Antivirus ..............279 Overview... - Page 280 Note: In protocols that are not listed in this table, VStream Antivirus uses a "best effort" approach to detect viruses. In such cases, detection of viruses is not guaranteed and depends on the specific encoding used by the protocol. D-Link NetDefend firewall User Guide...
-
Page 281: Enabling/Disabling Vstream Antivirus
Enabling/Disabling VStream Antivirus If you are subscribed to the VStream Antivirus subscription service, VStream Antivirus virus signatures are automatically updated, so that security is always up- to-date, and your network is always protected. Note: VStream Antivirus differs from the Email Antivirus subscription service (part of the Email Filtering service) in the following ways: •... -
Page 282: Viewing Vstream Signature Database Information
This system of incremental updates to the main database a llows for quicker updates and saves on network bandwidth. You can v iew information about the VStream signature datab ases currently in use, in the VStream Antivirus page. D-Link NetDefend firewall User Guide... -
Page 283: Configuring Vstream Antivirus
Configuring VStream Antivirus able 58: Account Page Fields This field… Displays… Main database The date and time at which the main database was last updated, followed by t he version number. Daily database The date and time at which the daily database was last updated, followed by the version number. - Page 284 The following rule types exist: VStream Antivirus Rule Types Table 59: VStream Antivirus Rule Types Rule Description Pass This rule type enables you to specify that VStream Antivirus should not scan traffic matching the rule. D-Link NetDefend firewall User Guide...
- Page 285 Configuring VStream Antivirus Rule Description Scan This rule type enables you to specify that VStream Antivirus should scan traffic matching the rule. If a virus is found, it is blocked and logged. Adding and Editing Rules To add or edit a rule 1.
- Page 286 3. Select the type of rule you want to create. 4. Click Next. The Step 2: Service dialog box appears. The example below shows a Scan rule. 5. Complete the fields using the relevant information in the table below. D-Link NetDefend firewall User Guide...
- Page 287 Configuring VStream Antivirus 6. Click Next. The Step 3: Destination & Source dialog box appears. 7. Complete the fields using the relevant information in the table below. The Step 4: Done dialog box appears. 8. Click Finish. The new rule appears in the Firewall Rules page. Chapter 10: Using VStream Antivirus...
- Page 288 To specify an IP address, select Specified IP and type the desired IP address source is in the filed provided. To specify an IP address range, select Specified Range and type the desired IP address range in the fields provided. D-Link NetDefend firewall User Guide...
- Page 289 Configuring VStream Antivirus In this field… Do this… And the Select the destination of the connections you want to allow or block. destination is To specify an IP address, select Specified IP and type the desired IP address in the text box. To specify an IP address range, select Specified Range and type the desired IP address range in the fields provided.
- Page 290 To delete an existing rule 1. Click Antivirus in the main menu, and click the Policy tab. The Antivirus Policy page appears. 2. Click the Erase icon of the rule you wish to delete. A confirmation message appears. D-Link NetDefend firewall User Guide...
-
Page 291: Configuring Vstream Advanced Settings
Configuring VStream Antivirus 3. Click OK. The rule is deleted. Configuring VStream Advanced Settings configure VStream Antivirus ad vanced settings Click Antivirus in the main menu, and click the Advanced tab. The Advanced Antivirus Settings page appears. 2. Complete the fields using the table below. 3. - Page 292 The following file extensions: ade, adp, bas, bat, chm, cmd,com, cpl, crt, exe, hlp, hta, inf, ins, isp, js, jse, lnk, mdb, mde, msc, msi, msp , mst, pcd, pif, reg, scr, sct, shs,shb, url, vb, vbe, vbs, wsc, wsf, wsh. D-Link NetDefend firewall User Guide...
- Page 293 Configuring VStream Antivirus In this field… Do this… Pass safe file types Select this option to accept common file types that are known to without scanning be safe, without scanning them. Safe files types are: • MPEG streams • RIFF Ogg Stream •...
- Page 294 Specify how VStream Antivirus should handle archive such files, by selecting one of the following: • Pass file without scanning. Accept the file without scanning it. This is the default. • Block file. Block the file. D-Link NetDefend firewall User Guide...
-
Page 295: Updating Vstream Antivirus
Updating VStream Antivirus Updating VStream Antivirus When you are subscribed to the VStream Antivirus updates service, VStream Antivirus virus signatures are automatically updated, keeping security up-to-date with no need for user intervention. However, you can still check for updates manually, if needed. To update the VStream Antivirus virus signature database 1. -
Page 297: Using Subscription Services
Connecting to a Service Center Chapter 11 Using Subscription Services is chapter explains how to start subscription services, and ho w to use Software Updates, Web Filtering, and Email Filtering services. Note: Check with your reseller regarding availability of subscription services, or surf to www.sofaware.com/servic ecenters to locate a Service Center in your area. - Page 298 Connecting to a Service Center The Account page appears. 2. In the Service Account area, click Connect. D-Link NetDefend firewall User Guide...
- Page 299 Connecting to a Service Center The NetDefend Services Wizard opens, with the Service Center dialog box displayed. Make sure the Connect to a different Service Center check box is selected. Do one of the following: • To connect to the Sofa Ware Service Center, choose usercenter.sofaware.com.
- Page 300 Enter your gateway ID and registration key in the appropriate fields, as given your service provider, then click Next. to you by • The Conne cting… screen appears. • The Confir mation dia log box appears with a list of services to which you are subscribed. D-Link NetDefend firewall User Guide...
- Page 301 Connecting to a Service Center Next. 6. Click The Done screen appears with a success message. 7. Click Fin ish. following things happe • If a new fi rmware is available, the NetDefend firewall may start downloadi ng it. This may take severa l minutes.
- Page 302 • The services to which you are subscribed are now available on your nd listed as such on the Account page. See Viewing NetDefend firewall a Services Information on page 287 for further information. • The Services submenu includes the services to which you are subscribed. D-Link NetDefend firewall User Guide...
-
Page 303: Viewing Services Information
Viewing Services Information Viewing Services Information e Account page displays the following information about your subscription. able 62: Accoun t Page Fields This field… Displays… Service Center The name of the Service Center to which you are connected (if known). Name Gateway ID Your gateway ID. -
Page 304: Refreshing Your Service Center Connection
Your service settings are refreshed. Configuring Your Account This option allows you to access your Service Center's Web site, which may offer additional configuration options for your account. Contact your Service Center for a user ID and password. D-Link NetDefend firewall User Guide... -
Page 305: Disconnecting From Your Service Center
Disconnecting from Your Service Center To configure your account Click Services in the main menu, and click the Account tab. The Account page appears. 2. In the Service Account area, click Configure. Note: If no additional settings are available from your Service Center, this button will not appear. -
Page 306: Web Filtering
Enabling/Disabling Web Filtering Note: If you are remotely managed, contact your Service Center to change these settings. To enable/disable Web Filtering 1. Click Services in the main menu, and click the Web Filtering tab. D-Link NetDefend firewall User Guide... -
Page 307: Selecting Categories For Blocking
Web Filtering The Web Filtering page appears. 2. Drag the On/Off lever upwards or downwards. W b Filtering is enabled/disabled. Selec ting Categories for Blocking You c an define which types of Web sites should be considered appropriate fo r your family o r office members, by selecting the categories. -
Page 308: Temporarily Disabling Web Filtering
To temporarily disable Web Filtering 1. Click Services in the main menu, and click the Web Filtering tab. The Web Filtering page appears. 2. Click Snooze. • Web Filtering is temporarily disabled for all internal network computers. D-Link NetDefend firewall User Guide... - Page 309 Web Filtering • The Snooze button changes to Resume. • The Web Filtering Off popup window opens. To re-enable the service, click Resume, either in the popup window, or on t b Filtering page. • The service is re-enabled for all inte rnal network computers.
-
Page 310: Automatic And Manual Updates
However, you can still check for updates manually, if needed. To manually check for security and software updates 1. Click Services in the main menu, and click the Software Updates tab. D-Link NetDefend firewall User Guide... -
Page 311: Checking For Software Updates When Locally Managed
Automatic and Manual Updates The Software Updates page appears. 2. Click Update Now. The system checks for new updates and installs them. Checking for Software Updates when Locally Managed If your NetDefend firewall is locally managed, you can set it to automatically check for software updates, or you can set it so that software updates must be checked for manually. - Page 312 Automatic/Manual lever downwards. manually, dra The NetDefen d firewall does not check for software updates automatical ck for software updates, click Update Now. 4. To manually che The system checks for new updates and installs them. D-Link NetDefend firewall User Guide...
-
Page 313: Working With Vpns
Overview Chapter 12 Working With VPNs This chapter des cribes how to use your NetDefend firewall as a Remote A ccess VPN Cl ient, serv er, or gateway. This chapter includes the following topics: Overview ....................297 ..Setting Up Your Net Defend firewall as a VPN Server......303 Adding and Editi ng VPN Sites ..............308... -
Page 314: Site-To-Site Vpns
Service Center, then the Service Center can automaticall y deploy VPN configuration for your appliance. Site-to-Site VP A Site-to-Site VPN consists of two or more Site-to-Site VPN Gateways that can communicate with each other in a bi-directional relationship. The connected D-Link NetDefend firewall User Guide... - Page 315 Overview networks function as a single network. You can use this type of VPN to mesh office branches into one corporate network. Figure 12: Site-to-Site VPN Chapter 12: Working With VPNs...
- Page 316 VPN site, using the procedure Adding and Editing VPN Sites on page 308. b. Then enable the Remote Access VPN Server using the procedure Setting Up Your NetDefend firewall as a R emote Access VPN Server on page 303. D-Link NetDefend firewall User Guide...
-
Page 317: Remote Access Vpns
Overview Remote Access VPNs A Remote Access VPN consists of one Rem ote Access VPN Server or Site-to-S VPN Gateway, and one or m ore Remote Access VPN Clients. You can use this type of VPN to make an office network remotely available to authorized users, ch as employees working from home, who connect t o the office Remote Access Server with their Remote Access V... -
Page 318: Internal Vpn Server
Inter al security threats cause outages, downtime, and lost revenue. Wired networks that deal with highly sensitive information—especially networks in public places, such as classrooms—are vulnerable to users trying to hack th internal network. D-Link NetDefend firewall User Guide... -
Page 319: Setting Up Your Netdefend Firewall As A Vpn Server
Setting Up Your NetDefend firewall as a VPN Server Using the internal VPN Server, along with a strict security policy for non-VPN users, can enhance security both for wired networks and for wireless networks, which are particularly vulnerable to security breaches. The internal VPN Server can be used in the NetDefend firewall wireless appliance, regardles s of the wireless security settings. - Page 320 See Setting Up Remote VPN Access for Users on page 367. Note: Disabling the VPN Server for a specific ty pe of connection (from the Internet or from internal networks) will caus e all existing VPN tunnels of that type to disconnect. D-Link NetDefend firewall User Guide...
-
Page 321: Configuring The Remote Access Vpn Server
Setting Up Your NetDefend firewall as a VPN Server Configuring the Remote Access VPN Server configure the Remote Access VPN Serv Click VPN in the main menu, and click the VPN Server tab. The SecuRemote VPN Server page appears. 2. Select the llow SecuRemote users to connect from the Internet check box. Chapter 12: Working With VPNs... -
Page 322: Configuring The Internal Vpn Server
The Remote Access VPN Server is enabled for the specified connection types. Configuring the Internal VPN Server To configure the internal VPN Server 1. Click VPN in the main menu, and click the VPN Server tab. The SecuRemote VPN Server page appears. D-Link NetDefend firewall User Guide... -
Page 323: Installing Securemote
Setting Up Your NetDefend firewall as a VPN Server Select the Allow SecuRemote users to connect from my internal ne tworks check box. New check boxes appear. To allow authenticated users co nnecting from internal networks to bypass the on, select the Bypass firewall and access your internal network without restricti the firewall check box. -
Page 324: Adding And Editing Vpn Sites
PN Client icon in the taskbar, select Settings, and then click Help. Adding and Editing VPN Sites To add or edit VPN sites 1. Click VPN in the main menu, a nd click the VPN Sites tab. D-Link NetDefend firewall User Guide... - Page 325 Adding and Editing VPN Sites The VPN Sites page appears with a list of VPN sites. Do one of the following: • To add a VPN site, click New Site. • To edit a VPN site, click Edit in the desired VPN site’s row. Chapter 12: Working With VPNs...
- Page 326 • Select Remote Access VPN to establish remote access from your Remote Access VPN Client to a Remote Access VPN Server. • ect Site-to-Site VPN to create a permanent bi-directional connection to ther Site-to-Site VPN Gateway. 4. Click Next. D-Link NetDefend firewall User Guide...
-
Page 327: Configuring A Remote Access Vpn Site
Adding and Editing VPN Sites Configuring a Remote Access VPN Site If you selected Remote Access VPN, the VPN Gateway Address dialog box appears. 1. Enter the IP address of the Remote Access VPN Server to which you want to connect, as given to you by the network administrator To allow the VPN site to bypass the firewall and access your internal network without restriction, select the Bypass the firewall check box. - Page 328 4. Specify how you want to obtain the VPN network configuration. Refer to VPN Network Configuration Fields on page 320. 5. Click Next. The following things happen in the order below: • If you chose Specify Configuration, a second VPN Network Configuration dialo g bo x appears. D-Link NetDefend firewall User Guide...
- Page 329 Adding and Editing VPN Sites Complete the fields using the information in VPN Network Configuration Fields on page 320 and click Next. • The Auth entication Method dialog box appears. 6. Complete the fields using the information in Authentication Methods Fields on page 322.
- Page 330 If you selected Username and Password, the VPN Login dialog b ox appears. 1. Complet e the fields using the information in VPN Login Fields o n page 322. 2. Click Next. • If you selected Automatic Login, the Connect dialog box appea D-Link NetDefend firewall User Guide...
- Page 331 Adding and Editing VPN Sites Do the following: PN Server, select the Try 1) To try to connect to the Remote Access V to Con nect to the VPN Gateway check box. This allows you to test the VPN connection. Warning: If you try to connect to the VPN site before c ompleting the wizard, all existing tunnels will be terminated.
- Page 332 The VPN Sites page reappears. If you added a VPN site, the new site appears in the VPN Sites list. If you edited a VPN site, the modifications are reflected in the VPN Sites list. Certificate Authentication Method If you selected Certificate, the Connect dialog box appears. D-Link NetDefend firewall User Guide...
- Page 333 Adding and Editing VPN Sites 1. To try to connect to the Remote Access VPN Server, select the Try to Connect to the VPN Gateway check b This allows you to test the VPN connection. Warning: If you try to connect to the VPN site befo re completing the wizard, all existing tunnels will be terminated.
- Page 334 VP N Sites list. If you edited a VPN site, the modifications are r eflected in the VPN Sites lis RSA SecurID Authentication Method If you selected RSA SecurID, the Site Name dialog box appears. D-Link NetDefend firewall User Guide...
- Page 335 Adding and Editing VPN Sites Enter a name for the VPN site. You may choose any name. 2. Click Next. The VPN Site Created screen appears. Click Finish. The VPN Sites page reappears. If you added a VPN site, the new site ap pears in the VPN Sites list.
- Page 336 Internet resources through the central office, you can choose to route all traffic from the rem ote offices through the central office. Note: You can onl y configure one VPN site to route all traffic. D-Link NetDefend firewall User Guide...
- Page 337 Adding and Editing VPN Sites In this field… Do this… Route Based VPN ick this option to create a virtual tunnel interface (VTI) for this site, so at it can participate in a route-based VPN. oute-based VPNs allow routing connections over VPN tunnels, so that mote VPN sites can participate in dynamic or static routing schemes.
- Page 338 When authenticating to the VPN site, you must enter a four-digit PIN code and the SecurID passcode shown in your SecurID token's display. The RSA SecurID token generates a new passcode every minute. SecurID is only supp orted in Remote Access manual login mode. D-Link NetDefend firewall User Guide...
- Page 339 Adding and Editing VPN Sites able 65: VPN Login Fields In th is field… Do this… anual Login Click thi s option to configure the site for Manual Login. Manual Login connects only the computer you are currently logged onto the VPN site, and only when the appropriate user name and password have been entered.
-
Page 340: Configuring A Site-To-Site Vpn Gateway
If you selected Site-to-Site VPN, the VPN Gateway Address dialog box appears. 1. Complete the fields using the information in VPN Gateway Address Field s on page 335. 2. Click Next. The VPN Network Configuration dialo g box appears. D-Link NetDefend firewall User Guide... - Page 341 Adding and Editing VPN Sites 3. Specify how you want to obtain the VPN network configuration. Refer to VPN Network Configuration Fields on page 320. 4. Click Next. • If you chose Specify Configuration, a second VPN Network Configuration dialog box appears. Complete the fields using the information in VPN Network Configuration Fields on page 320, and then click Next.
- Page 342 Complete the fields using the information in Route Based VPN Fields on d then click Next. page 33 6, an • The Authent ication Method dialog box appears. 5. Complete the fi elds using the information in Authentication Methods Fields on page 337. 6. Click Next. D-Link NetDefend firewall User Guide...
- Page 343 Adding and Editing VPN Sites Shared Secret Authentication Method Shared Sec ret, the Authentication dialog box appears. If you sele cted If you chose Download Configuration, the dialog box contains additional fields. 1. Complete the fields using the information in VPN Authentication Fields on page 337 and click Next.
- Page 344 The Security Methods dialog box appears. 2. To configure advanced security settings, click Show Advanced Settings. New fields appear. 3. Complete the fields using the information in Security Methods Fields on page 337 and click Next. D-Link NetDefend firewall User Guide...
- Page 345 Adding and Editing VPN Sites The Connect dialog box appears. 4. To try to connect to the Remote Access VPN Server, select the Try to Connect to the VPN Gateway check box. This allows you to test the VPN connection. Warning: If you try to connect to the VPN site b efore comp leting the wizard, all...
- Page 346 7. To keep the tunnel to the VPN site alive even if there is no network traffic between the NetDefend firewall and the VPN site, select Keep this site alive. . Click Next. D-Link NetDefend firewall User Guide...
- Page 347 Adding and Editing VPN Sites • If you selected Keep this site alive, and previously you chose Download Conf iguration, the "K ep Alive" Configuration dialog box appears. Do the following: 1) Type up to three IP addresses which the NetDefend firewall should ping in order to keep the tunnel to the VPN site alive.
- Page 348 • If you chose Download Configuration, the Authentication dialog box appears. Complete the fields using the information in VPN Authentication Fields on page 337 and click Next. • The Security Methods dialog box appears. 1. To configure advanced security settings, click Show Advanced Settings. D-Link NetDefend firewall User Guide...
- Page 349 Adding and Editing VPN Sites New fields appear. 2. Complete the fields using the info rmation in Security Methods Fields on page 337 and click Next. The Connect dialog box appears. emote Access VPN Server, select the Try to Connect to 3.
- Page 350 You may choose any name. 6. To keep the tunnel to the VPN site alive even if there is no network traffic between the NetDefend firewall and the VPN site, select Keep this site alive. 7. Click Next. D-Link NetDefend firewall User Guide...
- Page 351 Adding and Editing VPN Sites • If you selected Keep this site alive, and previously you chose Download Configuration, the "Keep Alive" Configuration dial og box appears. Do the following: 1) Type up to three IP addresses which the NetDefend firewall should ping in order to keep th e tunnel to the VPN site alive.
- Page 352 NetDefend command line interface (CLI). For information on using CLI, see Controlling the Appliance via the Command Line on page 386. For information on the relevant commands for OSPF, refer to the NetDefend CLI Reference Guide. D-Link NetDefend firewall User Guide...
- Page 353 Adding and Editing VPN Sites Tabl e 68: Authentication Methods Fields In this field… Do this… Shared Secret Select this option to use a shared secret for VPN authentication. A shared secret is a string used to identify VPN sites to each other. Certificate Select this option to use a certificate for VPN authentication.
- Page 354 Security Methods Select the encryption and integrity algorithm to use for VPN traffic: • Automatic. The NetDefend firewall automatically selects the best security methods supported by the site. This is the default. • A specific algorithm D-Link NetDefend firewall User Guide...
- Page 355 Adding and Editing VPN Sites In this field… Do this… erfect Forward Specify whether to enable Perfect Forward Secrecy (PFS), by selecting Secrec one of the following: • Enabled. PFS is ena bled. The Diffie-Hellman group field is enabled. • Disabled.
-
Page 356: Deleting A Vpn Site
2. T enable a VPN site, do t he following: a. Click the icon in the desired VPN site’s row. A confir mation m essage appears. b. Click The icon cha nges to , and the VPN site is enabled. D-Link NetDefend firewall User Guide... -
Page 357: Logging On To A Remote Access Vpn Site
Logging on to a Remote Access VPN Site 3. To disable a VPN site, do the following: Note: Disab ling a VPN site eliminates the tunne l and erases the network topology. a. Cli ck the icon in the desired VPN site’s row. A confirmat ion message appears. -
Page 358: Logging On Through The Netdefend Portal
2. From the Site Name list, select the site to which you want to log on. Note: Disabled VPN sites will not appear in the Site Name list. 3. Type your user name and password in the appropriate fields. 4. Click Login. D-Link NetDefend firewall User Guide... -
Page 359: Logging On Through The My.vpn Page
Logging on to a Remote Access VPN Site • If the NetDefend firewall is configured to automatically download the network configuration, the NetDefend firewall downloads the network configuration. • If when adding the VPN site you specified a network configuration, the NetDefend firewall attempts to create a tunnel to the VPN site. - Page 360 • Once the NetDefend firewall has finished conn ecting, the Status field changes to “Connected”. • Th e VPN Login Status box remains open until you manually log off of th N site. D-Link NetDefend firewall User Guide...
-
Page 361: Logging Off A Remote Access Vpn Site
Logging off a Remote Access VPN Site Logging off a Remote Access VPN Site You need to manually log off a VPN site, if it is a Remote Access VPN site configured for Manual Login. To log off a VPN site •... -
Page 362: Generating A Self-Signed Certificate
In this ca se, there is no need to generate a self-signed certificate. enerating a Self-Signed Certificate To generate a self-signed certificate 1. Click VPN in the main menu, and click the Certificate tab. D-Link NetDefend firewall User Guide... - Page 363 Installing a Certificate The Certificate page appears. 2. Click Install Certificate. The NetDefend Certificate Wizard opens, with the Certificate Wizard dialog box displayed. 3. Click Generate a self-signed security certificate for this gateway. Chapter 12: Working With VPNs...
- Page 364 Complete the fields using the information in the table below. Click Next. The NetDefend firewall generates the certificate. This may take a few seconds. The Done dialog box appears, displaying the certificate's details. 6. Click Finish. D-Link NetDefend firewall User Guide...
- Page 365 Installing a Certificate The NetDefend firewall installs the certificate. If a certificate is already installed, it is overwritten. The Certificate Wizard closes. The Certificates page displays the following information: • The gateway's certificate • The gateway's name • The gateway certificate's fingerprint •...
-
Page 366: Importing A Certificate
Certificate tab. The Certificate page appears. 2. Click Install Certificate. The NetDefend Certificate Wizard opens, with the Certificate Wizard dialog box displayed. 3. Click Import a security certificate in PKCS#12 format. D-Link NetDefend firewall User Guide... - Page 367 Installing a Certificate The Import Certificate dialog box appears. 4. Click Browse to open a file browser from which to locate and select the file. e filename that you selected is displayed. Click Next. The Import-Certificate Passphrase dialog box appears. This may take a few ments.
-
Page 368: Uninstalling A Certificate
Note: If you want to replace a currently installed certificate, there is no need to uninstall the certificate first. When you install the new certificate, the old certificate will be overwritten. D-Link NetDefend firewall User Guide... -
Page 369: Viewing Vpn Tunnels
Viewing VPN Tunnels To uninstall a certificate 1. Click VPN in th lick the Certificate tab. e main menu, and c The Certificate page appears with the name of the currently installed certificate. 2. Click Uninstall. A confirma tion message appears. 3. - Page 370 The currently active security protocol (IPSEC). Source The IP address or address range of the entity from which the tunnel originates. The entity's type is indicated by an icon. See VPN Tunnel Icons on page 355. D-Link NetDefend firewall User Guide...
- Page 371 Viewing VPN Tunnels This field… Displays… Destination The IP address or address range of the entity to which the tunnel is connected. entity's type is indicated by an icon. See VPN Tunnel Icons on page 355. Secu rity The type of encr yption used to secure the connection, and the type of Message Authentication Code (MAC) used to verify the integrity of the...
-
Page 372: Viewing Ike Traces For Vpn Connections
1. Click Reports in the main menu, and click the VPN Tunnels tab. The VPN Tunnels page appears with a table of open tunnels to VPN sites. 2. Click Clear IKE Trace. All IKE trace data currently stored on the NetDefend firewall is cleared. D-Link NetDefend firewall User Guide... - Page 373 Viewing IKE Traces for VPN Connections To view the IKE trace for a conne ction 1. Establish a VPN tunnel to t he VPN site with which you are experiencing connection problems. For information on when and how VPN tunnels are established, see Viewing VPN Tunnels on page 353.
-
Page 375: Managing Users
Changing Your Password Chapter 13 Managing Users This chapter desc ribes how to manage NetDefend firewall users. You can defi multiple users, set the ir passwords, and assign them various permissions. This chapter includes the following topics: Changing Your Passwo rd .................359 Adding and Editing Users ............... - Page 376 Changing Your Password The Internal Users page appears. your username, click Edit. In the row of The Account Wiza rd opens displaying the Set User Details dialog box. 3. Edit the Password and Confirm password fields. D-Link NetDefend firewall User Guide...
-
Page 377: Adding And Editing Users
Adding and Editing Users Note: U se 5 to 25 characters (letters or numbers) for the new password. 4. Click Ne The Set User Permissions dialog box appears. ick Finish. 5. Cl Your changes are saved. Adding and Editing Users This procedure explains how to add and edit users. - Page 378 Edit next to the desire user. e Acco unt Wizard opens d isplaying the Set User Details dialog bo 3. Complete the fields using the information in Set User Details Fields on page 363. 4. Click Next. D-Link NetDefend firewall User Guide...
- Page 379 Adding and Editing Users The Set User Permissions dialog box appears. The options that appear on the page are dependant on the software and services you are using. 5. Complete the fields using the information in Set Use r Permissions Fields on page 364.
- Page 380 Select this option to allow the user to connect to this NetDefend firewall ccess using their VPN client. For further information on setting up VPN remote access, see Setting Up Remote VPN cess for Users on page 367. D-Link NetDefend firewall User Guide...
-
Page 381: Adding Quick Guest Hotspot Users
Select this option to allow the user to log on to the My HotSpot page. For information on Secure HotSpot, see Configuring Secure HotSpot on page 256. This option only appears in DFL-CP310 with Power Pack. Adding Quick Guest HotSpot Users The NetDefend firewall provides a shortcut for quickly adding a guest HotSpot user. - Page 382 Print. 4. To print th 5. Click Finish The guest user is saved. You can edit the guest user's details and permissions using the procedure Adding and Editing Users o n page 361. D-Link NetDefend firewall User Guide...
-
Page 383: Viewing And Deleting Users
Viewing and Deleting Users iewing a nd Deleting Users Note : The “admin” user cannot be deleted. To view or delete users ck Users in the main menu, and click the Internal Users tab. 1. Cli The Inte rnal Users page appears with a list of all users and their permissions. The expiration time of expired users appears in red. -
Page 384: Using Radius Authentication
A to the NetDefend gateway as part of response to the authentication req uest, and the gateway assigns the user permissions as specified in the VSA. If the VSA is not returned by the RADIUS D-Link NetDefend firewall User Guide... - Page 385 Using RADIUS Authentication server for a specific user, the gateway will use the default permission set for this user. use RADIUS authentication 1. Click Users in the main menu, and click the RADIUS tab. RADIUS page appears. 2. Complete the fields using the table below. Apply.
- Page 386 To clear the text box, click Clear. Port Type the port number on the RADIUS server’s host computer. The default port number is 1812. hared Secret Type the shared secret to use for secure communication with the RADIUS server. D-Link NetDefend firewall User Guide...
- Page 387 Using RADIUS Authentication In this field… Do this… Realm If your organization us es RADIUS realms, type the realm to append to RADIUS requests. The realm will be appended to the username as follows: <username>@<realm> For example, if you set the realm to “myrealm”, and the user "JohnS" attempts to log on to the NetDefend Portal, the NetDefend firewall will send the R...
-
Page 388: Configuring The Radius Vendor-Specific Attribute
HotSpot Access Select this option to allow the user to access the My HotSpot page. This option only appears in DFL-CP310 with Power Pack. Configuring the RADIUS Vendor-Specific Attribute For detailed instructions and examples, refer to the "Configuring the RADIUS Vendor-Specific Attribute"... - Page 389 Configuring the RADIUS Vendor-Specific Attribute Table 77: VSA Syntax Permission Description Attribute Attribute Attribute Values Notes Number Format none. The user dmin Indicates the String administrator’s cannot ac cess the level of access to NetDefend Portal. the NetDefend readonly. The user Portal can log on to the NetDefend Portal,...
- Page 390 The user can Indicates w hether String This permission is the user can override Web only relevant if overrid e Web Filtering. the Web Filtering Filtering. service is false. The user enabled. cannot override Web Filtering. D-Link NetDefend firewall User Guide...
-
Page 391: Maintenance
Viewing Firmware Status Chapter 14 Maintenance This chapter describes the tasks required for maintenance and diagnosis of your etDefend firewall. This chapter includes the following topics: Viewing Firmware Status .................375 Updating the Firmware................377 Upgrading Your Software Product ............379 Registering Your NetDefend firewall............383 Configuring Syslog Logging ..............384 Controlling the Appliance via the Command Line ........386 Configuring HTTPS .................390... - Page 392 WAN MAC Address The MAC address used for 00:80:11:22:33:44 the Internet connection Firmware Version The current version of the firmware Installed Product The licensed software and NetDefend unlimited nodes the number of allowed nodes D-Link NetDefend firewall User Guide...
-
Page 393: Updating The Firmware
Updating the Firmware This field… Displays… For example… Uptim The time that elapsed from 01:21:15 the moment the unit was turned on Hardware Type The type of the current Sbox-500 NetDefend firewall hardware ardware Version The current hardware version of the NetDefe firewall Updating the Firmware you are subscribed to Software Updates, firmware updates are performed... - Page 394 Updating may take a few minutes, during which time the PWR/SEC LED may start flashing red or orange. Do not power off the appliance. At the end of the process the NetDefend firewall restarts automatically. D-Link NetDefend firewall User Guide...
-
Page 395: Upgrading Your Software Product
Upgrading Your Software Product u can upgrade your NetDefend fire wall by adding the DFL-CP310 Power Pack. After purchasing the Power Pack, you will receive a new Product Key that enables you to use the Power Pack on the same NetDefend firewall you have today. There is no need to replace your hardware. - Page 396 Enter a d iffer ent Product Key. 3. Click Product Key field, enter the new Product Key. 4. In the 5. Click Next. The Installe d New Product Key dialog box appears. 6. Click Next. D-Link NetDefend firewall User Guide...
- Page 397 Upgrading Your Software Product The first Registration dialog box appears. 7. Do one of the following: • To register your NetDefend firewall later on, clear the I want to register my product check box and then click Next. • To register your NetDefend firewall now, do the following: 1) Click Next.
- Page 398 2) Enter your contact information in the appropriate fields. 3) To receive email notifications regarding new firmware versions and services, select the check box. 4) Click Next. The Registration… screen app ears. The third Registration dialog box appears. D-Link NetDefend firewall User Guide...
-
Page 399: Registering Your Netdefend Firewall
If you want to activate your warranty and optionally receive notifications of new firmware versions and services, you must register your NetDefend firewall. Privacy Statement: D-Link is committed to protecting your privacy. We use the information we collect about you to process orders and to improve our ability to serve your needs. -
Page 400: Configuring Syslog Logging
Note: Kiwi Syslog Daemon is freeware and can be downloaded from http://www.kiwisyslog.com. For technical support, contact Kiwi Enterprises. configure Syslog logging 1. Click Setup in the main menu, and click the Logging tab. D-Link NetDefend firewall User Guide... - Page 401 Configuring Syslog Logging The Logging page appears. 2. Complete the fields using the information in the table below. 3. Click Apply. Table 79: Logging Page Fields In this field… Do this… Syslog Serv Type the IP address of the computer that will run the Syslog service twork computers), or click This Computer to allow your (one of your ne computer to host the service.
-
Page 402: Controlling The Appliance Via The Command Line
Using the NetDefend Portal You can control your appliance via the NetDefend Portal's command line interface. To control the appliance via the NetDefend Portal 1. Click Setup in the main menu, and click the Tools tab. D-Link NetDefend firewall User Guide... - Page 403 Controlling the Appliance via the Command Line The Tools page appears. 2. Click Command. The Command Line page appears. 3. In the upper field, type a command. Chapter 14: Maintenance...
-
Page 404: Using The Serial Console
1. Connect the serial console to your NetDefend firewall's serial port, using an RS- 232 Null modem cable. For information on locating the serial port, see Rear Panel. 2. Click Network in the main menu, and click the Ports tab. D-Link NetDefend firewall User Guide... - Page 405 Controlling the Appliance via the Command Line The Ports page appears. 3. In the RS232 drop-down list, select Console. 4. Click Apply. You can now control the NetDefend firewall from the serial console. For information on all supported commands, refer to the NetDefend CLI Reference Guide.
-
Page 406: Configuring Https
See Access Options on page 391 for information. Warning: If remote HTTPS is enabled, your NetDefend firewall settings can be changed remotely, so it is especially important to make sure all NetDefend firewall users’ passwords are difficult to guess. D-Link NetDefend firewall User Guide... - Page 407 Configuring HTTPS Note: You can use HTTPS to access the NetDefend Portal from your internal network, by surfing to https://my.firewall. If you selected IP Address Range, additional fields appear. 3. If you selected IP Address Range, enter the desired IP address range in the fields provided.
-
Page 408: Configuring Ssh
To configure SSH 1. Click Setup in the main menu, and click the Management tab. The Management page appears. 2. Specify from where SSH access should be granted. D-Link NetDefend firewall User Guide... - Page 409 Configuring SSH See Access Options on page 391 for information. Warning: If remote S SH is enabled, your NetDefend firewall settings can be changed remotely, so it is especially important to make sure all NetDefend firewall users’ passwords are difficult to guess. If you selected IP Address Range, additional fields appear.
-
Page 410: Configuring Snmp
1. Click Setup in the main menu, and click the Management tab. The Management page appears. 2. Specify from where SNMP access should be granted. See Access Options on page 391 for information. If you selected IP Address Range, additional fields appear. D-Link NetDefend firewall User Guide... - Page 411 Configuring SNMP The Community field and the Advanced link are enabled. 3. If you selected IP Address Range, enter the desired IP address range in the fields provid 4. In the Community field, type the name of the SNMP community string. SNMP clients uses the SNMP community string as a password, when connecting to the NetDefend firewall.
- Page 412 SN MP clients, and is u seful for admi nistrative purp oses. System Contact pe the name of the contact person This information will be visible to SNMP clients, and is useful for administrative purposes. D-Link NetDefend firewall User Guide...
-
Page 413: Setting The Time On The Appliance
Setting the Time on the Appliance In this field... Do this… SNMP Port Type the port to use for SNMP. The default port is 161. Setting the Time on the Appliance You set the time displayed in the NetDefend Portal during initial appliance setup. If desired, you can change the date and time using the procedure below. - Page 414 The following things happen in the order below: • If you selected Specify date and time, the Specify Date and Time dialog box appea Set the date, time, and time zone in the fields provided, then click Next. D-Link NetDefend firewall User Guide...
- Page 415 Setting the Time on the Appliance • If you selected Use a Time Server, the Time Servers dialog box appears. Complete the fields using the information in Time Servers Fields on page 0, then click Next. • The Date and Time Updated screen appears. 5.
- Page 416 Secondary Server Type the IP address of the Sec ondary NTP server. This fiel d is optional. Clear Clear th e field. elect your time zone Select the time zone in which you are located. D-Link NetDefend firewall User Guide...
-
Page 417: Using Diagnostic Tools
Using Diagnostic Tools Using Diagnostic Tools The NetDefend firewall is equipped with a set of diagnostic tools that are useful for troubleshooting Internet connectivity. Table 84: Diagnostic Tools se this To do this… For information, see... ol… Ping Check that a specific IP address or DNS Using IP Tools on page 402 name can be reached via the Internet. -
Page 418: Using Ip Tools
(round-trip) in milliseconds. • If you selected Traceroute, the following things happen: The NetDefend firewall connects to the specified IP address or DNS name. D-Link NetDefend firewall User Guide... - Page 419 Using Diagnostic Tools The IP Tools window opens and displays a list of routers used to make the connection. • If you selected WHOIS, the following thi ngs happen: The NetDefend firewall queries the Inte rnet WHOIS server. A window displays the name of the en y to which the IP address or DNS name is registered and their con...
-
Page 420: Using Packet Sniffer
1. Click Setup in the main menu, and Tools tab. click the The Tools pag e appears. 2. Click Sniffer. The Packet Sniffer window opens. 3. Complete the fields using the info rmation in the table below. 4. Click Start. D-Link NetDefend firewall User Guide... - Page 421 Using Diagnostic Tools The Packet Sniffer window disp lays the name of the interface, the number of packets collected, and the percenta ge of storage space remaining on the appliance for storing the p ackets. 5. Click Stop to stop collecting packets. A standard File Download dialog box appears.
- Page 422 Select this option to capture incom ing and outgoing packets for this to/from this gate gateway only. If this option is not selected, Pack et Sniffer will collect packets for all traffic on the interface. D-Link NetDefend firewall User Guide...
-
Page 423: Filter String Syntax
Using Diagnostic Tools ilter String Syntax The following represents a li st of basic filter s tring elements: • and on page 407 • dst on page 408 • dst port on page 408 • ether proto on page 409 •... - Page 424 The following filter string saves packets th at a re destined for the IP address 192.168.10.1: dst 192.168.10.1 dst port URPOSE element captures all packets d estined for a specific port. dst port YNTAX dst port port D-Link NetDefend firewall User Guide...
- Page 425 Using Diagnostic Tools Note: This element can be pre pended by tc p or u dp. For information, see tcp on page 413 and udp on page 414. ARAMETERS port Intege r. The port t o which the packet is sent. XAMPLE The following filter string saves packets th at are destined for port 80:...
- Page 426 The following filter string saves all packets that either originated from IP address 192.168.10.1, or are destined for that same IP address: host 192.168.10.1 URPOSE element is used to negate filter string elements. YNTAX not element ! element ARAMETERS element String. A filter string element. D-Link NetDefend firewall User Guide...
- Page 427 Using Diagnostic Tools XAMPLE The following filter string saves packets that are not destined for port 80 not dst port 80 POSE element is used to alternate between str ing elements. The filtered packets must match at least on e of the filter string elem ents.
- Page 428 The fo llowing filter string saves packets that or iginated from IP address 192.168.10.1: src 192.168.10.1 src po URPOSE eleme nt captures all packets originating from a specific port. src port YNTAX src port port D-Link NetDefend firewall User Guide...
- Page 429 Using Diagnostic Tools Note: This element can be prepended by tcp or udp. F or info rmation, see tcp on page 4 13 and udp on page 414. ARAMETER port Integer. The port to which the p acket is sent. XAMPLE he following f ilter string saves packets that...
- Page 430 UDP packet s originating from or destined for a specific por • src port apture all UD P packets originating from a specific port. XAMPLE The following filter st ring captures all UDP packets: D-Link NetDefend firewall User Guide...
-
Page 431: Backing Up The Netdefend Firewall Configuration
Backing Up the NetDefend firewall Configuration XAMPLE he followin g filter string captures all UDP pac kets destine d for port 80: udp dst port 80 Backing Up the NetDefend firewall Configuration You can export the NetDefend firewall configuration to a *.cf g file, and use this file to backup and restore NetDefend firewall settings, as needed. -
Page 432: Importing The Netdefend Firewall Configuration
2. Click Impor The Import Settings page appears. . Do one of the fo llowing: • In the Impor t Settings field, type the full p ath to the c onfiguration file. D-Link NetDefend firewall User Guide... - Page 433 Backing Up the NetDefend firewall Configuration • Click Browse, and browse to the configur ation file. 4. Click Upload. A confirmatio n message appears. 5. Click The NetDefend firewall settings are imported. The Import Settings page displays the config uration file's c ontent and the result of implementing each configuration command.
-
Page 434: Resetting The Netdefend Firewall To Defaults
NetDefend firewall to factory def aults v ia the Web interface Setup in the main menu, and click the Tools tab. 1. Click The Tools page appears. . Click Facto ry Settings. D-Link NetDefend firewall User Guide... - Page 435 Resetting the NetDefend firewall to Defaults A confirmation message appears. 3. To revert to the firmware version that shipped with the appliance, select the check box. 4. Click OK. • The Please Wait screen appears. • The NetDefend firewall returns to its factory defaults. •...
- Page 436 Warning: If you choose to reset the NetDefend firewall by disconnecting the power cable and then reconnecting it, be sure to leave the NetDefend firewall disconnected for at least three seconds, or the NetDefend firewall might not function properly until you reboot it as described below. D-Link NetDefend firewall User Guide...
-
Page 437: Running Diagnostics
Running Diagnostics Running Diagnostics You can view technical information about your NetDefend firewall’s hardware, firmware, license, network status, and Service Center. This information is useful for troubleshooting. You can export it to an *.html file and send it to technical support. To view diagnostic information 1. -
Page 438: Rebooting The Netdefend Firewall
A confirmation message appears. 3. Click OK. • The Please Wait screen appears. • The NetDefend firewall is restarted (the PWR/SEC LED flashes quickly). This may take a few minutes. • The Login page appears. D-Link NetDefend firewall User Guide... -
Page 439: Using Network Printers
Overview Chapter 15 Using Network Printers This chapter describes how to set up and use network printers. This chapter includes the following topics: O verview ....................423 S etting Up Network Printers ..............424 C onfiguring Computers to Use Network Printers ........425 V iewing Network Printers ................435... -
Page 440: Setting Up Network Printers
4. If the printer is not listed, check that you connected the printer correctly, then click Refresh to refresh the page. 5. Write down the port number allocated to the printer. D-Link NetDefend firewall User Guide... -
Page 441: Configuring Computers To Use Network Printers
Configuring Computers to Use Network Printers The port number appears in the Printer Server TCP Port field. You will need this number later, when configuring computers to use the network printer. 6. To change the port number, do the following: a. - Page 442 4. Right-click in the window, and click Add Printer in the popup menu. The Add Printer Wizard opens with the Welcome dialog box displayed. 5. Click Next. The Local or Network Printer dialog box appears. 6. Click Local printer attached to this computer. D-Link NetDefend firewall User Guide...
- Page 443 Configuring Computers to Use Network Printers Note: Do not select the Automatically detect and install my Plug and Play printer check box. 7. Click Next. The Select a Printer Port dialog box appears. 8. Click Create a new port. 9. In the Type of port drop-down list, select Standard TCP/IP Port. 10.
- Page 444 Network. The Port Name field is filled in automatically. 13. Click Next. The Add Standard TCP/IP Printer Port Wizard opens, with the Additional Port Information Required dialog box displayed. 14. Click Custom. 15. Click Settings. D-Link NetDefend firewall User Guide...
- Page 445 Configuring Computers to Use Network Printers The Configure Standard TCP/IP Port Monitor dialog box opens. 16. In the Port Number field, type the printer's port number, as shown in the Printers page. 17. In the Protocol area, make sure that Raw is selected. 18.
- Page 446 The printer appears in the Printers and Faxes window. 24. Right-click the printer and click Properties in the popup menu. The printer's Properties dialog box opens. 25. In the Ports tab, in the list box, select the port you added. D-Link NetDefend firewall User Guide...
-
Page 447: Mac Os-X
Configuring Computers to Use Network Printers The port's name is IP_<LAN IP address>. 26. Click OK. MAC OS-X This procedure is relevant for computers with the latest version of the MAC OS-X operating system. Note: This procedure may not apply to earlier MAC OS-X versions. To configure a computer to use a network printer 1. - Page 448 The System Preferences window appears. 3. Click Show All to display all categories. 4. In the Hardware area, click Print & Fax. The Print & Fax window appears. 5. In the Printing tab, click Set Up Printers. D-Link NetDefend firewall User Guide...
- Page 449 Configuring Computers to Use Network Printers The Printer List window appears. 6. Click Add. New fields appear. 7. In the first drop-down list, select IP Printing. 8. In the Printer Type drop-down list, select Socket/HP Jet Direct. 9. In the Printer Address field, type the NetDefend firewall's LAN IP address, or "my.firewall".
- Page 450 12. In the Model Name list, select the desired model. 13. Click Add. The new printer appears in the Printer List window. 14. In the Printer List window, select the newly added printer, and click Make Default. D-Link NetDefend firewall User Guide...
-
Page 451: Viewing Network Printers
Viewing Network Printers Viewing Network Printers To view network printers 1. Click Setup in the main menu, and click the Printers tab. The Printers page appears, displaying a list of connected printers. For each printer, the model, serial number, port, and status is displayed. A printer can have the following statuses: •... -
Page 452: Resetting Network Printers
To reset a network printer 1. Click Setup in the main menu, and click the Printers tab. The Printers page appears. 2. Next to the desired printer, click Reset. The network printer's current print job is restarted. D-Link NetDefend firewall User Guide... -
Page 453: Troubleshooting
Resetting Network Printers Chapter 16 Troubleshooting This chapter provides solutions to common problems you may encounter while using the NetDefend firewall. Note: For information on troubleshooting wireless connectivity, see T roubleshooting Wireless Connectivity on page 183. This chapter includes the following topics: C onnectivity .................... -
Page 454: Connectivity
I cannot access my DSL broadband connection. What should I do? DSL equipment comes in two flavors: bridges (commonly known as DSL modems) and routers. Some DSL equipment can be configured to work both ways. D-Link NetDefend firewall User Guide... - Page 455 Connectivity • If you connect to your ISP using a PPPoE or PPTP dialer defined in your operating system, your equipment is most likely configured as a DSL bridge. Configure a PPPoE or PPTP type DSL connection. • If you were not instructed to configure a dialer in your operating system, your equipment is most likely configured as a DSL router.
- Page 456 NAT, such as a DSL router or Wireless router, but the device will block all incoming connections from reaching your NetDefend firewall. To fix this problem, do ONE of the following. (The solutions are listed in order of preference.) D-Link NetDefend firewall User Guide...
- Page 457 Connectivity • Consider whether you really need the router. The NetDefend firewall can be used as a replacement for your router, unless you need it for some additional functionality that it provides, such as Wireless access. • If possible, disable NAT in the router. Refer to the router’s documentation for instructions on how to do this.
-
Page 458: Service Center And Upgrades
Center, check that the Service Center IP address is typed correctly. • The NetDefend firewall connects to the Service Center using UDP ports 9281/9282. If the NetDefend firewall is installed behind another firewall, make sure that these ports are open. D-Link NetDefend firewall User Guide... -
Page 459: Other Problems
Other Problems Other Problems I have forgotten my password. What should I do? Reset your NetDefend firewall to factory defaults using the Reset button as detailed R esetting the NetDefend firewall to Defaults on page 418. Why are the date and time displayed incorrectly? You can adjust the time on the Setup page's Tools tab. -
Page 461: Specifications
..............449 F ederal Communications Commission Radio Frequency Interference Statement ....................451 Technical Specifications Table 86: NetDefend Appliance Attributes Attribute DFL-CP310 DFL-CPG310 General Dimensions 20 x 3.1 x 15.5 cm 20 x 3.1 x 15.5 cm (width x height x depth) (7.9 x 1.2 x 6.1 inches) - Page 462 - 5°C ~ 50°C - 5°C ~ 50°C Humidity: 5%~90% at 25°C/ 5%~90% at 25°C/ Storage/Operation None condensed None condensed Applicable Standards Shock & Vibration CNS1219 C6343 CNS1219 C6343 Safety EN60950/ EN60950/ IEC60950/ IEC60950/ cTUVus 60950 cTUVus 60950 D-Link NetDefend firewall User Guide...
- Page 463 Technical Specifications Attribute DFL-CP310 DFL-CPG310 Quality ISO9001:2000 ISO9001:2000 TL9000-HW R3.0 TL9000-HW R3.0 ISO14001 ISO14001 Ohsas18001: Ohsas18001: 1999 1999 Mean Time Between 68,000 Hours at 30 ºC 68,000 Hours at 30 ºC Failures (MTBF) Chapter 17: Specifications...
- Page 464 Table 87: NetDefend Wireless Attributes Attribute DFL-CPG310 series Operation Frequency 2.412-2.484 MHz Transmission Power 79.4 mW Modulation OFDM, DSSS, 64QAM, 16QAM, QPSK, BPSK, CCK, DQPSK, DBPSK WPA Authentication EAP-TLS, EAP-TTLS, PEAP (EAP-GTC), PEAP (EAP-MSCHAP Modes D-Link NetDefend firewall User Guide...
-
Page 465: Ce Declaration Of Conformity
• Directive 73/23/EEC (Low Voltage Directive – LVD) • Directive 99/05/EEC (Radio Equipment and Telecommunications Terminal Equipment Directive) In accordance with the following standards: Table 88: NetDefend Appliance Standards Attribute DFL-CP310 DFL-CPG310 EN 55022:1998 EN 50081-1:1992 EN 61000-3-2: 1995 EN 50082-1:1997... - Page 466 Terminal Equipment Directive) and FCC Part 15 Class B. The product has been tested in a typical configuration. For a copy of the Original Signed Declaration (in full conformance with EN45014), please contact SofaWare at the above address. D-Link NetDefend firewall User Guide...
-
Page 467: Federal Communications Commission Radio Frequency Interference Statement
Federal Communications Commission Radio Frequency Interference Statement Federal Communications Commission Radio Frequency Interference Statement This equipment complies with the limits for a Class B digital device, pursuant to Part 15 of the FCC Rules. These limits are designed to provide reasonable protection against harmful interference when the equipment is operated in a commercial environment. -
Page 469: Glossary Of Terms
Glossary of Terms Glossary of Terms network. Cable modems offer a high-speed 'always-on' connection. ADSL Modem A device connecting a computer to Certificate Authority the Internet via an existing phone The Certificate Authority (CA) line. ADSL (Asymmetric Digital issues certificates to entities such as Subscriber Line) modems offer a gateways, users, or computers. - Page 470 "handles", that Hacking are translated into IP addresses. An activity in which someone breaks An example of a Domain Name is into someone else's computer 'www.sofaware.com'. system, bypasses passwords or licenses in computer programs; or in D-Link NetDefend firewall User Guide...
- Page 471 Glossary of Terms other ways intentionally breaches receiving data packets across the computer security. The end result is Internet. When you request an that whatever resides on the HTML page or send e-mail, the computer can be viewed and Internet Protocol part of TCP/IP sensitive data can be stolen without includes your IP address in the anyone knowing about it.
- Page 472 Inspection Network Address address on the LAN. Translation (NAT) implementation Mbps supports hundreds of pre-defined applications, services, and protocols, Megabits per second. Measurement more than any other firewall vendor. unit for the rate of data transmission. D-Link NetDefend firewall User Guide...
- Page 473 Glossary of Terms NetBIOS PPTP NetBIOS is the networking protocol The Point-to-Point Tunneling used by DOS and Windows Protocol (PPTP) allows extending a machines. local network by establishing private “tunnels” over the Internet. This protocol it is also used by some DSL Packet providers as an alternative for PPPoE.
- Page 474 Control Protocol, UDP uses the sent to you from a Web server, the Internet Protocol to actually get a Transmission Control Protocol data unit (called a datagram) from (TCP) program layer in that server one computer to another. Unlike D-Link NetDefend firewall User Guide...
- Page 475 Glossary of Terms TCP, however, UDP does not provide the service of dividing a WLAN message into packets (datagrams) A WLAN is a wireless local area and reassembling it at the other end. network protected by the NetDefend UDP is often used for applications firewall.
-
Page 477: Index
Index Index cable type • 35 certificate 802.1x • 161, 163 explained • 345 generating self-signed • 346 account, configuring • 288 importing • 350 active computers, viewing • 194 installing • 345 active connections, viewing • 197 uninstalling • 352 Allow and Forward rules, explained •... - Page 478 • 204 hub • 35, 90, 119, 438, 455 firmware explained • 375, 454 IGMP • 251 updating manually • 377 IKE traces, viewing • 356 viewing status • 375 initial login • 39 D-Link NetDefend firewall User Guide...
- Page 479 Index installation cable • 35 cable type • 35 configuring High Availability for • 119 network • 35 connection • 54, 56, 65 Instant Messengers • 254 explained • 456 internal VPN Server ports • 35 configuring • 306 LAND • 226 explained •...
- Page 480 • 87, 139, 401, 455, 457 resetting • 436 Packet Sanity • 229 setting up • 424 Packet Sniffer using • 423 filter string syntax • 407 viewing • 435 using • 404 Pass rules, explained • 268 D-Link NetDefend firewall User Guide...
- Page 481 Index event log • 187 node limit • 194 traffic • 191 classes • 151 viewing • 187 explained • 151 wireless statistics • 198 QoS classes routers • 90, 119, 401, 438, 457 adding and editing • 155 rules assigning services to •...
- Page 482 • 288 using • 130 services static routes software updates • 294 adding and editing • 139 Web Filtering • 290 explained • 139 Setup Wizard • 39, 54 using • 139 D-Link NetDefend firewall User Guide...
- Page 483 Index viewing and deleting • 144 exporting reports • 194 Strict TCP • 239 using • 191 subnet masks, explained • 458 viewing reports • 191 subscription services traffic reports explained • 281 exporting • 194 starting • 281 viewing • 191 viewing information •...
- Page 484 • 341 Welchia • 235 explained • 297, 459 WEP • 161, 163 viewing • 353 WHOIS • 401 VStream Antivirus wireless hardware • 162 about • 263 wireless protocols • 163 configuring • 267 D-Link NetDefend firewall User Guide...
- Page 485 Index wireless stations preparing • 182 viewing • 198 WLAN configuring • 161 defined • 459 preparing stations for • 182 troubleshooting connectivity • 183 viewing statistics for • 198 WPA • 161, 163 WPA2 • 163 WPA-PSK • 161, 163 Index...