Table of Contents
Advertisement
Advertisement
Table of Contents

Related Manuals for KitchenAid KES2102


Summary of Contents for KitchenAid KES2102
- Page 1 KES2102 INSTRUCTIONS INSTRUCTIONS INSTRUCCIONES...
- Page 2 Your satisfaction is our #1 goal. Remember to register your product online at www.kitchenaid.com or by mail using the enclosed Product Registration Card. Join us in the kitchen at www.proline.kitchenaid.com. USA: 1.800.832.7173 KitchenAid.com Canada: 1.800.807.6777 KitchenAid.ca...
-
Page 3: Table Of Contents
Espresso Machine, please fill out and mail your product registration card packed with the unit, or register on-line at www.kitchenaid.com. This card will enable us to contact you in the unlikely event of a product safety notification and assist us in complying with the provisions of the Consumer Product Safety Act. -
Page 4: Espresso Machine Safety
ESPRESSO MACHINE SAFETY Your safety and the safety of others are very important. We have provided many important safety messages in this manual and on your appliance. Always read and obey all safety messages. This is the safety alert symbol. This symbol alerts you to potential hazards that can kill or hurt you and others. -
Page 5: Electrical Requirements
ESPRESSO MACHINE SAFETY 10. Do not place on or near a hot gas or electric burner, or in a heated oven. 11. Always turn the appliance off, then plug cord into the wall outlet. To disconnect, turn the appliance off, then remove plug from wall outlet. 12. -
Page 6: Getting To Know Your Espresso Machine
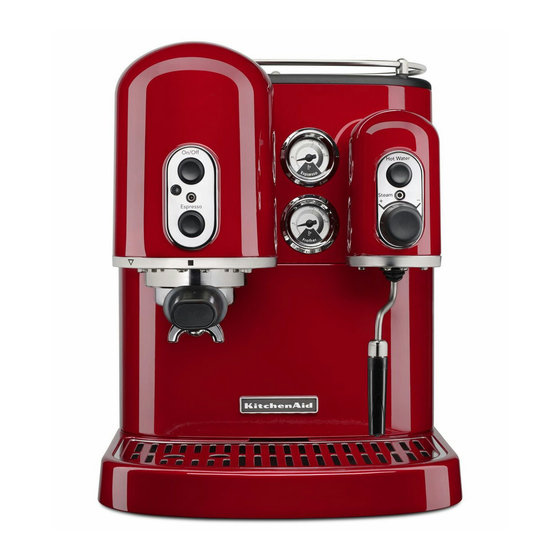
GETTING TO KNOW YOUR ESPRESSO MACHINE Parts and accessories* Espresso temperature Cup rail gauge On/Off Power Hot water button button On indicator Steam dial light Espresso button Frothing arm Brew head Water tank Frothing Portafilter nozzle Drip plate (sits inside Drip tray) Frother temperature gauge... -
Page 7: Assembling The Espresso Machine
ASSEMBLING THE ESPRESSO MACHINE Preparing the Espresso Machine for use Place the Espresso Machine on a clean, Align the three rail posts with the holes dry, level surface. on top of the Espresso Machine. Then press the rail posts firmly into the holes. Washing the water reservoir Lift the reservoir slightly, then remove Wash the reservoir in hot, soapy... -
Page 8: Connecting The Espresso Machine
ASSEMBLING THE ESPRESSO MACHINE Connecting the Espresso Machine WARNING Electrical Shock Hazard Plug into a grounded 3 prong Insert the end of the electrical cord without outlet. prongs into the cord receptacle in the back of the Espresso Machine. Plug the other end of Do not remove ground prong. -
Page 9: Warming The Boilers
OPERATING THE ESPRESSO MACHINE Warming the boilers Make certain the steam dial is closed by Press and hold the On/Off power rotating it clockwise as far as possible. button until the ON indicator lights up. The dual boilers will begin heating, and the Espresso and Hot Water functions will begin to operate. -
Page 10: Brewing Espresso
OPERATING THE ESPRESSO MACHINE When the pitcher is about half full, If no espresso is desired at this time, release the Hot Water button and close press the On/Off Power button to turn the Steam dial by rotating it clockwise the Espresso Machine off. - Page 11 OPERATING THE ESPRESSO MACHINE Press the filter basket into the Position the portafilter underneath the portafilter until it snaps into place. Do brew head and align the handle with not fill with coffee at this time. the arrow on the left side. Raise the portafilter into the brew head Press and hold the On/Off power and tighten it with a firm twist to the...
- Page 12 OPERATING THE ESPRESSO MACHINE Wait until the Espresso Machine has Remove the portafilter from the brew reached operating temperature; this will head by moving the handle to the left. take approximately 6 minutes. When Place one level measure of ground the boiler temperature gauge needle coffee (or a paper coffee pod) in the climbs into the “ready”...
- Page 13 OPERATING THE ESPRESSO MACHINE Place one or two espresso cups When the desired amount of espresso on the drip plate under the spouts has been brewed (1 oz. using the of the portafilter. Press the Espresso small filter basket or 2 oz. using the button, and espresso will start to flow large filter basket), press the Espresso into the cups.
-
Page 14: Frothing And Steaming Milk
OPERATING THE ESPRESSO MACHINE Frothing and steaming milk Frothing and steaming milk requires a bit of practice, but you’ll be surprised how quickly your skills will develop. The Espresso Machine gives you all the tools you need: an 11 ounce stainless steel pitcher shaped especially for frothing (with a spout perfectly designed for latte art), a frothing arm that adjusts horizontally and vertically for a comfortable working position, a frothing nozzle designed to enhance frothing, and a Steam Dial that lets you precisely control the volume of frothing steam. - Page 15 Avoid scalding the steaming (heating) the milk. milk, which occurs at 175 degrees. NOTE: KitchenAid recommends using a standard kitchen thermometer to determine when the milk reaches 140°F -165°F when learning to steam milk.
-
Page 16: Dispensing Hot Water
Dispensing hot water Hot water can also be dispensed from the frothing arm. This provides a convenient way to make Americanos, tea, or hot chocolate. Filling a demitasse with hot water is also a great way to warm it before brewing espresso. NOTE: Always dispense hot water into an empty container –... -
Page 17: Tips For Great Results
TIPS FOR GREAT RESULTS What is espresso? Espresso began as an attempt in the 1800s to produce the standards we have today: to quickly brew coffee on demand, by the one ounce of true espresso comes from cup. The goal was to serve the freshest, exposing 1/4 ounce (7 grams) of finely most flavorful coffee possible and avoid the ground and packed coffee to 195–205º... -
Page 18: Espresso Brewing Technique
Great Tasting Water The Right Grind – and Grinder An often overlooked element of great Espresso demands a very fine, very espresso is the brew water. If you don’t consistent grind. Blade grinders and enjoy the flavor of your tap water, don’t use inexpensive burr grinders usually fall short it to brew espresso –... -
Page 19: Proper Tamping Technique
TIPS FOR GREAT RESULTS and sweep any excess coffee from the filter heavily through the low density coffee – with their fingers, leaving exactly what they overextracting the bitter coffee compounds need. After you’ve had some experience – and flowing lightly through the higher dosing, leveling, and tamping your coffee, density coffee, underextracting the flavorful you’ll be able to consistently dose your... - Page 20 After removing the tamper, some grinds Apply a second, finishing tamp (also may stick to the side of the filter basket. called a polishing tamp). Press straight Tap the portafilter gently on the table down on the coffee with about 35 to jostle loose grinds onto the tamped pounds of pressure, then relax the coffee disc.
-
Page 21: Espresso Extraction Technique
TIPS FOR GREAT RESULTS Espresso extraction technique Shot Volume Some grinders do not allow the fine The brew group and boilers are heated. The adjustments necessary to correct the fresh coffee has been ground, dosed into the extraction rate. The best solution is to invest portafilter, expertly leveled, and precisely in a quality burr grinder. -
Page 22: Barista Tips
Barista tips When brewing multiple shots: • Clean the frothing arm and nozzle immediately after use. See “Care and • Use a towel to clean and dry the filter Cleaning” section. basket before filling with coffee. This will • Lower fat milks are generally easier to help to achieve even coffee extraction. -
Page 23: Glossary Of Espresso Drinks
TIPS FOR GREAT RESULTS Glossary of espresso drinks Americano Espresso Con Panna 6 to 8 ounces of hot water added to a single Espresso topped with a dollop of shot of espresso. This makes a superb cup whipped cream. of coffee. Espresso Lungo Café... -
Page 24: Glossary Of Espresso Machine Parts
TIPS FOR GREAT RESULTS Glossary of Espresso Machine parts Brew group Frothing arm and Frothing nozzle The part of the Espresso Machine that holds The frothing arm and nozzle allow you to all the working parts that allow you to brew make steamed milk for espresso drinks. -
Page 25: Care And Cleaning
CARE AND CLEANING Cleaning the Espresso Machine Keeping the Espresso Machine clean is vital to brewing the best espresso possible. You might notice that your machine is taking longer to brew, or the brew head is spewing or sputtering. These can be signs that it’s time to clean your Espresso Machine. Stale coffee oils on the portafilter, filter baskets, and shower screen will ruin the flavor of the most expertly prepared coffee, and any milk left on the frothing arm should be removed for best performance and taste. -
Page 26: Cleaning The Housing, Filters, Drip Tray, Drip Plate, Reservoir, And Pitcher
CARE AND CLEANING WARNING Electrical Shock Hazard Plug into a grounded 3 prong Plug into a grounded 3 prong outlet. outlet. Do not remove ground prong. Do not use an adapter. Do not use an extension cord. Failure to follow these instructions can result in death, fire, or electrical shock. -
Page 27: Cleaning The Shower Screen
CARE AND CLEANING Wash the filter baskets, drip tray, drip Use the shower screen brush or a damp plate, water reservoir, and frothing cloth to brush or wipe coffee grounds pitcher in the top rack of a dishwasher, from the brew head gasket and or by hand in warm, soapy water. -
Page 28: Priming After Long Periods Of Non-Use
These can be found online, or at coffee specialty shops. KitchenAid does not recommend using vinegar and water solutions or home remedies in place of a commercial descaler for the Espresso Machine. - Page 29 CARE AND CLEANING To catch the cleaning solution, place Press and hold the ON/OFF power a large cup under the brew head (do button until the ON indicator lights not attach the portafilter), and another up. It is not necessary for the boilers under the frothing nozzle.
-
Page 30: Troubleshooting
CARE AND CLEANING Remove the water reservoir and rinse Attach the shower screen to the with fresh water, then replace and fill brew head. See “Cleaning the shower with fresh water to the max fill line. screen” section for instructions. Be Press and hold the ON/OFF power sure to add additional fresh water button until the ON indicator lights... -
Page 31: Warranty
50 United States, the District of Columbia, Puerto Rico, and Canada This warranty extends to the purchaser and any succeeding owner for KitchenAid Pro-Line products operated in the 50 United States, the District of Columbia, Puerto Rico, and Canada. -
Page 32: Ordering Accessories And Replacement Parts
P .O. Box 218, St. Joseph, MI 49085-0218 Mississauga, ON L5N 0B7 Outside the United States and Puerto Rico: Consult your local KitchenAid dealer or the store where you purchased your Pro-Line product for information on how to obtain service.