
Related Manuals for Toro 68037


Summary of Contents for Toro 68037
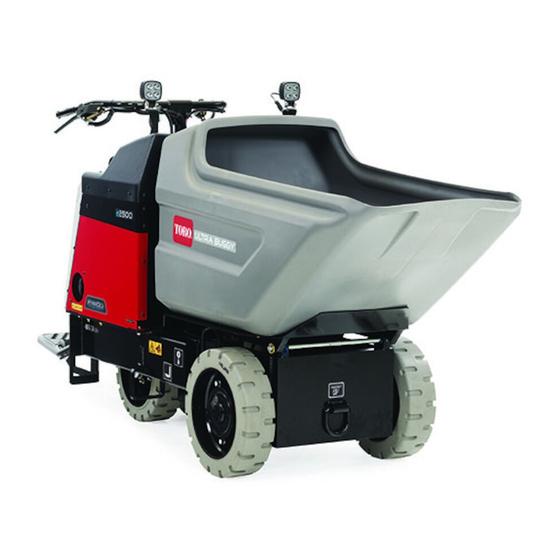
- Page 1 Operator’s Manual Electric Ultra Buggy Model—Serial Range 68037—400000000 and Up *3440-398* A 3440-398A Original Instructions (EN)
-
Page 2: Table Of Contents
(1) this device may not cause harmful interference, and (2) this device must accept any interference received, including interference that may cause undesired operation. Changes or modifications not expressly approved by Toro could void the user’s authority to operate the equipment. -
Page 3: Disclaimers And Regulatory Information
Chapter 2: Safety..........................2–1 General Safety ..........................2–1 Safety Alert Classifications......................2–1 Safety and Instructional Decals ....................2–2 Chapter 3: Product Overview ......................3–1 Controls............................... 3–1 Electrical Service Disconnect Switch..................3–1 Drive Controls..........................3–2 Dump Controls ..........................3–2 Emergency Stop ........................... 3–2 Key Switch ............................. - Page 4 Cleaning............................5–13 Removing Debris ........................5–13 Washing the Machine ........................ 5–13 Chapter 6: Storage..........................6–1 Storage Safety ..........................6–1 Preparing the Machine for Storage Over 30 Days..............6–1 Battery Storage Requirements...................... 6–1 Chapter 7: Troubleshooting ....................... 7–1 California Proposition 65 Warning Information Disclaimers and Regulatory Information: Page 4 3440-398 A...
-
Page 5: Chapter 1: Introduction
Whenever you need service, genuine Toro parts, or additional information, contact an Authorized G387213 Service Dealer or Toro Customer Service and have the model and serial numbers of your product ready. These numbers are located on the serial plate on your product . -
Page 6: Manual Conventions
Manual Conventions This manual identifies potential hazards and has safety messages identified by the safety- alert symbol, which signals a hazard that may cause serious injury or death if you do not follow the recommended precautions. g000502 This manual uses 2 words to highlight information. Important calls attention to special mechanical information and Note emphasizes general information worthy of special attention. -
Page 7: Chapter 2: Safety
Chapter 2 Safety General Safety • Read and understand the contents of this Operator’s Manual before starting the machine. • Do not operate the machine without all guards and other safety protective devices in place and functioning properly on the machine. •... -
Page 8: Safety And Instructional Decals
Safety and Instructional Decals Safety decals and instructions are easily visible to the operator and are located near any area of potential danger. Replace any decal that is damaged or missing. Decal Part: 115-4858 Force from above can cause crushing of fingers, hands, toes, or feet —install the cylinder lock. - Page 9 Decal Part: 125-6694 Tie-down location decal125-6694 Decal Part: 144-0276 decal144-0276 Explosion hazard—do not expose to fire or open Warning—read the Operator’s Manual. flame. Warning—do not open the battery; do not use a Electric shock hazard—do not perform damaged battery. maintenance on the battery. Decal Part: 144-0277 decal144-0277 Positive terminal...
- Page 10 Decal Part: 145-1168 decal145-1168 Warning—shut off the machine and remove the Warning—read the Operator’s Manual. key before leaving the operator’s position. Warning—all operators should read the Operator’s Manual and be trained before operating the Horn machine. Raise the hopper. Warning—keep bystanders away; look behind and Lower the hopper.
- Page 11 Decal Part: 145-1170 Warning—read the Operator’s Manual for charging information; do not operate the machine when the machine is charging; disconnect the charging cord before operating the machine. decal145-1170 Decal Part: 145-1173 Traction drive Read the Operator’s Manual for fuse information. Hopper lift cylinder decal145-1173 Decal Part: 145-1175...
- Page 12 Decal Part: 145-1181 Forklift lifting point decal145-1181 Decal Part: 145-1174 Read the Operator’s Manual for battery charging information. Battery charger input specifications : 100-240V ~1440VA(W) 50/60HZ decal145-1174 Safety: Safety and Instructional Decals Page 2–6 3440-398 A...
-
Page 13: Chapter 3: Product Overview
Chapter 3 Product Overview Work lights Handle bars Control panel Electrical service disconnect switch Operator platform Steering tires Hopper Drive tires Anti-static strap G380315 Controls Electrical Service Disconnect Switch Off—to de-energize the machine electrically On—to energize the machine electrically G387210 3440-398 A Page 3–1 Product Overview... -
Page 14: Drive Controls
Drive Controls Drive forward Neutral Drive backward G380320 Dump Controls Dump hopper Lower hopper G380321 Emergency Stop Pull to enable the machine. Note: Turn the key to the then position to continue operating the machine. Push to immediately shut off the machine. -
Page 15: Key Switch
Key Switch Turn the machine off. Turn the machine on. G380323 Light Control G380324 Throttle Control g357324 3440-398A Page 3–3 Product Overview: Controls... -
Page 16: Display
Display Display Icon Descriptions Description Icon Menu access Next Previous Scroll down Enter Increase Decrease Exit menu Check PIN entry Parking brake is engaged. Hour meter Battery voltage Battery charge—each solid bar represents the change in 10% increments. Display Main Menu Menu Item Description Faults... - Page 17 Display (continued) Menu Item Description Diagnostics Displays the state of each machine switch, sensor, and control output. This tells you which machine controls are on and off which assists in troubleshooting. Settings Customize and modify configuration variables on the InfoCenter display. About Lists the model number, serial number, and software version.
- Page 18 Display (continued) Display Settings Menu Menu Item Description Units Indicates the inputs and outputs for the battery. Inputs include the current battery voltage; outputs include the battery current and percentage state of charge. Language Controls the language used on the InfoCenter. Brightness Controls the brightness of the LCD display.
-
Page 19: Specifications
Discharge height 16.5 cm (6.5 inches) Attachments/Accessories A selection of Toro approved attachments and accessories is available for use with the machine to enhance and expand its capabilities. Contact your Authorized Service Dealer or authorized Toro distributor or go to www.Toro.com... -
Page 20: Chapter 4: Operation
Chapter 4 Operation Before Operation Before Operation Safety Before Operation General Safety • Never allow children or untrained people to operate the machine. Local regulations may restrict the age of the operator. The owner is responsible for training all operators and mechanics. -
Page 21: Performing Daily Maintenance
Before Operation Safety (continued) • Park the machine on a level surface, engage the parking brake (if applicable), and shut off the machine. Wait for all movement to stop and allow the machine to cool before adjusting, servicing, cleaning, or storing the machine. Performing Daily Maintenance Before starting the machine each day, perform the Each Use/Daily procedures listed in the Maintenance Schedule. - Page 22 During Operation Safety (continued) • Do not overload the hopper and always keep the load level when operating the machine. • Avoid operating the machine on loose terrain. Loose terrain could cause the machine to lose traction, affecting steering, stability, and braking. •...
-
Page 23: Starting The Machine
Starting the Machine 1. Ensure that the battery-disconnect switch is in the ON position. 2. Stand on the platform. 3. Insert the key into the key switch and turn it to the ON position. Note: The machine may have difficulty starting under severe cold conditions. When starting a cold machine, keep the machine above -7°C (20°F). - Page 24 Operator Platform (continued) Raising the Platform Rotate the platform up until it locks into position. G380478 Lowering the Platform 1. Push the platform forward to release pressure on the latch pin. 2. Pull the latch pin out and lower the platform. G388718 Operation: During Operation Page 4–5...
-
Page 25: Operating The Machine
Operating the Machine 1. Step onto the machine. CAUTION When mounting the machine, slippery or uneven ground may cause you to fall. Always have 3 out of 4 arms/legs in contact with the machine when you mount or dismount the machine. 2. -
Page 26: After Operation
• Do not get the charger wet; keep it protected from rain and snow. • A risk of fire, electric shock, or injury may result from using an accessory not recommended or sold by Toro. • To reduce risk of a battery explosion, follow these instructions and the instructions for any equipment that you intend to use near the charger. -
Page 27: Lowering The Hopper Without Power
After Operation Safety (continued) • Remove metal items such as rings, bracelets, necklaces, and watches when working with a lithium-ion battery. A lithium-ion battery can produce enough current to cause a severe burn. • Never operate the charger without good visibility or light. •... - Page 28 Lowering the Hopper without Power (continued) 4. Disconnect the hose fittings in the manifold block and allow the fluid to drain into the pan. Note: Dispose of the used fluid at a certified recycling center. 5. Connect the hose fittings. 6.
-
Page 29: Raising The Hopper Without Power
Raising the Hopper without Power 1. Remove any material from the hopper. 2. Raise the machine and support it using jack stands rated for the weight of the machine. 3. Place a large drain pan under the lift cylinder. 4. Remove the access panel. 5. -
Page 30: Haul The Machine
Haul the Machine Use a heavy-duty trailer or truck to haul the machine. Use a full-width ramp. Ensure that the trailer or truck has all the necessary brakes, lighting, and marking as required by law. Please carefully read all the safety instructions. Knowing this information could help you or bystanders avoid injury. - Page 31 Haul the Machine (continued) Loading the Machine WARNING Loading a machine onto a trailer or truck increases the possibility of tip-over and could cause serious injury or death. • Use extreme caution when operating a machine on a ramp. • Load and unload the machine with the heavy end up the ramp. •...
- Page 32 Haul the Machine (continued) 7. Use the metal tie-down loops to securely fasten the machine to the trailer or truck with straps, chains, cable, or ropes. Refer to local regulations for tie-down requirements. IMPORTANT Do not use the tie-down loops to lift the machine. G388893 Operation: After Operation Page 4–13...
- Page 33 Haul the Machine (continued) Unloading the Machine 1. Lower the ramp(s). 2. Lower the operator platform. 3. Drive the machine forward down the ramp. 3440-398A Page 4–14 Operation: After Operation...
-
Page 34: Chapter 5: Maintenance
• Use the cylinder lock to secure the hopper in the raised position. • Never tamper with safety devices. • To ensure safe, optimal performance of the machine, use only genuine Toro replacement parts. Replacement parts made by other manufacturers could be dangerous, and such use could void the product warranty. -
Page 35: Recommended Maintenance Schedule
• Inspect and maintain the battery, motor, controllers, switches, safety protective devices, electrical wiring, and connections according to the instructions. • Keep the machine clean to minimize hazards and make inspecting the machine for servicing easier. • Ensure that the extension cord plugs are in good condition and are not hot from operation. -
Page 36: Pre-Maintenance Procedures
Pre-Maintenance Procedures Retrieving a Machine In an emergency, you can push or tow the machine. Note: Do not tow the machine on a slope; the wheels will spin freely once the gear is removed. 1. Remove the gearbox cover. G388719 2. -
Page 37: Lifting The Machine
Lifting the Machine Lifting the Machine with a Forklift IMPORTANT Ensure that the hopper is empty before lifting the machine. 1. Place the platform in the raised position. 2. Lift the machine using the side or rear pockets. G380480 Lifting the Machine with a Hoist IMPORTANT Ensure that the hopper is empty before lifting the machine. -
Page 38: Using The Cylinder Lock
Using the Cylinder Lock Installing the Cylinder Lock 1. Park the machine on a level surface, move the motion-control levers to the N EUTRAL LOCK position, and fully raise the hopper. 2. Remove the 2 cotterless pins securing the cylinder lock to the machine. G380311 3. -
Page 39: Lubrication
Lubrication Greasing the Machine Grease Type: General-purpose grease. Note: Remove the blue protection caps, if applicable, before greasing and replace when finished. 1. Park the machine on a level surface. 2. Shut off the machine. 3. Clean the grease fittings with a rag. 4. -
Page 40: Electrical System Maintenance
Electrical System Maintenance Checking the Anti-Static Strap 1. Park the machine on a level surface, lower the hopper, shut off the machine, and remove the key. 2. Check the anti-static strap and replace it if it is worn or missing. G388771 Battery Service Note:... - Page 41 Battery Service (continued) temperature exceeds the range specified in the Battery Storage Requirements, page 6– IMPORTANT Temperatures outside of this range will damage your batteries. High temperatures during storage, especially at a high state of charge, reduces the life of the batteries.
- Page 42 Battery Service (continued) IMPORTANT Charge the machine in temperatures 0° to 45°C (32° to 113°F). The onboard charger will not function in temperatures exceeding this range. 1. Park the machine in the designated location for charging. 2. Shut off the machine and remove the key. 3.
-
Page 43: Drive System Maintenance
• Clean the charger cord with a slightly damp cloth after each use. • Coil the cord when not in use. • Periodically examine the cord for damage, and replace it when necessary with Toro- approved parts. Drive System Maintenance Inspecting the Tires Inspect tires for cuts, slashes, or bulges. -
Page 44: Changing The Drive-Motor Gear Oil
Changing the Drive-Motor Gear Oil 1. Start the machine and drive it for 5 minutes. Note: This warms the gear oil so that it drains better. 2. Park the machine on a level surface so that a drain plug on the front motor is in the 6 o’clock position. -
Page 45: Hydraulic System Maintenance
Hydraulic System Maintenance Hydraulic Fluid Specifications Hydraulic-Fluid type Toro Multipurpose ATF Hydraulic fluid capacity 3.03 L (3.2 US qt) The machine hydraulic tank is filled at the factory with approximately 3.03 L (3.2 US qt) of hydraulic fluid. Checking the Hydraulic Lines Check the hydraulic lines for leaks, loose fittings, kinked lines, loose mounting supports, wear, and deterioration. -
Page 46: Cleaning
Changing the Hydraulic Fluid (continued) 12. Install the cap. Cleaning Removing Debris 1. Park the machine on a level surface, shut off the machine, and remove the key. 2. Clean any debris from the machine. IMPORTANT Blow the dirt out rather than wash it out. If you use water, keep it away from electrical items and hydraulic valves. -
Page 47: Chapter 6: Storage
Chapter 6 Storage Storage Safety Park the machine on a level surface, engage the parking brake (if applicable), shut off the machine, and remove the key. Wait for all movement to stop and allow the machine to cool before adjusting, servicing, cleaning, or storing the machine. Preparing the Machine for Storage Over 30 Days IMPORTANT... - Page 48 IMPORTANT Storing the machine outside these temperature ranges will damage the batteries or reduce their lifespan. • Before you store the machine, charge or discharge the batteries to between 40% and 60% (54.3V and 57.3V). Note: A 50% charge is optimal to ensure a maximum battery life. When the batteries are charged to 100% before storage, the battery life shortens.
-
Page 49: Chapter 7: Troubleshooting
Chapter 7 Troubleshooting The machine does not start. Possible Cause Corrective Action The batteries need to be charged. 1. Check the InfoCenter for the battery status. 2. Charge the machine. The electrical service disconnect switch is in Turn the electrical service disconnect switch position. - Page 50 Possible Cause Corrective Action The hydraulic system is damaged. Contact your Authorized Service Dealer. The sensor is not working. 1. Adjust the sensor to 3/4 inch above the mounting bracket. 2. Check if the sensor has gone bad. The throttle is not working properly. Possible Cause Corrective Action The throttle needs to be calibrated.
-
Page 51: California Proposition 65 Warning Information
Toro has chosen to provide consumers with as much information as possible so that they can make informed decisions about the products they buy and use. Toro provides warnings in certain cases based on its knowledge of the presence of one or more listed chemicals without evaluating the level of exposure, as not all the listed chemicals provide exposure limit requirements.