Table of Contents
Advertisement
Quick Links
Advertisement
Table of Contents

Related Manuals for ABB IRBT 2005


Summary of Contents for ABB IRBT 2005
- Page 1 ROBOTICS Product manual IRBT 2005...
- Page 2 Trace back information: Workspace R18-2 version a15 Checked in 2018-10-30 Skribenta version 5.3.012...
- Page 3 Product manual IRBT 2005 IRC5 Document ID: 3HAC051130-001 Revision: F © Copyright 2015 - 2018 ABB. All rights reserved. Specifications subject to change without notice.
- Page 4 The information in this manual is subject to change without notice and should not be construed as a commitment by ABB. ABB assumes no responsibility for any errors that may appear in this manual. Except as may be expressly stated anywhere in this manual, nothing herein shall be construed as any kind of guarantee or warranty by ABB for losses, damages to persons or property, fitness for a specific purpose or the like.
-
Page 5: Table Of Contents
2.4.3 Hole configuration ................... 2.4.4 Track motion IRBT 2005 overview .............. 2.4.5 Assembling the sections of the track motion IRBT 2005 (Longer than 9 m) ..2.4.6 Positioning the stand ................2.4.7 Geometric alignment of track motion IRBT 2005 .......... - Page 6 EPS ....® 2.8.2 Configuration of grease pump MEMOLUB ..........Commissioning ....................2.9.1 Check list for IRBT 2005 before commissioning ..........Maintenance Introduction ...................... Maintenance schedule and expected component life ..........3.2.1 Specification of maintenance intervals ............3.2.2 Maintenance schedule ................
- Page 7 Special tools ....................Lifting accessories and lifting instructions .............. HILTI adhesive anchor ..................Spare parts Spare part lists and illustrations ................Circuit diagrams Index Product manual - IRBT 2005 3HAC051130-001 Revision: F © Copyright 2015 - 2018 ABB. All rights reserved.
- Page 8 This page is intentionally left blank...
-
Page 9: Overview Of This Manual
ABB and have the required knowledge of mechanical and electrical installation/repair/maintenance work. Product manual scope The manual covers covers all variants and designs of the IRBT 2005. Some variants and designs may have been removed from the business offer and are no longer available for purchase. - Page 10 Added tightening torque to screws when refitting. • Corrected the screws for fastening track to base to M16x125 mm. Hole configuration on page Continues on next page Product manual - IRBT 2005 3HAC051130-001 Revision: F © Copyright 2015 - 2018 ABB. All rights reserved.
- Page 11 Published in release R18.2. The following updates are made in this revi- sion: • Removed information about Documentation DVD, which is re- placed by myABB Business Portal. Product manual - IRBT 2005 3HAC051130-001 Revision: F © Copyright 2015 - 2018 ABB. All rights reserved.
-
Page 12: Product Documentation
Product documentation Categories for user documentation from ABB Robotics The user documentation from ABB Robotics is divided into a number of categories. This listing is based on the type of information in the documents, regardless of whether the products are standard or optional. - Page 13 The operating manuals describe hands-on handling of the products. The manuals are aimed at those having first-hand operational contact with the product, that is production cell operators, programmers, and troubleshooters. Product manual - IRBT 2005 3HAC051130-001 Revision: F © Copyright 2015 - 2018 ABB. All rights reserved.
-
Page 14: How To Read The Product Manual
Likewise, certain work methods or general information that is valid for several robot models, can be illustrated with illustrations that show a different robot model than the one that is described in the current manual. Product manual - IRBT 2005 3HAC051130-001 Revision: F © Copyright 2015 - 2018 ABB. All rights reserved. -
Page 15: Safety
Limitation of liability Any information given in this manual regarding safety must not be construed as a warranty by ABB that the industrial robot will not cause injury or damage even if all safety instructions are complied with. The information does not cover how to design, install and operate a complete system, nor does it cover all peripheral equipment that can influence the safety of the entire system. - Page 16 Unauthorized modifications of the originally delivered robot are prohibited. Without the consent of ABB, it is forbidden to attach additional parts through welding, riveting, or drilling of new holes into the castings. The strength of the robot could be affected.
-
Page 17: Protective Stop And Emergency Stop
1.1.2 Protective stop and emergency stop 1.1.2 Protective stop and emergency stop Overview The protective stops and emergency stops are described in the product manual for the controller. Product manual - IRBT 2005 3HAC051130-001 Revision: F © Copyright 2015 - 2018 ABB. All rights reserved. -
Page 18: Safety Actions
1.2 Safety actions 1.2.1 Fire extinguishing Note Use a CARBON DIOXIDE (CO ) extinguisher in the event of a fire in the manipulator or controller. Product manual - IRBT 2005 3HAC051130-001 Revision: F © Copyright 2015 - 2018 ABB. All rights reserved. -
Page 19: Emergency Release Of The Robot Axes
When releasing the holding brakes, the robot axes may move very quickly and sometimes in unexpected ways. Make sure no personnel is near or beneath the robot. Product manual - IRBT 2005 3HAC051130-001 Revision: F © Copyright 2015 - 2018 ABB. All rights reserved. -
Page 20: Make Sure That The Main Power Has Been Switched Off
Note Switch off all main power switches in a MultiMove system. Product manual - IRBT 2005 3HAC051130-001 Revision: F © Copyright 2015 - 2018 ABB. All rights reserved. -
Page 21: Safety Risks
Corrective maintenance must only be carried out by qualified personnel who are familiar with the entire installation as well as the special risks associated with its different parts. Continues on next page Product manual - IRBT 2005 3HAC051130-001 Revision: F © Copyright 2015 - 2018 ABB. All rights reserved. - Page 22 ABB is not liable for damages caused by the use of non-original spare parts and special equipment. ABB is not liable for damages or injuries caused by unauthorized modifications to the robot.
-
Page 23: Moving Robots Are Potentially Lethal
Make sure no personnel are present within the working range of the robot before pressing the start button. Product manual - IRBT 2005 3HAC051130-001 Revision: F © Copyright 2015 - 2018 ABB. All rights reserved. -
Page 24: First Test Run May Cause Injury Or Damage
Collision risks CAUTION When programming the movements of the robot, always identify potential collision risks before the first test run. Product manual - IRBT 2005 3HAC051130-001 Revision: F © Copyright 2015 - 2018 ABB. All rights reserved. -
Page 25: Work Inside The Working Range Of The Robot
Product manual - IRBT 2005 3HAC051130-001 Revision: F © Copyright 2015 - 2018 ABB. All rights reserved. -
Page 26: Enabling Device And Hold-To-Run Functionality
How to operate the hold-to-run function for IRC5 is described in Operating manual - IRC5 with FlexPendant. Product manual - IRBT 2005 3HAC051130-001 Revision: F © Copyright 2015 - 2018 ABB. All rights reserved. -
Page 27: Risks Associated With Live Electric Parts
The power supply for the motors (up to 800 VDC). • The user connections for tools or other parts of the installation (max. 230 VAC). Continues on next page Product manual - IRBT 2005 3HAC051130-001 Revision: F © Copyright 2015 - 2018 ABB. All rights reserved. - Page 28 Tools, material handling devices, etc., may be live even if the robot system is in the OFF position. Power supply cables which are in motion during the working process may be damaged. Product manual - IRBT 2005 3HAC051130-001 Revision: F © Copyright 2015 - 2018 ABB. All rights reserved.
-
Page 29: The Unit Is Sensitive To Esd
The mat must be grounded through a current-limit- ing resistor. Use a dissipative table mat. The mat should provide a controlled discharge of static voltages and must be grounded. Product manual - IRBT 2005 3HAC051130-001 Revision: F © Copyright 2015 - 2018 ABB. All rights reserved. -
Page 30: Hot Parts May Cause Burns
Wait until the potentially hot component has cooled if it is to be removed or handled in any other way. Do not put anything on hot metal surfaces, e.g. paper or plastic. Product manual - IRBT 2005 3HAC051130-001 Revision: F © Copyright 2015 - 2018 ABB. All rights reserved. -
Page 31: Safety Risks Related To Pneumatic/Hydraulic Systems
Dump valves should be used in case of emergency. Shot bolts should be used to prevent tools, etc., from falling due to gravity. Product manual - IRBT 2005 3HAC051130-001 Revision: F © Copyright 2015 - 2018 ABB. All rights reserved. -
Page 32: Brake Testing
3 Inspect and verify that the axis maintains its position. If the robot does not change position as the motors are switched off, then the brake function is adequate. Product manual - IRBT 2005 3HAC051130-001 Revision: F © Copyright 2015 - 2018 ABB. All rights reserved. -
Page 33: Safety Risks During Handling Of Batteries
Risk of fire or explosion. Operating temperatures are listed in Operating requirements on page Product manual - IRBT 2005 3HAC051130-001 Revision: F © Copyright 2015 - 2018 ABB. All rights reserved. -
Page 34: Safety Risks During Work With Gearbox Lubricants (Oil Or Grease)
Possible pressure build-up in gearbox Continues on next page Product manual - IRBT 2005 3HAC051130-001 Revision: F © Copyright 2015 - 2018 ABB. All rights reserved. - Page 35 The magnetic oil plugs will take Contaminated oil in care of any remaining metal gear boxes chips. Product manual - IRBT 2005 3HAC051130-001 Revision: F © Copyright 2015 - 2018 ABB. All rights reserved.
-
Page 36: Safety Signals And Symbols
ELECTROSTATIC Warns for electrostatic hazards which could result DISCHARGE (ESD) in severe damage to the product. Continues on next page Product manual - IRBT 2005 3HAC051130-001 Revision: F © Copyright 2015 - 2018 ABB. All rights reserved. - Page 37 Significance NOTE Describes important facts and conditions. Describes where to find additional information or how to do an operation in an easier way. Product manual - IRBT 2005 3HAC051130-001 Revision: F © Copyright 2015 - 2018 ABB. All rights reserved.
-
Page 38: Safety Symbols On Product Labels
Prohibition Used in combinations with other symbols. xx0900000839 Continues on next page Product manual - IRBT 2005 3HAC051130-001 Revision: F © Copyright 2015 - 2018 ABB. All rights reserved. - Page 39 Brake release Pressing this button will release the brakes. This means that the robot arm can fall down. xx0900000808 Continues on next page Product manual - IRBT 2005 3HAC051130-001 Revision: F © Copyright 2015 - 2018 ABB. All rights reserved.
- Page 40 The robot can tip over if the bolts are not securely fastened. xx0900000810 xx1500002402 Crush Risk of crush injuries. xx0900000817 Continues on next page Product manual - IRBT 2005 3HAC051130-001 Revision: F © Copyright 2015 - 2018 ABB. All rights reserved.
- Page 41 Risk of heat that can cause burns. (Both signs are used) xx0900000818 xx1300001087 Moving robot The robot can move unexpectedly. xx0900000819 xx1000001141 xx1500002616 Continues on next page Product manual - IRBT 2005 3HAC051130-001 Revision: F © Copyright 2015 - 2018 ABB. All rights reserved.
- Page 42 Lifting of robot xx0900000822 Can be used in combination with prohibition if oil is not allowed. xx0900000823 Mechanical stop xx0900000824 Continues on next page Product manual - IRBT 2005 3HAC051130-001 Revision: F © Copyright 2015 - 2018 ABB. All rights reserved.
- Page 43 Use the power switch on the controller. xx0900000827 Do not step Warns that stepping on these parts can cause damage to the parts. xx1400002648 Product manual - IRBT 2005 3HAC051130-001 Revision: F © Copyright 2015 - 2018 ABB. All rights reserved.
- Page 44 This page is intentionally left blank...
-
Page 45: Installation And Commissioning
Load software to the system. Creating and downloading a system on page 124 Update the revolution counters. Update revolution counters on page 265 Product manual - IRBT 2005 3HAC051130-001 Revision: F © Copyright 2015 - 2018 ABB. All rights reserved. -
Page 46: Operating Requirements
Complete track during transportation and Max. 95% at constant temperature storage Complete track during operation Max. 95% at constant temperature Continues on next page Product manual - IRBT 2005 3HAC051130-001 Revision: F © Copyright 2015 - 2018 ABB. All rights reserved. - Page 47 Max. load at emergency stop (kN) (kN) IRB 2600 with 1000 ±1.5 3.0±5.5 ±3.5 3.0±11.0 mm pedestal IRB 4600 with 250 mm ±1.5 3.0±7.0 ±3.5 3.0±15.0 pedestal Product manual - IRBT 2005 3HAC051130-001 Revision: F © Copyright 2015 - 2018 ABB. All rights reserved.
-
Page 48: Unpacking
The identification plates are shown in the figure. xx1500000228 ABB logo Rating label Calibration label Lifting label Warning label Instruction plate Product manual - IRBT 2005 3HAC051130-001 Revision: F © Copyright 2015 - 2018 ABB. All rights reserved. -
Page 49: Storage
Continues on next page Product manual - IRBT 2005 3HAC051130-001 Revision: F © Copyright 2015 - 2018 ABB. All rights reserved. - Page 50 2.3.2 Storage Continued Moving the cable chain from storage To move the chain from storage to track, see Lifting cable chain on page Product manual - IRBT 2005 3HAC051130-001 Revision: F © Copyright 2015 - 2018 ABB. All rights reserved.
-
Page 51: Unpacking
The track IRBT 2005 is wrapped in plastic. Unpack the track and inspect for any visible transport damage. If the track motion is damaged, contact ABB. -
Page 52: Lifting The Track Motion
Removing cover plates Before lifting the track motion, always remove the pre-mounted cover plates and rack plates. WARNING Never attempt to lift the track motion IRBT 2005 if the carriage is not in the centered position. Preparations before lifting Action... -
Page 53: Lifting And Moving Track Motion Irbt 2005
WARNING Never lift the track IRBT 2005 in segments longer than 9 meters. If the track is longer, the track has to be disassembled into smaller segments. Never lift the track IRBT 2005 using an overhead crane without first removing the cover plates. - Page 54 2 Installation and commissioning 2.3.4.2 Lifting and moving track motion IRBT 2005 Continued 2-9 sections lift The illustration shows the stand feet on the track motion IRBT 2005 where the lifting straps should be placed. xx1500000593 Track motion length Lifting stand foot from left...
- Page 55 2.3.4.2 Lifting and moving track motion IRBT 2005 Continued Lifting using fork lift Proceed as follows to lift the track motion IRBT 2005 using the fork lift. xx1500000591 Lifting using an overhead crane Proceed as follows to lift the track motion IRBT 2005 using an overhead crane.
- Page 56 Continued Moving the track motion using roller dollies Lift the IRBT 2005 according to lifting instructions, and place roller dollies under the stand's ground plates. Depending on the length of the track motion, the number of roller dollies varies. See table for information.
- Page 57 2 Installation and commissioning 2.3.4.2 Lifting and moving track motion IRBT 2005 Continued The type of roller dolly and the placement of the two types is shown in the following illustration and table. xx1500000595 Track motion length Roller dollies with steering...
-
Page 58: Lifting Weight
WARNING Never lift the track IRBT 2005 in segments longer than 9 meters. If the track is longer, the track has to be disassembled into smaller segments. Never lift the track IRBT 2005 using an overhead crane without first removing the cover plates. -
Page 59: Lifting Cable Chain
Description Cable chain end unit Cable chain pitch, with divider Cable chain pitch, no divider Cable chain, 10 links Continues on next page Product manual - IRBT 2005 3HAC051130-001 Revision: F © Copyright 2015 - 2018 ABB. All rights reserved. - Page 60 Required if using lifting method 1. Lifting sling, extra wide (50 mm) Required if using lifting method 2. Overhead crane Continues on next page Product manual - IRBT 2005 3HAC051130-001 Revision: F © Copyright 2015 - 2018 ABB. All rights reserved.
- Page 61 Without cables, the internal cable chain weights 3.4 kg / meter and the external cable chain weights 8 kg / meter. All lifting accessories used must be sized accordingly! Continues on next page Product manual - IRBT 2005 3HAC051130-001 Revision: F © Copyright 2015 - 2018 ABB. All rights reserved.
- Page 62 Lower the cable chain into the cable tray. The ends of the chain should be in the middle of the track. Continues on next page Product manual - IRBT 2005 3HAC051130-001 Revision: F © Copyright 2015 - 2018 ABB. All rights reserved.
- Page 63 2 Installation and commissioning 2.3.4.4 Lifting cable chain Continued CAUTION Make sure that the cable chain cannot come into contact with any moving parts. Product manual - IRBT 2005 3HAC051130-001 Revision: F © Copyright 2015 - 2018 ABB. All rights reserved.
-
Page 64: Technical Data For Track Motion
2 Installation and commissioning 2.3.5 Technical data for track motion 2.3.5 Technical data for track motion Travel length The travel length of the IRBT 2005 track motion varies based on the carriage type and carriage quantity. Carriage Carriage quant- Description... - Page 65 Mounting of manipulator on the track on page 110 to acquire the mounting direction, standard or mirrored, of the carriage. Continues on next page Product manual - IRBT 2005 3HAC051130-001 Revision: F © Copyright 2015 - 2018 ABB. All rights reserved.
- Page 66 In this case, add spaces as required. Formula for required space Required space for the track is calculated using the following formula: Continues on next page Product manual - IRBT 2005 3HAC051130-001 Revision: F © Copyright 2015 - 2018 ABB. All rights reserved.
- Page 67 Robot + Robot Robot with extra Value of N with extra plate plate + Robot with extra plate 4.23 5.23 Continues on next page Product manual - IRBT 2005 3HAC051130-001 Revision: F © Copyright 2015 - 2018 ABB. All rights reserved.
- Page 68 How to calculate the required space is described in Formula for required space on page Dimensions Without FlexLifter xx1400000180 Continues on next page Product manual - IRBT 2005 3HAC051130-001 Revision: F © Copyright 2015 - 2018 ABB. All rights reserved.
- Page 69 For robot with extra plate, the external cable chain cannot exceed the end of the track. The total length of IRBT 2005 depends on the quantity of modules, each of which is 1000 mm long. IRBT 2005 can be assembled with a minimum of 2 modules and a maximum of 110 modules.
- Page 70 Joined sections in Weight (kg) transport Value of N Robot Robot with extra Transfer plate 1040 1183 1057 1242 1385 1259 Continues on next page Product manual - IRBT 2005 3HAC051130-001 Revision: F © Copyright 2015 - 2018 ABB. All rights reserved.
- Page 71 3435 3578 3326 3494 3637 3780 3528 3696 3839 4184 3730 3898 4041 3982 3932 4100 4243 4386 4134 Continues on next page Product manual - IRBT 2005 3HAC051130-001 Revision: F © Copyright 2015 - 2018 ABB. All rights reserved.
- Page 72 Airborne noise level The sound pressure level outside the working space is less than 76 dB (A) / 1 m. Continues on next page Product manual - IRBT 2005 3HAC051130-001 Revision: F © Copyright 2015 - 2018 ABB. All rights reserved.
- Page 73 2.3.5 Technical data for track motion Continued Power consumption at maximum load Type of movement IR(B)T ISO Cube Within specification for respective robot Product manual - IRBT 2005 3HAC051130-001 Revision: F © Copyright 2015 - 2018 ABB. All rights reserved.
-
Page 74: Measures Of The Carriage Table
Both tables on double carriage track are the same. Eight M10 holes circled in the following figure are available for fastening the fixture on the carriage. xx1400000467 Continues on next page Product manual - IRBT 2005 3HAC051130-001 Revision: F © Copyright 2015 - 2018 ABB. All rights reserved. - Page 75 The figure below shows the dimensions of the transfer carriage table in mm. Eight M10 holes circled in the following figure are available for fastening the fixture on the carriage. xx1400001407 Continues on next page Product manual - IRBT 2005 3HAC051130-001 Revision: F © Copyright 2015 - 2018 ABB. All rights reserved.
- Page 76 Two holes at each side of the carriage table, circled in the following figure, are available for ground cables. xx1500001611 Continues on next page Product manual - IRBT 2005 3HAC051130-001 Revision: F © Copyright 2015 - 2018 ABB. All rights reserved.
- Page 77 250 mm, 500 mm, 750 mm and 1000 mm. Note 500mm, 750 mm and 1000 mm risers are not applicable to IRB 4600. Product manual - IRBT 2005 3HAC051130-001 Revision: F © Copyright 2015 - 2018 ABB. All rights reserved.
-
Page 78: On-Site Installation
However, in order to insure a good leveling, the foundation must be designed so that the track IRBT 2005 can be fitted without the incline exceeding 0.5 mm/m in the direction of travel and 0.2 mm/m across this. The leveling screws can also compensate a poor flatness of the slab and small bumps up to 10 mm. -
Page 79: Mounting Bolts
Mounting bolts Chemical anchor bolts, bolting towards steel foundation, are recommended to secure the track motion IRBT 2005 to the floor. However, the mounting bolts are not supplied since they must be selected on the basis of the material the foundation is made of. -
Page 80: Hole Configuration
Total length of the stand Quantity N 2.8 / 1.6 m 3.8 / 2.6 m 4.8 / 3.6 m etc. Continues on next page Product manual - IRBT 2005 3HAC051130-001 Revision: F © Copyright 2015 - 2018 ABB. All rights reserved. - Page 81 Concrete floor M16x125 mm The type and dimension of screws depend on the foundation conditions. See description for maximum floor loads in Operating environment. Product manual - IRBT 2005 3HAC051130-001 Revision: F © Copyright 2015 - 2018 ABB. All rights reserved.
-
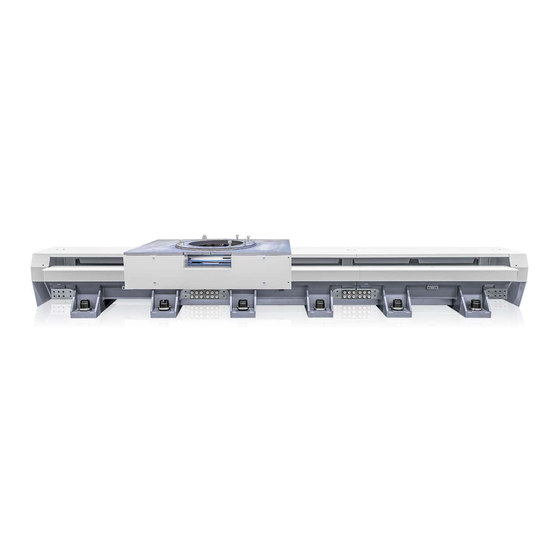
Page 82: Track Motion Irbt 2005 Overview
End cover Rack CAUTION Do not step on the cable chain or top cover; otherwise, injure and/or damage to the product may occur. Product manual - IRBT 2005 3HAC051130-001 Revision: F © Copyright 2015 - 2018 ABB. All rights reserved. -
Page 83: Assembling The Sections Of The Track Motion Irbt 2005 (Longer Than 9 M)
2 Installation and commissioning 2.4.5 Assembling the sections of the track motion IRBT 2005 (Longer than 9 m) 2.4.5 Assembling the sections of the track motion IRBT 2005 (Longer than 9 m) Required equipment Standard tools Quantity Tool Ring-open-end spanner 8 - 22 mm... - Page 84 2 Installation and commissioning 2.4.5 Assembling the sections of the track motion IRBT 2005 (Longer than 9 m) Continued Quantity Description Art. No. Illustration Calibration pin 3HAW107700354 Procedures of assembly The track motion is separated into 9 meter track segments when delivered. Tracks...
- Page 85 2 Installation and commissioning 2.4.5 Assembling the sections of the track motion IRBT 2005 (Longer than 9 m) Continued Assembling sections Action Illustration/Note Remove the bolts. Note To avoid the carriages from derailing during shipping, a bolt is fastened to the end of the linear guide rails on both sides of the track.
- Page 86 2 Installation and commissioning 2.4.5 Assembling the sections of the track motion IRBT 2005 (Longer than 9 m) Continued Action Illustration/Note Fit racks on sections using screws and wash- ers. Use a torque wrench. See Screw joints on page 273.
- Page 87 2 Installation and commissioning 2.4.5 Assembling the sections of the track motion IRBT 2005 (Longer than 9 m) Continued Action Illustration/Note Slightly tighten all the screws of the linear guides and finalize the horizontal alignment of the IRBT 2005 as described in...
- Page 88 2 Installation and commissioning 2.4.5 Assembling the sections of the track motion IRBT 2005 (Longer than 9 m) Continued Removing sections if too long Use this procedure to remove sections if the track is too long, until the required track length is achieved.
- Page 89 2 Installation and commissioning 2.4.5 Assembling the sections of the track motion IRBT 2005 (Longer than 9 m) Continued Action Illustration/Note Remove the top cover support, linear guides, the joint brackets and the rack by removing the screws. xx1500003254 A Top cover support...
- Page 90 2 Installation and commissioning 2.4.5 Assembling the sections of the track motion IRBT 2005 (Longer than 9 m) Continued Action Illustration/Note Secure the two bumpers at the end of the track by screws and washers. xx1400000230 A Bumper, 3HEA801665-001 B M12x40 Hex socket head cap...
- Page 91 2 Installation and commissioning 2.4.5 Assembling the sections of the track motion IRBT 2005 (Longer than 9 m) Continued Action Illustration/Note Fit the top screw of the end covers if this option is ordered. xx1400001828 A M6x12 Screw DIN6921, 9ADA181-11 (7 pcs)
-
Page 92: Positioning The Stand
Position the sections in the intended work site. If more than one section is used, as- semble them as described in Assembling the sections of the track motion IRBT 2005 (Longer than 9 m) on page xx1400001410 Adjust the horizontality of the IRBT 2005 with the M60 leveling screw using the lev- eling tool (Art. - Page 93 Drill a hole in the floor through the leveling screw: Ø 18.5 mm, 125 mm deep. xx1400000582 Brush the inside of the hole. xx1400000583 Continues on next page Product manual - IRBT 2005 3HAC051130-001 Revision: F © Copyright 2015 - 2018 ABB. All rights reserved.
- Page 94 Insert the triangular extremity of the threaded rod in the HILTI tool. Continues on next page Product manual - IRBT 2005 3HAC051130-001 Revision: F © Copyright 2015 - 2018 ABB. All rights reserved.
- Page 95 It is of the utmost importance that all screw joints be tightened with the correct torque. Failure to do so may result in damage to the equipment or personal. Product manual - IRBT 2005 3HAC051130-001 Revision: F © Copyright 2015 - 2018 ABB. All rights reserved.
-
Page 96: Geometric Alignment Of Track Motion Irbt 2005
2 Installation and commissioning 2.4.7 Geometric alignment of track motion IRBT 2005 2.4.7 Geometric alignment of track motion IRBT 2005 Align the track geometrically with a laser level Note The origin of coordinates is located in the manipulator’s base zero. - Page 97 2 Installation and commissioning 2.4.7 Geometric alignment of track motion IRBT 2005 Continued Alignment in Z direction The figure shows the possible variation along the Z-axis. The track should be laser aligned to within 0.2 mm from the origin per meter, along the entire X-axis.
- Page 98 2 Installation and commissioning 2.4.7 Geometric alignment of track motion IRBT 2005 Continued Action Illustration/Note Tighten the fitting nut when the level of the complete track is adjusted. xx1400000464 A Fitting nut Product manual - IRBT 2005 3HAC051130-001 Revision: F...
-
Page 99: Moving The Carriage Manually
121. Release the holding brake by pressing the brake release button on the carriage and keep it pressed. xx1400000465 Continues on next page Product manual - IRBT 2005 3HAC051130-001 Revision: F © Copyright 2015 - 2018 ABB. All rights reserved. - Page 100 24 V DC to the motor to release the brake, a recalibration is needed. CAUTION The motor brakes on the track motion IRBT 2005 are phase dependent. Incorrect polarity and unstable connection can cause damage to vital parts. Continues on next page...
- Page 101 Release the holding brake by pressing the brake release button on the carriage, which is shown in the figure, and keeping it de- pressed. xx1400000465 Continues on next page Product manual - IRBT 2005 3HAC051130-001 Revision: F © Copyright 2015 - 2018 ABB. All rights reserved.
- Page 102 Push the carriage to the desired location by hand. The brake will function again as soon as the button is released. Product manual - IRBT 2005 3HAC051130-001 Revision: F © Copyright 2015 - 2018 ABB. All rights reserved.
-
Page 103: Connecting Long Tracks
Action Illustration/Note Remove the top cover and rack cover of the end section. Continues on next page Product manual - IRBT 2005 3HAC051130-001 Revision: F © Copyright 2015 - 2018 ABB. All rights reserved. - Page 104 The bolts act as temporary stops and must be removed before assembling the sections. Continues on next page Product manual - IRBT 2005 3HAC051130-001 Revision: F © Copyright 2015 - 2018 ABB. All rights reserved.
- Page 105 Note This clamping tool is for reference only. Prepare clamping tools based on actual situation. Continues on next page Product manual - IRBT 2005 3HAC051130-001 Revision: F © Copyright 2015 - 2018 ABB. All rights reserved.
- Page 106 Make sure the lower edge of the linear guide rests against the mating surface of the section without gap. Continues on next page Product manual - IRBT 2005 3HAC051130-001 Revision: F © Copyright 2015 - 2018 ABB. All rights reserved.
- Page 107 3 Drill the holes in the floor through the leveling screws opening and install the anchors and secure the sections to the floor. See Securing the sections on page Product manual - IRBT 2005 3HAC051130-001 Revision: F © Copyright 2015 - 2018 ABB. All rights reserved.
-
Page 108: Assembling The Manipulator And Cable Tray
The following table shows the robot capability of IRBT 2005. Standard pedestals are generally allowed between the IRBT 2005 carriage and the robot but their height is limited and dependent on the type of the IRBT 2005 and the type of robot. - Page 109 Robot 250 mm pedestal 500 mm pedestal 750 mm pedestal 1000 mm pedes- IRB 1520 IRB 1600 IRB 2600 IRB 4600 Product manual - IRBT 2005 3HAC051130-001 Revision: F © Copyright 2015 - 2018 ABB. All rights reserved.
-
Page 110: Mounting Of Manipulator On The Track
WORLD xx1400001911 xx1500000928 +90 degrees WORLD xx1500000928 xx1400001912 +180 degrees WORLD xx1400001909 xx1500000928 +270 degrees WORLD xx1500000928 xx1400001910 Continues on next page Product manual - IRBT 2005 3HAC051130-001 Revision: F © Copyright 2015 - 2018 ABB. All rights reserved. - Page 111 WORLD xx1500000631 xx1500000927 +90 degrees WORLD xx1500000632 xx1500000927 +180 degrees WORLD xx1500000633 xx1500000927 +270 degrees WORLD xx1500000634 xx1500000927 Continues on next page Product manual - IRBT 2005 3HAC051130-001 Revision: F © Copyright 2015 - 2018 ABB. All rights reserved.
- Page 112 The following figure shows guide bushing assembly positions on the carriage table of the robot track. xx1400002680 Guide bushing fitting hole for IRB 1520 Guide bushing fitting hole for IRB 1600/2600/4600 Product manual - IRBT 2005 3HAC051130-001 Revision: F © Copyright 2015 - 2018 ABB. All rights reserved.
-
Page 113: Changing Manipulator Orientation
Guide the robot gently, using the screws while Make sure the robot base is correctly lowering it into its fitting position. fitted onto the guide bushings. Continues on next page Product manual - IRBT 2005 3HAC051130-001 Revision: F © Copyright 2015 - 2018 ABB. All rights reserved. - Page 114 Lift the robot from the pedestal to other posi- For how to lift the robot, according to tion. robot product manual. Continues on next page Product manual - IRBT 2005 3HAC051130-001 Revision: F © Copyright 2015 - 2018 ABB. All rights reserved.
- Page 115 Tighten the bolts in a criss-cross pattern to ensure that the base is not distorted. Product manual - IRBT 2005 3HAC051130-001 Revision: F © Copyright 2015 - 2018 ABB. All rights reserved.
-
Page 116: Assembling The Cable Tray
A M10x30 Hex socket head cap screw, 3HAB3409-51 (4 pcs) Tightening torque: 47 Nm Continues on next page Product manual - IRBT 2005 3HAC051130-001 Revision: F © Copyright 2015 - 2018 ABB. All rights reserved. - Page 117 Place the cable tray onto the brackets. Fasten the external cable tray with screws. M6x12 Torx counters. head screw, 9ADA624-5 Tightening torque: 10 Nm Product manual - IRBT 2005 3HAC051130-001 Revision: F © Copyright 2015 - 2018 ABB. All rights reserved.
-
Page 118: Electrical Installation
7 mm are recommended to be used as customer grounding cables, which will connect the cable grounding (Art. No.: 3HAC046927) of the track. Continues on next page Product manual - IRBT 2005 3HAC051130-001 Revision: F © Copyright 2015 - 2018 ABB. All rights reserved. - Page 119 Power cable, available for IRC5 • Signal cable, available for IRC5 Controller, available for IRC5 For the transfer track, this would be an SMB box. Product manual - IRBT 2005 3HAC051130-001 Revision: F © Copyright 2015 - 2018 ABB. All rights reserved.
-
Page 120: Connections
2 Installation and commissioning 2.6.2.1 Introduction 2.6.2 Connections 2.6.2.1 Introduction Connections The wiring diagrams are described in section Circuit diagrams on page 285. Product manual - IRBT 2005 3HAC051130-001 Revision: F © Copyright 2015 - 2018 ABB. All rights reserved. -
Page 121: Connectors On Controller, Irc5
XS.10 Customer options XS.11 Customer options XS.12 Customer options X3 Customer safety signals XS.28 Network connection XS.41 Additional axes SMB connection XS.2 Robot SMB connection Product manual - IRBT 2005 3HAC051130-001 Revision: F © Copyright 2015 - 2018 ABB. All rights reserved. -
Page 122: Inspection Of Cables And Covers Prior To Start-Up
Channel internal width > 2 mm and < 6 mm than chain outside width? Channel joints arranged flush and unobstructed? Guide channel running parallel to the moving end guide? Product manual - IRBT 2005 3HAC051130-001 Revision: F © Copyright 2015 - 2018 ABB. All rights reserved. -
Page 123: Software Installation
Creating and downloading a system on page 124. Product manual - IRBT 2005 3HAC051130-001 Revision: F © Copyright 2015 - 2018 ABB. All rights reserved. -
Page 124: Creating And Downloading A System
RobotWare 5 or RobotWare 6. RobotStudio version 6 or later supports both procedures. Note The track motion IRBT 2005 is only supported by RobotWare 6 and later. In RobotStudio, use Installation Manager to create and modify systems with RobotWare 6 and later. - Page 125 Verify that the selected robot orientation on the track motion matches the physical configuration, see Base frame configuration on page 133. For more detailed instructions on using the Installation Manager, see Operating manual - RobotStudio. Product manual - IRBT 2005 3HAC051130-001 Revision: F © Copyright 2015 - 2018 ABB. All rights reserved.
-
Page 126: Setting Upper And Lower Software Limits For The Track
Use this procedure to change the limits using the FlexPendant. Action Note From the ABB menu, tap Control Panel. Tap Configuration. Continues on next page Product manual - IRBT 2005 3HAC051130-001 Revision: F © Copyright 2015 - 2018 ABB. All rights reserved. - Page 127 Travel L (m) Upper Joint Lower Joint Bound (m) Bound (m) 4230 1.69 1.35 -0.34 5230 2.69 2.35 -0.34 Continues on next page Product manual - IRBT 2005 3HAC051130-001 Revision: F © Copyright 2015 - 2018 ABB. All rights reserved.
- Page 128 14.60 14.1 -0.5 18230 15.60 15.1 -0.5 19230 16.60 16.1 -0.5 20230 17.60 17.1 -0.5 21230 18.60 18.1 -0.5 Continues on next page Product manual - IRBT 2005 3HAC051130-001 Revision: F © Copyright 2015 - 2018 ABB. All rights reserved.
- Page 129 -0.34 18230 14.44 13.9 -0.5 14.1 -0.34 19230 15.44 14.9 -0.5 15.1 -0.34 20230 16.44 15.9 -0.5 16.1 -0.34 Continues on next page Product manual - IRBT 2005 3HAC051130-001 Revision: F © Copyright 2015 - 2018 ABB. All rights reserved.
- Page 130 FlexPendant. Action Note Before beginning, make sure that the revolution counter for the IRBT 2005 is updated. Continues on next page Product manual - IRBT 2005 3HAC051130-001 Revision: F © Copyright 2015 - 2018 ABB. All rights reserved.
- Page 131 Update the limit value in the MOC file. (In this example it is 9950.1 mm.) ARM: -upper_joint_bound 9.950 - lower_joint_bound -1 xx1400001922 Restart the controller. Continues on next page Product manual - IRBT 2005 3HAC051130-001 Revision: F © Copyright 2015 - 2018 ABB. All rights reserved.
- Page 132 If the software limit has not been set correctly the mechanical unit may hit the mechanical xx1400001913 hard stop. Repeat the previous steps for the other limit. Product manual - IRBT 2005 3HAC051130-001 Revision: F © Copyright 2015 - 2018 ABB. All rights reserved.
-
Page 133: Base Frame Configuration
Base Frame x,y,z defines the direction of the track motion base frame position in relation to the world frame (in meters). Base Frame y Base Frame z Continues on next page Product manual - IRBT 2005 3HAC051130-001 Revision: F © Copyright 2015 - 2018 ABB. All rights reserved. - Page 134 Base Frame q2 Base Frame q3 Base Frame q4 Use Joint Use Joint defines which joint data to use for the track motion. Product manual - IRBT 2005 3HAC051130-001 Revision: F © Copyright 2015 - 2018 ABB. All rights reserved.
-
Page 135: Configuration Examples
Base Frame q1 0.707107 Base Frame q2 Base Frame q3 Base Frame q4 0.707107 Gamma Rotation 1.570796 Use Joint track1 Continues on next page Product manual - IRBT 2005 3HAC051130-001 Revision: F © Copyright 2015 - 2018 ABB. All rights reserved. - Page 136 Base Frame q1 0.707107 Base Frame q2 Base Frame q3 Base Frame q4 -0.707107 Gamma Rotation -1.570796 Use Joint track1 Continues on next page Product manual - IRBT 2005 3HAC051130-001 Revision: F © Copyright 2015 - 2018 ABB. All rights reserved.
- Page 137 Base Frame q1 0.707107 Base Frame q2 Base Frame q3 Base Frame q4 0.707107 Gamma Rotation 1.570796 Use Joint track1-lin Continues on next page Product manual - IRBT 2005 3HAC051130-001 Revision: F © Copyright 2015 - 2018 ABB. All rights reserved.
- Page 138 Track motion (TRACK_1) Base Frame q1 0.707107 Base Frame q2 Base Frame q3 Base Frame q4 -0.707107 Gamma Rotation -1.570796 Use Joint track1-lin Product manual - IRBT 2005 3HAC051130-001 Revision: F © Copyright 2015 - 2018 ABB. All rights reserved.
-
Page 139: Configuration Of Additional Load
However, if for example an arc welding power source is fitted on the additional carriage plate, then the system parameter Arm Load t1_load_1 must be updated with the correct center of gravity and mass. Product manual - IRBT 2005 3HAC051130-001 Revision: F © Copyright 2015 - 2018 ABB. All rights reserved. -
Page 140: Lubrication
Opening the grease pump Action Illustration/Note Place the grease pump on a flat and clean surface. Continues on next page Product manual - IRBT 2005 3HAC051130-001 Revision: F © Copyright 2015 - 2018 ABB. All rights reserved. - Page 141 , and pump until you see grease coming out at the outlet. Two strokes of the manual pump are usually enough. xx1400001572 Continues on next page Product manual - IRBT 2005 3HAC051130-001 Revision: F © Copyright 2015 - 2018 ABB. All rights reserved.
- Page 142 ® Close the MEMOLUB as described before. Continues on next page Product manual - IRBT 2005 3HAC051130-001 Revision: F © Copyright 2015 - 2018 ABB. All rights reserved.
- Page 143 The completion of the cycle means that the battery and the control board of the grease pump are working well. xx1400001578 Product manual - IRBT 2005 3HAC051130-001 Revision: F © Copyright 2015 - 2018 ABB. All rights reserved.
-
Page 144: Configuration Of Grease Pump Memolub
Set of rings ® The figure shows the 3 rings disassembled from the grease pump MEMOLUB xx1600001023 Product manual - IRBT 2005 3HAC051130-001 Revision: F © Copyright 2015 - 2018 ABB. All rights reserved. -
Page 145: Commissioning
Is shielding visible? Cables need to be tied to prevent this from happening. Spare ABB cable also needs to be tied out of the way. Cables secured and not Robot cables need securing because they are loose down hanging loosely. - Page 146 2 Installation and commissioning 2.9.1 Check list for IRBT 2005 before commissioning Continued Verify that... Description No step damage Is there any step damage to any of the cable chain channel or support brackets, are they twisted causing cable chain...
- Page 147 2 Installation and commissioning 2.9.1 Check list for IRBT 2005 before commissioning Continued Verify that... Description Verify the torque on the bolts Connection bracket Verify that... Description Verify that all brackets are in correct position Brackets which connect track sections are dowelled and number identified to prevent incorrect fitting.
- Page 148 This page is intentionally left blank...
-
Page 149: Maintenance
Safety on page 15 before performing any service work. Note If the IRBT 2005 is connected to power, always make sure that the IRBT 2005 is connected to protective earth before starting any maintenance work. For more information see: •... -
Page 150: Maintenance Schedule And Expected Component Life
3.2.1 Specification of maintenance intervals Introduction The intervals are specified in different ways depending on the type of maintenance activity to be carried out and the working conditions of the IRBT 2005: • Calendar time: specified in months regardless of whether the system is running or not. -
Page 151: Maintenance Schedule
The first glide shoes to wear out will be located at the point where the chain first makes contact with itself during operation. Continues on next page Product manual - IRBT 2005 3HAC051130-001 Revision: F © Copyright 2015 - 2018 ABB. All rights reserved. - Page 152 The connector is available only when the option 1475-1 Oil Detection sensor is chosen. To make the sensor alert effective, the customer has to connect the sensor to the control device and configure the alert by self. Product manual - IRBT 2005 3HAC051130-001 Revision: F © Copyright 2015 - 2018 ABB. All rights reserved.
-
Page 153: Gearbox Oil
3.2.3 Gearbox oil Where to find information about gearbox oil Please see Technical reference manual - Lubrication in gearboxes (3HAC042927-001) for information about gearbox oil. Product manual - IRBT 2005 3HAC051130-001 Revision: F © Copyright 2015 - 2018 ABB. All rights reserved. -
Page 154: Expected Component Life
A gliding meter is described as the chain making contact with itself or the glide bars. Chains on tracks shorter than 6 meters travel distance do not have gliding contact. Product manual - IRBT 2005 3HAC051130-001 Revision: F © Copyright 2015 - 2018 ABB. All rights reserved. -
Page 155: Activities 100 Km Or 1 Week
When you clean the racks, it is necessary to lubricate the racks manually. Use one of the recommended lubricants: Equipment Note Lubricant KLÜBER Microlube GB0 Lubricant TOTAL Multis EP 0 Lint free cloth Continues on next page Product manual - IRBT 2005 3HAC051130-001 Revision: F © Copyright 2015 - 2018 ABB. All rights reserved. - Page 156 Inspect the racks and the pinion, clean them if necessary. Note Use lint free cloth. Use a brush to lubricate the racks. Refit the covers. Product manual - IRBT 2005 3HAC051130-001 Revision: F © Copyright 2015 - 2018 ABB. All rights reserved.
-
Page 157: Cleaning The Linear Guides
Equipment Note Lubricant KLÜBER Microlube GB0 Lubricant TOTAL Multis EP 0 Lint free cloth Continues on next page Product manual - IRBT 2005 3HAC051130-001 Revision: F © Copyright 2015 - 2018 ABB. All rights reserved. - Page 158 If you have cleaned them, use a brush to lubricate the linear guides. Move the carriage back and forth and re- peat step 3. Refit the covers. Product manual - IRBT 2005 3HAC051130-001 Revision: F © Copyright 2015 - 2018 ABB. All rights reserved.
-
Page 159: Activities 1 Month
3.4.1 Inspecting the automatic lubrication system Overview There is an automatic lubrication system in IRBT 2005. An electric pump will deliver the correct quantity of grease from a cartridge to the ball bearing blocks and to the pinion at required time intervals (one cycle per day). The grease is pushed in the piping by the pump;... - Page 160 MEMOL- ® EPS on page 140. xx1400001754 A Checking lubrication cup level through the notch Continues on next page Product manual - IRBT 2005 3HAC051130-001 Revision: F © Copyright 2015 - 2018 ABB. All rights reserved.
- Page 161 The automatic lubrication system should be checked that it can work properly. For information about checking Memolub function, see Test the grease pump ® MEMOLUB (verify function) on page 143. Product manual - IRBT 2005 3HAC051130-001 Revision: F © Copyright 2015 - 2018 ABB. All rights reserved.
-
Page 162: Emergency Stop And Stroke Limit System
The procedure below details how to ensure the effectiveness of the motor brake in case of emergency stop. Action Illustration/Note Ensure that the IRBT 2005 is powered, but not moving. Press the emergency stop button. The brake is applied; you should hear the noise in the motor area. -
Page 163: Inspecting The Cables And Connectors
If one element is damaged, it is possible to replace it without removing the whole chain from IRBT 2005. Product manual - IRBT 2005 3HAC051130-001 Revision: F © Copyright 2015 - 2018 ABB. All rights reserved. -
Page 164: Activities 3 Months
The track cable harness is totally located in the cable chain. xx1400001286 Customer cables Track motor and manipulator power cables Signal cables for the manipulator and IRBT 2005 track motor Cable chain Cable connectors or SMB box connecting cables from the track and from IRC5 controller... - Page 165 Some dust can be expected from the cables as they rub against the dividers in the chain. Continues on next page Product manual - IRBT 2005 3HAC051130-001 Revision: F © Copyright 2015 - 2018 ABB. All rights reserved.
- Page 166 164. If strapping has been replaced ensure that a paint pen is used to mark both sides of the cable tie. Continues on next page Product manual - IRBT 2005 3HAC051130-001 Revision: F © Copyright 2015 - 2018 ABB. All rights reserved.
- Page 167 If found to be loose they need to be removed, have locking liquid applied to them and then be refitted and tightened. Product manual - IRBT 2005 3HAC051130-001 Revision: F © Copyright 2015 - 2018 ABB. All rights reserved.
-
Page 168: Inspecting The Felt Gear
276. Inspecting the felt gear Action Illustration/Note Inspect the felt gear. If damaged, replace it. See Replacing the felt gear on page 233. Product manual - IRBT 2005 3HAC051130-001 Revision: F © Copyright 2015 - 2018 ABB. All rights reserved. -
Page 169: Activities 12 Months
Cables are packed too tight inside the carriage cavities. • Cables are not properly adjusted (see Inspection of cables and covers prior to start-up on page 122). Product manual - IRBT 2005 3HAC051130-001 Revision: F © Copyright 2015 - 2018 ABB. All rights reserved. -
Page 170: Inspecting The Mechanical Stops
Visually inspect the bumpers on mechanical stops for damage. xx1400001283 A Bumper B Mechanical stop If the mechanical stops are damaged, replace them. Product manual - IRBT 2005 3HAC051130-001 Revision: F © Copyright 2015 - 2018 ABB. All rights reserved. -
Page 171: Inspecting The Gear Wheel, Gearbox And Backlash
Inspect the backlash, gear wheel and gearbox. If backlash is improper, adjust it. See justing the gearbox backlash on page 229. Continues on next page Product manual - IRBT 2005 3HAC051130-001 Revision: F © Copyright 2015 - 2018 ABB. All rights reserved. - Page 172 204. Verification of the tightening torque Every year, remove the necessary IRBT 2005 and carriage side covers and make sure that the tightening torque of the eight M10x40 class 12.9 hex socket head cap screws that secure the gear to the bracket is 70 Nm.
-
Page 173: Adjusting The Leveling
3.6.4 Adjusting the leveling 3.6.4 Adjusting the leveling Adjusting the leveling Follow the procedure in Geometric alignment of track motion IRBT 2005 on page 96 to adjust the leveling on the track. Product manual - IRBT 2005 3HAC051130-001 Revision: F... -
Page 174: Activities 36 Months
3.7.1 Replacing SMB battery WARNING See instructions for batteries, Safety risks during handling of batteries on page Location of SMB battery xx1000001415 Continues on next page Product manual - IRBT 2005 3HAC051130-001 Revision: F © Copyright 2015 - 2018 ABB. All rights reserved. - Page 175 • hydraulic pressure supply • air pressure supply to the robot, before entering the robot working area. Continues on next page Product manual - IRBT 2005 3HAC051130-001 Revision: F © Copyright 2015 - 2018 ABB. All rights reserved.
- Page 176 Fit the new battery and connect the battery cable. Close the SMB box. Update the revolution counters. Calibration on page 263. Dispose of the old battery. Environmental information on page 267. Product manual - IRBT 2005 3HAC051130-001 Revision: F © Copyright 2015 - 2018 ABB. All rights reserved.
-
Page 177: Repair
Make sure to read through the chapter Safety on page 15 before commencing any service work. Note If the IRBT 2005 is connected to power, always make sure that the IRBT 2005 is connected to earth before starting any repair work. For more information see: •... -
Page 178: Replacing The Linear Guides
(B) and rack covers (C) around the lin- ear guide to be replaced by removing screws (A). xx1400000231 Continues on next page Product manual - IRBT 2005 3HAC051130-001 Revision: F © Copyright 2015 - 2018 ABB. All rights reserved. - Page 179 A Linear guide B Ø 12xØ 32x4 Washer for rail, l3HAC047749-001 C M12x35 Hex socket head cap screw, 3HAB3409-66 Continues on next page Product manual - IRBT 2005 3HAC051130-001 Revision: F © Copyright 2015 - 2018 ABB. All rights reserved.
- Page 180 "step" while passing the linear guide's junction. xx1400001752 A Ball bearing block B Linear guide Continues on next page Product manual - IRBT 2005 3HAC051130-001 Revision: F © Copyright 2015 - 2018 ABB. All rights reserved.
- Page 181 Tightening torque: 45 Nm xx1400001752 Tighten the hex socket head cap screws Tightening torque: 125 Nm M12x35. Fit the covers. Product manual - IRBT 2005 3HAC051130-001 Revision: F © Copyright 2015 - 2018 ABB. All rights reserved.
-
Page 182: Replacing The Ball Bearing Blocks
These procedures include references to the tools re- required. See references to these quired. procedures in the step-by-step in- structions below. Continues on next page Product manual - IRBT 2005 3HAC051130-001 Revision: F © Copyright 2015 - 2018 ABB. All rights reserved. - Page 183 (don't rise it more than 1 mm). WARNING Rising the carriage more than 1 mm can seriously damage the remaining three ball bearing blocks. Continues on next page Product manual - IRBT 2005 3HAC051130-001 Revision: F © Copyright 2015 - 2018 ABB. All rights reserved.
- Page 184 Remove the standard screws delivered with the block and replace with the grease pipe fitting taken from the old block. Continues on next page Product manual - IRBT 2005 3HAC051130-001 Revision: F © Copyright 2015 - 2018 ABB. All rights reserved.
- Page 185 (A) must be on the upper face of the block. A Machined reference surface B Fittings C The other surface of the block has no reference line. Continues on next page Product manual - IRBT 2005 3HAC051130-001 Revision: F © Copyright 2015 - 2018 ABB. All rights reserved.
- Page 186 These are further detailed in the section First test run may cause injury or damage on page Product manual - IRBT 2005 3HAC051130-001 Revision: F © Copyright 2015 - 2018 ABB. All rights reserved.
-
Page 187: Replacing The Racks
See refer- ences to the tools required. ences to these procedures in the step-by-step instruc- tions below. Continues on next page Product manual - IRBT 2005 3HAC051130-001 Revision: F © Copyright 2015 - 2018 ABB. All rights reserved. - Page 188 Fit the rack with the screws and washers. Do not tighten the screws yet. xx1400000227 A M10x40 hexagon head bolt, class 12.9 B Ø17xØ11x2 washers C Rack Continues on next page Product manual - IRBT 2005 3HAC051130-001 Revision: F © Copyright 2015 - 2018 ABB. All rights reserved.
- Page 189 Repeat with following racks until all racks are aligned with each other. Once you have tightened a screw, mark it with a white marker. xx1400001752 Refit the covers. Product manual - IRBT 2005 3HAC051130-001 Revision: F © Copyright 2015 - 2018 ABB. All rights reserved.
-
Page 190: Replacing The Mechanical Stops
Spare part number is specified in Spare parts on page 283. Standard toolkit The content is defined in Standard tools on page 276. Continues on next page Product manual - IRBT 2005 3HAC051130-001 Revision: F © Copyright 2015 - 2018 ABB. All rights reserved. - Page 191 Fit the screws (C) and nuts (A). xx1400002686 A M20 hexagon nut, 9ADA267-11 B Mechanical stop C M20x100 Hex socket head cap screw, 3HAB3409-206 Tightening torque: 90 Nm Product manual - IRBT 2005 3HAC051130-001 Revision: F © Copyright 2015 - 2018 ABB. All rights reserved.
-
Page 192: Replacing The Motor, Gearbox And Gear Wheel
Motor bracket - remains stationery Gear wheel - remains stationery Felt gear - remains stationery Gearbox - remains stationery Continues on next page Product manual - IRBT 2005 3HAC051130-001 Revision: F © Copyright 2015 - 2018 ABB. All rights reserved. - Page 193 (10 mm), and out- side diameter no bigger that the thick washer outside diameter. xx1500000635 xx1500000636 xx1500000637 Continues on next page Product manual - IRBT 2005 3HAC051130-001 Revision: F © Copyright 2015 - 2018 ABB. All rights reserved.
- Page 194 Loosen the screws. Use a ratchet wrench. xx1400001588 A M12x40 Hex socket head cap screws, 3HAB3409-67 (4 pcs) Continues on next page Product manual - IRBT 2005 3HAC051130-001 Revision: F © Copyright 2015 - 2018 ABB. All rights reserved.
- Page 195 (the tube will be pushed away along with the carriage). xx1400001592 A Lubrication tube connector Continues on next page Product manual - IRBT 2005 3HAC051130-001 Revision: F © Copyright 2015 - 2018 ABB. All rights reserved.
- Page 196 Removing the drive train Action Illustration/Note Remove the covers above the drive train. xx1400000231 Continues on next page Product manual - IRBT 2005 3HAC051130-001 Revision: F © Copyright 2015 - 2018 ABB. All rights reserved.
- Page 197 A M8 eye bolt (2 pcs) Disconnect the power and resolver connectors from the motor. Guide the cables in the tray area. xx1400001625 Continues on next page Product manual - IRBT 2005 3HAC051130-001 Revision: F © Copyright 2015 - 2018 ABB. All rights reserved.
- Page 198 A Ø 17xØ 11x2 washer, 3HAB4233-1 B M10x40 hex socket head cap installation screw, 3HAB3409-50 C Cable chain support Continues on next page Product manual - IRBT 2005 3HAC051130-001 Revision: F © Copyright 2015 - 2018 ABB. All rights reserved.
- Page 199 A M8x30 Hex socket head cap screw, 9ADA183-38 (4 pcs) B Ø13xØ8.4x1.6 plain washer, 9ADA312-7 (4 pcs) Continues on next page Product manual - IRBT 2005 3HAC051130-001 Revision: F © Copyright 2015 - 2018 ABB. All rights reserved.
- Page 200 Fit the locating cylindrical pin to the motor us- ing a rubber mallet. Insert it completely. xx1400001637 A Ø10x32 Cylindrical pin with threaded hole, 3HAC043986- Continues on next page Product manual - IRBT 2005 3HAC051130-001 Revision: F © Copyright 2015 - 2018 ABB. All rights reserved.
- Page 201 For the mirrored cable chain orientation, refit the cable chain support with two screws. Reconnect the power and signal cables to the motor. Continues on next page Product manual - IRBT 2005 3HAC051130-001 Revision: F © Copyright 2015 - 2018 ABB. All rights reserved.
- Page 202 Tightening torque: 100 Nm Connect the lubrication tube connectors of the ball bearing block. xx1400001592 A Lubrication tube connector Continues on next page Product manual - IRBT 2005 3HAC051130-001 Revision: F © Copyright 2015 - 2018 ABB. All rights reserved.
- Page 203 Refit the side cover of the carriage. xx1400001587 A M6x12 Screw DIN6921, 9ADA181-11 (4 pcs) Refit the top cover. Product manual - IRBT 2005 3HAC051130-001 Revision: F © Copyright 2015 - 2018 ABB. All rights reserved.
-
Page 204: Replacing The Gearbox
Gearbox - remains stationery Required equipment Equipment Art. No. Note Standard toolkit The content is defined in Standard tools on page 276. Continues on next page Product manual - IRBT 2005 3HAC051130-001 Revision: F © Copyright 2015 - 2018 ABB. All rights reserved. - Page 205 (10 mm), and out- side diameter no bigger that the thick washer outside diameter. xx1500000635 xx1500000636 xx1500000637 Continues on next page Product manual - IRBT 2005 3HAC051130-001 Revision: F © Copyright 2015 - 2018 ABB. All rights reserved.
- Page 206 Loosen the screws. Use a ratchet wrench. xx1400001588 A M12x40 Hex socket head cap screws, 3HAB3409-67 (4 pcs) Continues on next page Product manual - IRBT 2005 3HAC051130-001 Revision: F © Copyright 2015 - 2018 ABB. All rights reserved.
- Page 207 (the tube will be pushed away along with the carriage). xx1400001592 A Lubrication tube connector Continues on next page Product manual - IRBT 2005 3HAC051130-001 Revision: F © Copyright 2015 - 2018 ABB. All rights reserved.
- Page 208 Removing the drive train Action Illustration/Note Remove the covers above the drive train. xx1400000231 Continues on next page Product manual - IRBT 2005 3HAC051130-001 Revision: F © Copyright 2015 - 2018 ABB. All rights reserved.
- Page 209 A M8 eye bolt (2 pcs) Disconnect the power and resolver connectors from the motor. Guide the cables in the tray area. xx1400001625 Continues on next page Product manual - IRBT 2005 3HAC051130-001 Revision: F © Copyright 2015 - 2018 ABB. All rights reserved.
- Page 210 A Ø 17xØ 11x2 washer, 3HAB4233-1 B M10x40 hex socket head cap installation screw, 3HAB3409-50 C Cable chain support Continues on next page Product manual - IRBT 2005 3HAC051130-001 Revision: F © Copyright 2015 - 2018 ABB. All rights reserved.
- Page 211 9ADA183-38). xx1400001639 Refitting the gearbox Refitting the gearbox Action Illustration/Note Inject lubricant into the gearbox until it is filled. Continues on next page Product manual - IRBT 2005 3HAC051130-001 Revision: F © Copyright 2015 - 2018 ABB. All rights reserved.
- Page 212 Attach the lifting chains to the eye bolts on the motor and lift the motor into position on the track with guidance from the locating cylindrical pin. Continues on next page Product manual - IRBT 2005 3HAC051130-001 Revision: F © Copyright 2015 - 2018 ABB. All rights reserved.
- Page 213 Reinstalling the carriage to the drive train bracket Action Illustration/Note Push the carriage back above the drive train. Continues on next page Product manual - IRBT 2005 3HAC051130-001 Revision: F © Copyright 2015 - 2018 ABB. All rights reserved.
- Page 214 A Lubrication tube connector Connect the lubrication tube connector of the pinion. xx1400001596 A Lubrication tube connector Continues on next page Product manual - IRBT 2005 3HAC051130-001 Revision: F © Copyright 2015 - 2018 ABB. All rights reserved.
- Page 215 Refit the side cover of the carriage. xx1400001587 A M6x12 Screw DIN6921, 9ADA181-11 (4 pcs) Refit the top cover. Product manual - IRBT 2005 3HAC051130-001 Revision: F © Copyright 2015 - 2018 ABB. All rights reserved.
-
Page 216: Replacing The Gear Wheel
Gearbox - remains stationery Required equipment Equipment Art. No. Note Standard toolkit The content is defined in Standard tools on page 276. Continues on next page Product manual - IRBT 2005 3HAC051130-001 Revision: F © Copyright 2015 - 2018 ABB. All rights reserved. - Page 217 (10 mm), and out- side diameter no bigger that the thick washer outside diameter. xx1500000635 xx1500000636 xx1500000637 Continues on next page Product manual - IRBT 2005 3HAC051130-001 Revision: F © Copyright 2015 - 2018 ABB. All rights reserved.
- Page 218 Loosen the screws. Use a ratchet wrench. xx1400001588 A M12x40 Hex socket head cap screws, 3HAB3409-67 (4 pcs) Continues on next page Product manual - IRBT 2005 3HAC051130-001 Revision: F © Copyright 2015 - 2018 ABB. All rights reserved.
- Page 219 (the tube will be pushed away along with the carriage). xx1400001592 A Lubrication tube connector Continues on next page Product manual - IRBT 2005 3HAC051130-001 Revision: F © Copyright 2015 - 2018 ABB. All rights reserved.
- Page 220 Removing the drive train Action Illustration/Note Remove the covers above the drive train. xx1400000231 Continues on next page Product manual - IRBT 2005 3HAC051130-001 Revision: F © Copyright 2015 - 2018 ABB. All rights reserved.
- Page 221 A M8 eye bolt (2 pcs) Disconnect the power and resolver connectors from the motor. Guide the cables in the tray area. xx1400001625 Continues on next page Product manual - IRBT 2005 3HAC051130-001 Revision: F © Copyright 2015 - 2018 ABB. All rights reserved.
- Page 222 A Ø 17xØ 11x2 washer, 3HAB4233-1 B M10x40 hex socket head cap installation screw, 3HAB3409-50 C Cable chain support Continues on next page Product manual - IRBT 2005 3HAC051130-001 Revision: F © Copyright 2015 - 2018 ABB. All rights reserved.
- Page 223 A M8x30 Hex socket head cap screw, 9ADA183-38 (4 pcs) B Ø13xØ8.4x1.6 plain washer, 9ADA312-7 (4 pcs) Continues on next page Product manual - IRBT 2005 3HAC051130-001 Revision: F © Copyright 2015 - 2018 ABB. All rights reserved.
- Page 224 Tighten the screws. xx1400002645 A M10x35 Hex socket head cap screw, 3HAB3409- Tightening torque: 70 Nm B Pinion on rack, 3HAC047375-001 Continues on next page Product manual - IRBT 2005 3HAC051130-001 Revision: F © Copyright 2015 - 2018 ABB. All rights reserved.
- Page 225 Fit the locating cylindrical pin to the motor us- ing a rubber mallet. Insert it completely. xx1400001637 A Ø10x32 Cylindrical pin with threaded hole, 3HAC043986- Continues on next page Product manual - IRBT 2005 3HAC051130-001 Revision: F © Copyright 2015 - 2018 ABB. All rights reserved.
- Page 226 For the mirrored cable chain orientation, refit the cable chain support with two screws. Reconnect the power and signal cables to the motor. Continues on next page Product manual - IRBT 2005 3HAC051130-001 Revision: F © Copyright 2015 - 2018 ABB. All rights reserved.
- Page 227 Tightening torque: 100 Nm Connect the lubrication tube connectors of the ball bearing block. xx1400001592 A Lubrication tube connector Continues on next page Product manual - IRBT 2005 3HAC051130-001 Revision: F © Copyright 2015 - 2018 ABB. All rights reserved.
- Page 228 Refit the side cover of the carriage. xx1400001587 A M6x12 Screw DIN6921, 9ADA181-11 (4 pcs) Refit the top cover. Product manual - IRBT 2005 3HAC051130-001 Revision: F © Copyright 2015 - 2018 ABB. All rights reserved.
-
Page 229: Adjusting The Gearbox Backlash
Tighten the locking screws (A), (B) and (C). xx1400001661 A Locking screw B Locking screw C Locking screw Tightening torque: 70 Nm Continues on next page Product manual - IRBT 2005 3HAC051130-001 Revision: F © Copyright 2015 - 2018 ABB. All rights reserved. -
Page 230: Product Manual - Irbt
The indicator should show data between 0.07-0.13 mm. Push the carriage 1000 mm. X+ direction Continue with step to step 7. Continues on next page Product manual - IRBT 2005 3HAC051130-001 Revision: F © Copyright 2015 - 2018 ABB. All rights reserved. - Page 231 Note During adjustment, note that the cable chain should be assembled and cables to motor should be connected. Continues on next page Product manual - IRBT 2005 3HAC051130-001 Revision: F © Copyright 2015 - 2018 ABB. All rights reserved.
- Page 232 Tightening torque: 70 Nm Calibrate the track motion. Use previously Fine calibration on page 264. measured reference values for the zero posi- tion. Product manual - IRBT 2005 3HAC051130-001 Revision: F © Copyright 2015 - 2018 ABB. All rights reserved.
-
Page 233: Replacing The Felt Gear
Motor bracket - remains stationery Gear wheel - remains stationery Felt gear - remains stationery Gearbox - remains stationery Continues on next page Product manual - IRBT 2005 3HAC051130-001 Revision: F © Copyright 2015 - 2018 ABB. All rights reserved. - Page 234 (10 mm), and out- side diameter no bigger that the thick washer outside diameter. xx1500000635 xx1500000636 xx1500000637 Continues on next page Product manual - IRBT 2005 3HAC051130-001 Revision: F © Copyright 2015 - 2018 ABB. All rights reserved.
- Page 235 Loosen the screws. Use a ratchet wrench. xx1400001588 A M12x40 Hex socket head cap screws, 3HAB3409-67 (4 pcs) Continues on next page Product manual - IRBT 2005 3HAC051130-001 Revision: F © Copyright 2015 - 2018 ABB. All rights reserved.
- Page 236 (the tube will be pushed away along with the carriage). xx1400001592 A Lubrication tube connector Continues on next page Product manual - IRBT 2005 3HAC051130-001 Revision: F © Copyright 2015 - 2018 ABB. All rights reserved.
- Page 237 B M8x20 Hex socket head cap screw, on felt gear bracket Remove the screw from the felt gear bracket. Continues on next page Product manual - IRBT 2005 3HAC051130-001 Revision: F © Copyright 2015 - 2018 ABB. All rights reserved.
- Page 238 Note Do not tighten the screws yet. xx1400001588 A M12x40 Hex socket head cap screws, 3HAB3409-67 (4 pcs) Continues on next page Product manual - IRBT 2005 3HAC051130-001 Revision: F © Copyright 2015 - 2018 ABB. All rights reserved.
- Page 239 Refit the bracket for brake release and secure brake release cables with cable ties. Continues on next page Product manual - IRBT 2005 3HAC051130-001 Revision: F © Copyright 2015 - 2018 ABB. All rights reserved.
- Page 240 4.8.1 Replacing the felt gear Continued Action Illustration/Note Refit the side cover of the carriage. xx1400001587 A M6x12 Screw DIN6921, 9ADA181-11 (4 pcs) Refit the top cover. Product manual - IRBT 2005 3HAC051130-001 Revision: F © Copyright 2015 - 2018 ABB. All rights reserved.
-
Page 241: Replacing The Cable Chain And Cables
Circuit diagram Circuit diagrams on page 285. Moving away the carriage Action Illustration/Note Remove all cover plates. Continues on next page Product manual - IRBT 2005 3HAC051130-001 Revision: F © Copyright 2015 - 2018 ABB. All rights reserved. - Page 242 WARNING Turn off all electric power and pneumatic pres- sure supplies to the robot and IRBT 2005. Take a note of how the cabling is strapped on the carriage. Pay special attention to how the IRB power cable is routed.
- Page 243 Remove screws at the fixed end of the cable chain. xx1400001980 A M6x20 Hex socket head cap screw, 9ADA183-25 Pull the complete cable chain out. Continues on next page Product manual - IRBT 2005 3HAC051130-001 Revision: F © Copyright 2015 - 2018 ABB. All rights reserved.
- Page 244 WARNING Turn off all electric power and pneumatic pres- sure supplies to the robot and IRBT 2005. Take a note of how the cabling is strapped on the carriage. Pay special attention to how the IRB power cable is routed.
- Page 245 Secure the fixing end of the cable chain on the cable tray by screws. xx1400001980 A M6x20 Hex socket head cap screw, 9ADA183-25 Continues on next page Product manual - IRBT 2005 3HAC051130-001 Revision: F © Copyright 2015 - 2018 ABB. All rights reserved.
- Page 246 Refit top covers. Refitting the external cable chain Action Illustration/Note Move the carriage to the gliding side of the cable tray. Continues on next page Product manual - IRBT 2005 3HAC051130-001 Revision: F © Copyright 2015 - 2018 ABB. All rights reserved.
- Page 247 Continues on next page Product manual - IRBT 2005 3HAC051130-001 Revision: F © Copyright 2015 - 2018 ABB. All rights reserved.
- Page 248 Perform a test run before powering up the track Test run on page 258. to full speed and duty cycle. Continues on next page Product manual - IRBT 2005 3HAC051130-001 Revision: F © Copyright 2015 - 2018 ABB. All rights reserved.
- Page 249 Complete the installation of the new cable Refitting the cable chain on chain. page 245. Product manual - IRBT 2005 3HAC051130-001 Revision: F © Copyright 2015 - 2018 ABB. All rights reserved.
-
Page 250: Replacing The Side Links And Glide Shoes
Location of the side links The figure shows the location of the side links on the cable chain. xx1400001677 Side link Continues on next page Product manual - IRBT 2005 3HAC051130-001 Revision: F © Copyright 2015 - 2018 ABB. All rights reserved. - Page 251 276. Removing the side link Action Illustration/Note Bend the links until two marks on the side line xx1300000939 Continues on next page Product manual - IRBT 2005 3HAC051130-001 Revision: F © Copyright 2015 - 2018 ABB. All rights reserved.
- Page 252 Remove the glide shoes by pushing in the clips with a screwdriver and then pulling out the glide shoes. Refit the glide shoes by pushing it into place until it snaps. Product manual - IRBT 2005 3HAC051130-001 Revision: F © Copyright 2015 - 2018 ABB. All rights reserved.
-
Page 253: Replacing The Cables
Cable layout in the track with extra plate is similar with the robot track. While more extra plate-related cables are added and routed through cable chain. Continues on next page Product manual - IRBT 2005 3HAC051130-001 Revision: F © Copyright 2015 - 2018 ABB. All rights reserved. - Page 254 Be careful not to damage the brake release cables. Removing the cable Action Illustration/Note Disconnect the motor cables and cut the cable straps. Continues on next page Product manual - IRBT 2005 3HAC051130-001 Revision: F © Copyright 2015 - 2018 ABB. All rights reserved.
- Page 255 A Cable chain B Tie wrap plate C Separator for cables D Cable chain link Remove the cable to be replaced. Continues on next page Product manual - IRBT 2005 3HAC051130-001 Revision: F © Copyright 2015 - 2018 ABB. All rights reserved.
- Page 256 Refit the upper part of the cable tray to the cable outlet if it is dismantled. Reconnect the motor cables. Continues on next page Product manual - IRBT 2005 3HAC051130-001 Revision: F © Copyright 2015 - 2018 ABB. All rights reserved.
- Page 257 Right: if correctly installed the cable should fit comfortably in the chains cavity Continues on next page Product manual - IRBT 2005 3HAC051130-001 Revision: F © Copyright 2015 - 2018 ABB. All rights reserved.
- Page 258 Moving back the carriage Action Illustration/Note Move back the carriage and secure it to the drive train bracket with the screws. Continues on next page Product manual - IRBT 2005 3HAC051130-001 Revision: F © Copyright 2015 - 2018 ABB. All rights reserved.
- Page 259 Perform a test run before powering up the track Test run on page 258. to full speed and duty cycle. Product manual - IRBT 2005 3HAC051130-001 Revision: F © Copyright 2015 - 2018 ABB. All rights reserved.
-
Page 260: Replacing Smb Board
Disconnect the cables. Remove the screws holding the plate. Pull out the plate. Continues on next page Product manual - IRBT 2005 3HAC051130-001 Revision: F © Copyright 2015 - 2018 ABB. All rights reserved. - Page 261 Cross tighten the screws to make sure the sealing is tight. Connect the cables and close the cover. Update the revolution counters. Calibration on page 263. Product manual - IRBT 2005 3HAC051130-001 Revision: F © Copyright 2015 - 2018 ABB. All rights reserved.
-
Page 262: Cut The Paint Or Surface On The Robot Before Replacing Parts
Carefully grind the paint edge that is left on the structure to a smooth surface. Product manual - IRBT 2005 3HAC051130-001 Revision: F © Copyright 2015 - 2018 ABB. All rights reserved. -
Page 263: Calibration
WARNING Make sure no persons are on IRBT 2005 when the carriage is in motion. Also make sure that IRBT 2005's cover plates are free from loose objects, otherwise they can get trapped between the carriage and the plates. -
Page 264: Fine Calibration
A: Calibration notch on the carriage B: Calibration hole on the section Insert the calibration pin. A dowel pin diameter 8mm can also be used. Tap ABB on the top left of the FlexPendant. Tap Calibration. Select the desired mechanical unit. Tap Fine calibration. -
Page 265: Update Revolution Counters
A: Calibration sharp edge of the mov- ing part B: Calibration sharp edge of the fixed part Tap ABB on the top left of the FlexPendant. Tap Calibration. Select the desired mechanical unit. Tap Update revolution counters. Select the desired axis. -
Page 266: Defining Base Frame
To run coordinated axes, the base frame must be defined. See Application manual - Additional axes and stand alone controller (Coordinated track motion). Product manual - IRBT 2005 3HAC051130-001 Revision: F © Copyright 2015 - 2018 ABB. All rights reserved. -
Page 267: Decommissioning
Incineration must be carried out under controlled conditions in accordance with local regulations. Continues on next page Product manual - IRBT 2005 3HAC051130-001 Revision: F © Copyright 2015 - 2018 ABB. All rights reserved. - Page 268 Spills can form a film on water surfaces causing damage to organisms. Oxygen transfer could also be impaired. • Spillage can penetrate the soil causing ground water contamination. Product manual - IRBT 2005 3HAC051130-001 Revision: F © Copyright 2015 - 2018 ABB. All rights reserved.
-
Page 269: Reference Information
7 Reference information 7.1 Introduction General This chapter includes general information, complementing the more specific information in the different procedures in the manual. Product manual - IRBT 2005 3HAC051130-001 Revision: F © Copyright 2015 - 2018 ABB. All rights reserved. -
Page 270: Applicable Standards
Terminology and general principles EN 574:1996 + A1:2008 Safety of machinery - Two-hand control devices - Functional aspects - Principles for design Continues on next page Product manual - IRBT 2005 3HAC051130-001 Revision: F © Copyright 2015 - 2018 ABB. All rights reserved. - Page 271 Safety requirements for industrial robots and robot systems ANSI/UL 1740 Safety standard for robots and robotic equipment CAN/CSA Z 434-14 Industrial robots and robot Systems - General safety require- ments Product manual - IRBT 2005 3HAC051130-001 Revision: F © Copyright 2015 - 2018 ABB. All rights reserved.
-
Page 272: Unit Conversion
2.21 lb. Weight 0.035 ounces Pressure 1 bar 100 kPa 14.5 psi Force 0.225 lbf Moment 1 Nm 0.738 lbf-ft Volume 0.264 US gal Product manual - IRBT 2005 3HAC051130-001 Revision: F © Copyright 2015 - 2018 ABB. All rights reserved. -
Page 273: Screw Joints
UNBRAKO screws UNBRAKO is a special type of screw recommended by ABB for certain screw joints. It features special surface treatment (Gleitmo as described below) and is extremely resistant to fatigue. - Page 274 A special torque specified in the repair, maintenance or installation procedure overrides the standard torque. Dimension Tightening torque (Nm) Tightening torque (Nm) Class 10.9, lubricated Class 12.9, lubricated Continues on next page Product manual - IRBT 2005 3HAC051130-001 Revision: F © Copyright 2015 - 2018 ABB. All rights reserved.
- Page 275 A special torque specified in the repair, maintenance or installation procedure overrides the standard torque. Dimension Tightening torque Nm - Tightening torque Nm - Tightening torque Nm - Nominal Min. Max. Product manual - IRBT 2005 3HAC051130-001 Revision: F © Copyright 2015 - 2018 ABB. All rights reserved.
-
Page 276: Standard Tools
Hex bit socket head cap no. 6 socket 1/2", bit length=20 mm Hex bit socket head cap no. 8 socket 1/2", bit length=20 mm Plastic mallet Small screwdriver Product manual - IRBT 2005 3HAC051130-001 Revision: F © Copyright 2015 - 2018 ABB. All rights reserved. -
Page 277: Special Tools
3HAC054535-001 Locking nut adjustment tool 3HAC054534-001 Rack clamp The actual rack clamp to be used should be pre- pared based on actual situation. Product manual - IRBT 2005 3HAC051130-001 Revision: F © Copyright 2015 - 2018 ABB. All rights reserved. -
Page 278: Lifting Accessories And Lifting Instructions
This implies that the instructions delivered with the lifting accessories should be stored for later reference. Product manual - IRBT 2005 3HAC051130-001 Revision: F © Copyright 2015 - 2018 ABB. All rights reserved. -
Page 279: Hilti Adhesive Anchor
Shear VRk HAS [kN] Recommended loads : concrete C 20/25 – fck,cube = 25 N/mm², anchor HAS 40,0 Tensile NRd HAS [kN] Continues on next page Product manual - IRBT 2005 3HAC051130-001 Revision: F © Copyright 2015 - 2018 ABB. All rights reserved. - Page 280 Short-term elevated base material temperatures are those that occur over brief intervals, e.g. as a result of diurnal cycling. Continues on next page Product manual - IRBT 2005 3HAC051130-001 Revision: F © Copyright 2015 - 2018 ABB. All rights reserved.
- Page 281 Anchor size Rotary hammer TE 2 - TE 16 Other tools blow out pump or compressed air gun, setting tools Continues on next page Product manual - IRBT 2005 3HAC051130-001 Revision: F © Copyright 2015 - 2018 ABB. All rights reserved.
- Page 282 20 minutes 10 °C to 19 °C 30 minutes 0 °C to 9 °C 1 hour -5 °C to - 1 °C 5 hour Product manual - IRBT 2005 3HAC051130-001 Revision: F © Copyright 2015 - 2018 ABB. All rights reserved.
-
Page 283: Spare Parts
Spare parts and exploded views are not included in the manual but delivered as a separate document for registered users on myABB Business Portal, www.mypo- rtal.abb.com. Product manual - IRBT 2005 3HAC051130-001 Revision: F © Copyright 2015 - 2018 ABB. All rights reserved. - Page 284 This page is intentionally left blank...
-
Page 285: Circuit Diagrams
Circuit diagram - IRB 2600 3HAC029570-007 Circuit diagram - IRB 4600 3HAC029038-003 IRBT 2005 Product Article numbers for circuit diagrams Medium Track Motion IRBT 2005 3HAC051586-001 Product manual - IRBT 2005 3HAC051130-001 Revision: F © Copyright 2015 - 2018 ABB. All rights reserved. - Page 286 This page is intentionally left blank...
-
Page 287: Index
36 limitation of liability, 15 safety standards, 270 Lithium safety zones, 16 disposal, 267 screw joints, 273 setting the base frame, 133 Product manual - IRBT 2005 3HAC051130-001 Revision: F © Copyright 2015 - 2018 ABB. All rights reserved. - Page 288 ANSI, 271 brakes, 32 CAN, 271 three-position enabling device, 26 EN, 270 EN IEC, 270 EN ISO, 270 validity and responsibility, 15 steel Product manual - IRBT 2005 3HAC051130-001 Revision: F © Copyright 2015 - 2018 ABB. All rights reserved.
- Page 290 SHANGHAI 201319, China Telephone: +86 21 6105 6666 ABB Inc. Robotics and Motion 1250 Brown Road Auburn Hills, MI 48326 Telephone: +1 248 391 9000 abb.com/robotics © Copyright 2015 - 2018 ABB. All rights reserved. Specifications subject to change without notice.