Table of Contents
Advertisement
DAB+ RADIO / DAB+ RADIO /
RADIO DAB+ SDR 15 A1
DE
AT
CH
DAB+ RADIO
Bedienungsanleitung
FR
BE
RADIO DAB+
Mode d'emploi
PL
RADIO DAB+
Instrukcja obsługi
SK
DAB+ RÁDIO
Návod na obsluhu
IAN 341 133_1910
GB
IE
DAB+ RADIO
Operating instructions
NL
BE
DAB+ RADIO
Gebruiksaanwijzing
CZ
RÁDIO DAB+
Návod k obsluze
DE
NL
PL
BE
CZ
SK
Advertisement
Table of Contents

Related Manuals for Silvercrest SDR 15 A1


Summary of Contents for Silvercrest SDR 15 A1
- Page 1 DAB+ RADIO / DAB+ RADIO / RADIO DAB+ SDR 15 A1 DAB+ RADIO DAB+ RADIO Bedienungsanleitung Operating instructions RADIO DAB+ DAB+ RADIO Mode d‘emploi Gebruiksaanwijzing RADIO DAB+ RÁDIO DAB+ Instrukcja obsługi Návod k obsluze DAB+ RÁDIO Návod na obsluhu IAN 341 133_1910...
- Page 2 Klappen Sie vor dem Lesen die Seite mit den Abbildungen aus und machen Sie sich an- schließend mit allen Funktionen des Gerätes vertraut. Before reading, unfold the page containing the illustrations and familiarise yourself with all functions of the device. Avant de lire le mode d‘emploi, ouvrez la page contenant les illustrations et familiari- sez-vous ensuite avec toutes les fonctions de l‘appareil.
- Page 3 2 3 4 Menu/Info Preset Select / -Volume+...
-
Page 4: Table Of Contents
Table of Contents Information about this user manual ...... 59 1.1. Explanation of symbols ..........59 Proper use ............62 Safety information ..........63 3.1. Restricted group of people ........64 3.2. Operating safety ............65 Damage to hearing ..........72 Declaration of conformity ........ - Page 5 16.1. Setting the alarm ............85 16.2. Stopping the alarm/activating the snooze function 87 16.3. Sleep timer ..............87 Settings ..............88 17.1. Overview of the menus in FM, DAB and Bluetooth operating modes ............88 Cleaning .............. 92 Troubleshooting ........... 93 Repairs ..............
-
Page 6: Information About This User Manual
Information about this user manual Thank you for choosing our product. We hope you enjoy us- ing this device. Please read the safety instructions and the user manual care- fully before using the device for the first time. Note the warnings on the device and in the user manual. - Page 7 CAUTION! Warning: risk of minor and/or moderate injuries! Follow the instructions to avoid situations that may lead to moderate or minor injuries. NOTICE! Follow the instructions to avoid property damage. Follow the instructions to avoid situations that may damage the device. Instructions and tips on operating the device.
- Page 8 Instruction • List Protection class II Electrical devices in protection class II are devic- es that have double and/or reinforced insulation throughout, and do not have the option of con- necting a protective earth. The housing of an elec- trical device in protection class II, with surround- ing insulating material, might either form all of the additional or reinforced insulation, or part of it.
-
Page 9: Proper Use
Proper use This is an entertainment electronics device. Your DAB+/FM radio is intended for music and sound playback of radio programmes as well as play- back of sound media via Bluetooth ® The device is only intended for private use and not for industrial/commercial use. -
Page 10: Safety Information
Safety information Do not modify the device without our consent and do not use any auxiliary equipment that we have not approved or supplied. Only use replacement parts or accessories that we have supplied or approved. Comply with all the information in this user manual, especially the safety information. -
Page 11: Restricted Group Of People
3.1. Restricted group of people This device can be used by children of eight years and older, and by people with limited physical, sensory or mental capacity, or with a lack of experience and knowledge, but only with proper supervision, or if they have been told how to use the device safely, and have understood the risks involved if they use it im- properly. -
Page 12: Operating Safety
play with the plastic bags. There is a risk of choking and suffocation. 3.2. Operating safety Before using the device for the first time, check the device and mains adapter for damage. A defective or damaged radio or mains adapter may not be used. - Page 13 Unplug the mains adapter from the socket if you are away for a long period or there is a thunder storm. 3.2.1. Power supply WARNING! Risk of electric shock! There is a risk of electric shock from live parts. Please follow the safety advice be- low closely: ...
- Page 14 Always unplug the mains adapter from the socket before cleaning. In an emergency, for example, if you see smoke coming out of the device or if it makes unusual noises, immediately unplug the mains adapter from the mains socket and the device. ...
- Page 15 3.2.2. Installation location/surroundings In the first few hours of use, new products may give off a typical, unavoidable but total- ly harmless smell which will wear off with time. We recommend you ventilate the room regu- larly to help dissipate this odour. We have tak- en appropriate measures during the develop- ment of this product to ensure that levels are well below legal limits.
- Page 16 During the set-up process, maintain a minimum distance of 5 cm around the device for suffi- cient ventilation. Ventilation must not be impeded by covering the device with objects such as mag azines, ta- ble cloths, curtains etc. ...
- Page 17 3.2.4. Safe handling of rechargeable batteries WARNING! Risk of explosion! Rechargeable batteries may contain com- bustible materials. If handled incorrectly, rechargeable batteries can leak, become very hot, ignite or even explode, which could damage your device and/or your health. Charge the battery only with the original ac- cessory (mains adapter).
- Page 18 WARNING! Risk of explosion! There is a risk of explosion if the battery is replaced incorrectly. Only replace batteries with the same type or an equivalent type recommended by the man- ufacturer. 3.2.5. Repairs Please contact our Service Centre if you have technical problems with your device.
-
Page 19: Damage To Hearing
Damage to hearing Damage to hearing! Excessive sound pressure when using ear- phones and headphones can result in damage to and/or loss of hearing. Before pressing play, set the volume to the lowest setting by turning the con- -VOLUME+ troller. -
Page 20: Unpacking The Device
Unpacking the device Remove the product from the packaging and remove all packag- ing material. DANGER! Risk of choking and suffocation! Risk of choking and suffocation through swallowing or inhaling plastic wrap. Keep the plastic packaging out of the reach of children. -
Page 21: Description Of Components
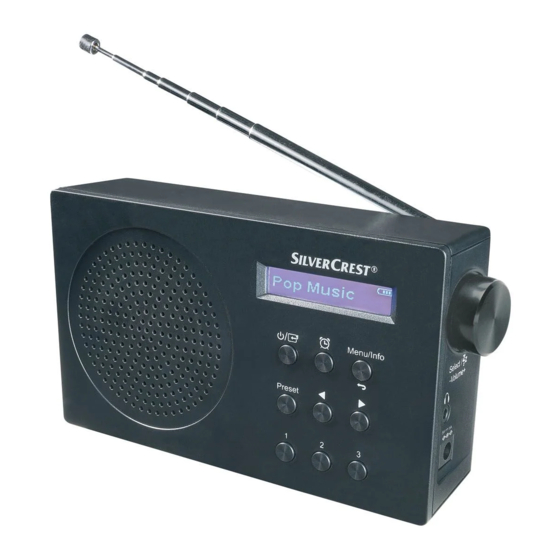
Description of components 7.1. Front Fig. A button – Switch device on/switch to standby mode; switch between DAB+, FM and Bluetooth Dot-matrix display button – Open alarm menu MENU/INFO/ button – Open menu; display station information; return to previous menu ... -
Page 22: Connecting The Mains Adapter
8. Connecting the mains adapter The device can be operated using the mains adapter or the integrated rechargeable battery. Only use the supplied mains adapter to connect the radio. The mains adapter has a type plate detailing the technical specifi- cations of the mains adapter. -
Page 23: Using The Device For The First Time
10. Using the device for the fi rst time When using the device for the first time, the radio starts in DAB+ mode with a station search. The date and time are set automatically. The dis- play language is set to English by default. 10.1. -
Page 24: Setting The Language
SELECT Then press the controller to open the system settings. Press the button or turn the controller to select <Time>. SELECT Then press the controller to open the time settings. Press the button or turn the controller to select <Set Time/ Date>. -
Page 25: Setting The Volume
12. Setting the volume -VOLUME+ When the device is in use, turn the controller anti- clockwise to decrease the volume. -VOLUME+ When the device is in use, turn the controller clock- wise to increase the volume. The volume set is briefly shown on the display. -VOLUME+ ... -
Page 26: Radio Mode
14. Radio mode You can use this radio to receive FM and DAB+ stations. Your radio has the Dynamic Label Segment (DLS) information service, which displays information such as artist, song titles or current traffic news on the display. After switching on for the first time, the device automatically searches for DAB stations that can be received and stores them. - Page 27 14.1.2. Selecting DAB stations from the station list Press the button to open the station list. Press the button again to select the desired DAB station from the stations list. SELECT Press the controller to play the station.
-
Page 28: Fm Mode
14.1.4. Selecting DAB favourites PRESET Briefly press the button. <Preset Recall> is shown on the display. Press the button or turn the controller to select the desired memory slot. SELECT Press the controller to select the station. Alternatively: ... - Page 29 14.2.2. Using the AMS (Automatic Station Search with station ) function The AMS function performs an automatic station search and stores the stations found. MENU/INFO In FM mode, press and hold the button until the menu is shown on the display. ...
- Page 30 Previously stored stations will be deleted without advance warning. The first three programme positions in the station list are reserved for the fast keys . Stations can be stored to the fast key slots as de- scribed above. Alternatively, proceed as follows: ...
-
Page 31: Display Information/Select Views
Refer to the user manual for your audio playback device for more information. The name of the DAB radio is "SDR 15 A1". If you are prompted to enter a password on the external device, en- ter "0000"... -
Page 32: Using The Alarm
SELECT press and hold the controller until pairing mode restarts. You can control how tracks are played, the volume and a range of spe- cial functions on your external device and on the DAB radio. What functions are available is dependent on your external device and the software that you use. - Page 33 The following alarm durations can be selected: 15 minutes, 30 minutes, 45 minutes, 60 minutes, 90 minutes or 120 minutes. SELECT Use the buttons or turn the controller to set the de- sired source. You can be woken by either the alarm or a DAB/FM SELECT radio station.
-
Page 34: Stopping The Alarm/Activating The Snooze Function
16.2. Stopping the alarm/activating the snooze function When the alarm sounds and the display flashes, you can end the alarm by pressing either the button or the button. Pressing the controller activates the snooze function. A 15-minute countdown takes place on the display. After this, the alarm sounds again. -
Page 35: Settings
SELECT Then press the controller to select the desired duration. While the set timer elapses, the battery symbol and the remain- ing time <S10> flash alternately on the display. 17. Settings System settings can only be adjusted when the device is switched on. Proceed as follows to navigate in the menu and make settings: ... - Page 36 17.1.1. Menus in DAB+ mode All setting options for DAB+ mode can be found here. Menu name Description FULL SCAN Automatic station search PRESET RECALL Select one of 30 stored stations. PRESET SAVE Select a memory slot for storing the desired station.
- Page 37 17.1.2. Menus in FM mode All setting options for FM mode can be found here. Menu name Description PRESET RECALL Select one of 30 stored stations. PRESET SAVE Select a memory slot for storing the desired station. SCAN SETTING STRONG STATIONS Select whether to search for all (even weak) or only strong stations.
- Page 38 17.1.3. System menu All settings options that can be configured in DAB+, FM or Bluetooth mode can be found here. Menu name Description SYSTEM SLEEP Set sleep timer TIME SET TIME/DATE Manually set the time and date. UPDATE Choose whether or not the date and time are set automatically via the DAB or FM signal.
-
Page 39: Cleaning
Menu name Description DIM LEVEL Specify the desired dimmed display lighting intensity. The following settings can be config- ured: • Bright (high dim strength) • Medium (medium dim strength) • Dim (low dim strength) LANGUAGE Select the menu language The following languages can be selected: English, Deutsch, Français or Italiano FACTORY RESET Reset to factory settings... -
Page 40: Troubleshooting
19. Troubleshooting Problem Possible Remedy cause The device can- • The battery may be • Charge the battery as de- not be switched dead. scribed in section "Battery operation/charging the • The mains adapter is device". not connected prop- erly. •... - Page 41 Problem Possible Remedy cause No sound • The volume is set • Increase the volume as required. too low. • Remove the connect- • Headphones are ed headphones, if appli- connected. cable. 94 – EN...
-
Page 42: Repairs
20. Repairs Please contact our Service Centre if you have technical problems with your device. WARNING! Risk of electric shock! There is a risk of electric shock from live parts. Never open the housing of the mains adapter or device to repair it yourself. ... -
Page 43: Storing The Device When Not In Use
21. Storing the device when not in use NOTICE! Possible material damage! Risk of damage to the device due to improper use of the device. Fully charge the device every 2 months to avoid damage to the battery. Store the DAB+ radio and respective mains adapter in a dry, cool place and take care to ensure that the DAB+ radio and mains adapt- er are protected against dust and extreme tem-... -
Page 44: Disposal
22. Disposal PACKAGING Your device has been packaged to protect it from damage in transit. The packaging is made of materials that can be recy- cled in an environmentally friendly manner. DEVICE Old devices that carry the symbol illustrated may not be dis- posed of in ordinary household waste. -
Page 45: Technical Specifications
23. Technical specifi cations Mains adapter Manufacturer DongGuan Obelieve Electronic Co., Ltd. Importer MLAP GmbH Meitnerstr. 9 70563 Stuttgart Germany HR number: HRB 763735 Model OBL-0501000E (EU) OBL-0501000B (UK) Input voltage, AC 100–240 V ~ alternating current 50/60 Hz, max. 0.3 A frequency, input current Output voltage, DC 5.0 V... - Page 46 Radio Power supply DC 5 V 1000 mA Battery operation DC 3.7 V 2000 mAh, 7.4 Wh Runtime of up to 10 hours Output power 1 W RMS Headphone output 150 mV max. voltage UKW frequency band 87.5–108 MHz DAB+ frequency band 174.9–239.2 MHz Number of memory slots 30 (DAB), 30 (FM)
-
Page 47: Trademark Information
® word mark and logos are registered trademarks of Blue- tooth SIG, Inc. and are used by the manufacturer under licence. Silvercrest ® is a registered trademark of Lidl Stiftung & Co. Kg. Other trademarks are the property of their respective owners. -
Page 48: Conditions Of Warranty
24.2. Conditions of warranty The warranty period begins on the date of purchase. Please take care to keep the original purchase receipt. This document will serve as a proof of purchase. If, within three years of the date of purchase of this product, any defect in material or manufacture should become evident, the product will –... -
Page 49: Scope Of Warranty
24.4. Scope of warranty The product is manufactured in accordance with strict quality guidelines and thoroughly tested before dispatch. The warranty applies for defects in materials or manufacture. This warranty does not extend to product parts that are subject to normal wear and can therefore be regarded as wearing parts or to damage to fragile parts, e.g. -
Page 50: Processing Of Warranty Claims
24.5. Processing of warranty claims For speedy processing of your request, please observe the fol- lowing instructions: • For all enquiries, please keep the receipt and the article number (e.g. IAN 12345) to hand as proof of purchase. • The article number is to be found on the type plate, an engraving, on the title page of your instructions (bottom left) or on an adhesive label on the rear or underside. - Page 51 Service United Kingdom Hotline +44 20 3481 1602 Mon - Fri: 09:00 - 17:00 Please use the contact form at www.mlap.info/con- tact Service Ireland Hotline +353 1 6533859 Mon - Fri: 09:00 - 17:00 Please use the contact form at www.mlap.info/con- tact Service North Ireland Hotline...
-
Page 52: Supplier/Producer/Importer
Service Cyprus Hotline +357 2 2008081 Mon - Fri: 09:00 - 17:00 Please use the contact form at www.mlap.info/con- tact IAN: 341 133_1910 25.6. Supplier/Producer/Importer Please note that you cannot use the address below for returns. Please contact the Service Centre mentioned above. MLAP GmbH Meitnerstr. - Page 53 MLAP GmbH Meitnerstr. 9 70563 Stuttgart GERMANY Stand der Informationen · Last Information Update Version des informations · Stand van de informatie Stan informacji · Stav informací · Aktuálny stav informácií: Update: 05/2020 · Ident.-No.: 50064698-44197-20200305-8 IAN 341 133_1910...