
Related Manuals for Huawei ACBox2000-21-D0-A-US


Summary of Contents for Huawei ACBox2000-21-D0-A-US
- Page 1 Part Number: 31010WDW ACBox2000-21-D0-A-US User Manual (U.S. Edition) Issue Date 2016-12-15 HUAWEI TECHNOLOGIES CO., LTD.
- Page 2 Notice The purchased products, services and features are stipulated by the contract made between Huawei and the customer. All or part of the products, services and features described in this document may not be within the purchase scope or the usage scope. Unless otherwise specified in the contract, all statements, information, and recommendations in this document are provided "AS IS"...
-
Page 3: About This Document
About This Document About This Document Purpose This document describes the ACBox2000-21-D0-A-US (ACBox2000 for short) in terms of the installation, cable connections, and maintenance. Read through this document to understand the safety information as well as the ACBox2000 functions and features before installing and operating the ACBox2000. - Page 4 Changes between document issues are cumulative. The latest document issue contains all updates made in previous issues. Issue 01 (2016-12-15) This issue is the first official release. Issue 01 (2016-12-15) Huawei Proprietary and Confidential Copyright © Huawei Technologies Co., Ltd.
-
Page 5: Table Of Contents
6.1 Checking Before Power-On ............................35 6.2 System Power-On ............................... 36 6.3 Powering Off the ACBox2000 ............................ 36 7 Routine Maintenance ......................... 37 8 Technical Specifications ......................38 Issue 01 (2016-12-15) Huawei Proprietary and Confidential Copyright © Huawei Technologies Co., Ltd. -
Page 6: Safety Precautions
The safety precautions provided in this document do not cover all the safety precautions. Huawei will not be liable for any consequence caused by the violation of the safety operation regulations and design, production, and usage standards. - Page 7 Comply with local laws and regulations when bridging and wiring AC cables. Follow local laws and regulations when operating AC-powered devices. Use dedicated tools when performing high voltage and AC operations. Power Cable Issue 01 (2016-12-15) Huawei Proprietary and Confidential Copyright © Huawei Technologies Co., Ltd.
- Page 8 Before connecting a power cable, check that the label on the power cable is correct. Component To ensure that a device runs safely, replace a failed device component with a component of the same type and specifications. Issue 01 (2016-12-15) Huawei Proprietary and Confidential Copyright © Huawei Technologies Co., Ltd.
-
Page 9: Product Overview
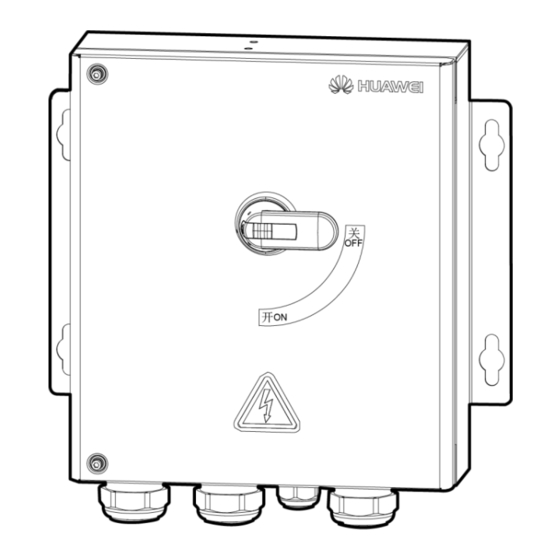
ACBox2000. Figure 2-1 Model number description Network Application Figure 2-2 shows the location of the ACBox2000 in a grid-tied PV power system. Issue 01 (2016-12-15) Huawei Proprietary and Confidential Copyright © Huawei Technologies Co., Ltd. - Page 10 NFPA_70. It is recommended that the ACBox2000 be installed near the inverter. Appearance Figure 2-3 shows an ACBox2000. Issue 01 (2016-12-15) Huawei Proprietary and Confidential Copyright © Huawei Technologies Co., Ltd.
-
Page 11: Label Conventions
Before removing the Operation warning ACBox2000 cover, disconnect all AC power supplies. Refer to instructions Remind operators to refer to the instructions shipped with the ACBox2000. Issue 01 (2016-12-15) Huawei Proprietary and Confidential Copyright © Huawei Technologies Co., Ltd. -
Page 12: Working Principle
EU WEEE mark The ACBox2000 must not be disposed of as domestic waste. 2.3 Working Principle Figure 2-5 shows the ACBox2000 working principle. Issue 01 (2016-12-15) Huawei Proprietary and Confidential Copyright © Huawei Technologies Co., Ltd. - Page 13 ACBox2000-21-D0-A-US User Manual (U.S. Edition) 2 Product Overview Figure 2-5 Working principle Issue 01 (2016-12-15) Huawei Proprietary and Confidential Copyright © Huawei Technologies Co., Ltd.
-
Page 14: Acbox2000 Storage
Periodic inspections are required during storage. If any rodent bites are found, replace the packing materials promptly. Before using an ACBox2000 that has been stored for a long period, ensure that it is inspected and tested by professionals. Issue 01 (2016-12-15) Huawei Proprietary and Confidential Copyright © Huawei Technologies Co., Ltd. -
Page 15: Installation
Hammer drill in.) and Φ16 mm (0.63 used for drilling holes in in.) supports Drill bit: Φ16 mm (0.63 in.), used for drilling holes in walls Issue 01 (2016-12-15) Huawei Proprietary and Confidential Copyright © Huawei Technologies Co., Ltd. - Page 16 Open end: 18 mm (0.71 Secures bolts. in.) Diagonal pliers Cut cable ties. Wire stripper Peels cable jackets. Rubber mallet Hammers expansion bolts into holes. Utility knife Removes packages. Issue 01 (2016-12-15) Huawei Proprietary and Confidential Copyright © Huawei Technologies Co., Ltd.
- Page 17 Cleans up dust after drilling holes. Diameter ≤ 10 mm (0.39 Marker Marks signs. in.) Measuring tape Measures distances. Level Levels hole positions. Protective gloves Protect your hands during installation. Issue 01 (2016-12-15) Huawei Proprietary and Confidential Copyright © Huawei Technologies Co., Ltd.
- Page 18 Hydraulic pliers Crimp OT terminals. Heat shrink tubing Wraps the cable crimping area of an OT terminal. Heat gun Heat-shrinks a tube. Cable tie Binds cables. Issue 01 (2016-12-15) Huawei Proprietary and Confidential Copyright © Huawei Technologies Co., Ltd.
-
Page 19: Installation Dimensions
The carrier where the ACBox2000 is installed must be fireproof. The ACBox2000 weighs 11 kg (24.25 lb). Ensure that installation surface is solid enough to bear the ACBox2000. Issue 01 (2016-12-15) Huawei Proprietary and Confidential Copyright © Huawei Technologies Co., Ltd. -
Page 20: Wall-Mounted Installation
Step 1 Locate the positions for drilling holes based on the ACBox2000 installation dimensions, level the hole positions using a level, and mark holes using a marker. Figure 4-3 Marking holes Issue 01 (2016-12-15) Huawei Proprietary and Confidential Copyright © Huawei Technologies Co., Ltd. - Page 21 Vertically insert expansion bolts into the holes, and knock the expansion bolts completely into the holes by using a rubber mallet. Partially tighten the expansion bolts. Loosen the bolts. Issue 01 (2016-12-15) Huawei Proprietary and Confidential Copyright © Huawei Technologies Co., Ltd.
-
Page 22: Support-Mounted Installation
Step 1 Locate the positions for drilling holes based on the ACBox2000 installation dimensions, level the hole positions using a level, and mark holes using a marker. Issue 01 (2016-12-15) Huawei Proprietary and Confidential Copyright © Huawei Technologies Co., Ltd. - Page 23 Step 3 Insert the delivered bolt assemblies (spring washers, flat washers, and M12x40 bolts) into the holes, and secure them using stainless steel nuts and flat washers. Issue 01 (2016-12-15) Huawei Proprietary and Confidential Copyright © Huawei Technologies Co., Ltd.
- Page 24 45 N· m using a torque wrench with an open end of 18 mm (0.71 in.). Figure 4-10 Securing an ACBox2000 ----End Issue 01 (2016-12-15) Huawei Proprietary and Confidential Copyright © Huawei Technologies Co., Ltd.
-
Page 25: Pole-Mounted Installation
N· m using a torque wrench with an open end of 18 mm (0.71 in.). Figure 4-11 Securing pole-mounting brackets Step 2 Secure the ACBox2000 to the pole-mounting brackets. For detailed operations, see Support-Mounted Installation. Issue 01 (2016-12-15) Huawei Proprietary and Confidential Copyright © Huawei Technologies Co., Ltd. - Page 26 ACBox2000-21-D0-A-US User Manual (U.S. Edition) 4 Installation Figure 4-12 Securing an ACBox2000 ----End Issue 01 (2016-12-15) Huawei Proprietary and Confidential Copyright © Huawei Technologies Co., Ltd.
-
Page 27: Electrical Connections
All DC switches of the two inverters that connect to the ACBox2000 are OFF. Huawei shall not be liable for any device damage caused by violation of the cable connection regulations specified in this document. 5.2 Cable Specifications... -
Page 28: Opening The Chassis Door
Step 1 Remove the two screws from the chassis door using a hex key and set them aside. Figure 5-1 Removing screws Step 2 Open the chassis door and install a door rod. Issue 01 (2016-12-15) Huawei Proprietary and Confidential Copyright © Huawei Technologies Co., Ltd. -
Page 29: Connecting A Ground Cable
Context You need to prepare M8 OT terminals. Procedure Step 1 Remove an appropriate length of the insulation layer from the ground cable using a wire stripper. Issue 01 (2016-12-15) Huawei Proprietary and Confidential Copyright © Huawei Technologies Co., Ltd. - Page 30 Step 6 Use the bolt to secure the ground cable crimped with the OT terminal and tighten the bolt to a torque of 8 N· m using a socket wrench. Figure 5-5 Connecting a ground cable Issue 01 (2016-12-15) Huawei Proprietary and Confidential Copyright © Huawei Technologies Co., Ltd.
-
Page 31: Connecting Ac Input Power Cable 1
Step 7 Connect the AC input power cable to the AC input terminal block, and then secure them to a torque of 8 N· m using a 13 mm (0.51 in.) socket wrench with an extension rod. Issue 01 (2016-12-15) Huawei Proprietary and Confidential Copyright © Huawei Technologies Co., Ltd. - Page 32 Step 8 Secure the cable routing pipe. ----End Follow-up Procedure Check that the cables are connected correctly and securely, and then seal the waterproof connectors with firestop putty. Issue 01 (2016-12-15) Huawei Proprietary and Confidential Copyright © Huawei Technologies Co., Ltd.
-
Page 33: Connecting Ac Input Power Cable 2
Step 7 Connect the AC input power cable to the AC input terminal block, and then secure them to a torque of 8 N· m using a 13 mm (0.51 in.) socket wrench with an extension rod. Issue 01 (2016-12-15) Huawei Proprietary and Confidential Copyright © Huawei Technologies Co., Ltd. - Page 34 Step 8 Secure the cable routing pipe. ----End Follow-up Procedure Check that the cables are connected correctly and securely, and then seal the waterproof connectors with firestop putty. Issue 01 (2016-12-15) Huawei Proprietary and Confidential Copyright © Huawei Technologies Co., Ltd.
-
Page 35: Connecting An Ac Output Power Cable
Step 4 Remove the safety warning panels and insulation partitions from the load switch. Figure 5-11 Removing safety warning panels and insulation partitions Step 5 Connect the AC output power cable. Issue 01 (2016-12-15) Huawei Proprietary and Confidential Copyright © Huawei Technologies Co., Ltd. - Page 36 The wire colors shown in figures are for reference only. Select an appropriate cable according to the local standards. Step 6 Reinstall the safety warning panels and insulation partitions. Issue 01 (2016-12-15) Huawei Proprietary and Confidential Copyright © Huawei Technologies Co., Ltd.
-
Page 37: Closing The Chassis Door
Check that the cables are connected correctly and securely, and then seal the waterproof connectors with firestop putty. 5.8 Closing the Chassis Door Procedure Step 1 Install the cover. Issue 01 (2016-12-15) Huawei Proprietary and Confidential Copyright © Huawei Technologies Co., Ltd. - Page 38 Figure 5-15 Adjusting the door rod Step 3 Close the chassis door and tighten the two screws on the door to a torque of 4 N· m using a hex key. Issue 01 (2016-12-15) Huawei Proprietary and Confidential Copyright © Huawei Technologies Co., Ltd.
- Page 39 ACBox2000-21-D0-A-US User Manual (U.S. Edition) 5 Electrical Connections Figure 5-16 Tightening screws ----End Issue 01 (2016-12-15) Huawei Proprietary and Confidential Copyright © Huawei Technologies Co., Ltd.
-
Page 40: System Commissioning
□ Yes □ No Check that all the locking caps on idle waterproof connectors at the chassis bottom are tightened. Issue 01 (2016-12-15) Huawei Proprietary and Confidential Copyright © Huawei Technologies Co., Ltd. -
Page 41: System Power-On
Step 3 Switch off the output circuit breaker at the low-voltage side of the box-type transformer for the ACBox2000. Step 4 Turn the switch handle on the chassis door to OFF. ----End Issue 01 (2016-12-15) Huawei Proprietary and Confidential Copyright © Huawei Technologies Co., Ltd. -
Page 42: Routine Maintenance
The first inspection is Check that ground cables are securely connected. half a year after the reliability initial commissioning. From then on, the interval can be semiannual or annual. Issue 01 (2016-12-15) Huawei Proprietary and Confidential Copyright © Huawei Technologies Co., Ltd. -
Page 43: Technical Specifications
Highest operating altitude 4000 m (13123.36 ft) Relative humidity 4%–100% RH –40° C (–40° F) to +70° C (+158° F) Transportation and storage temperature Weight 11 kg (24.25 lb) Issue 01 (2016-12-15) Huawei Proprietary and Confidential Copyright © Huawei Technologies Co., Ltd. - Page 44 User Manual (U.S. Edition) 8 Technical Specifications Item ACBox2000-21-D0-A-US Protection level IP65/Type 3R Cable routing Routed in and out from the bottom Maintenance mode Maintained from the front Issue 01 (2016-12-15) Huawei Proprietary and Confidential Copyright © Huawei Technologies Co., Ltd.