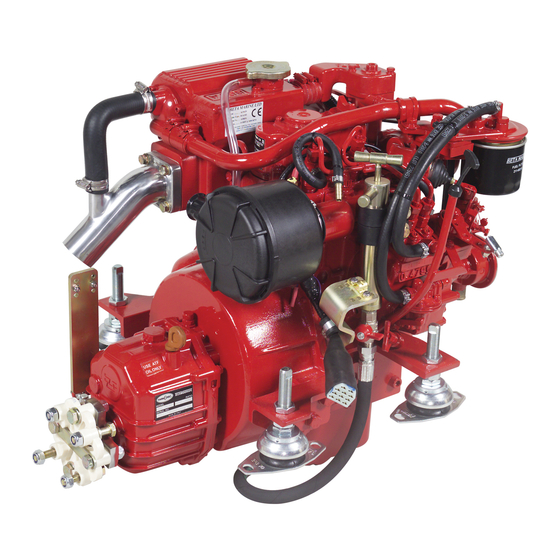
Beta Marine Beta 10 Operator's Maintenance Manual
Small diesel engine range
Hide thumbs
Also See for Beta 10:
- Operator's maintenance manual (100 pages) ,
- Installation manual (132 pages) ,
- Operator's maintenance manual (68 pages)
Table of Contents
Advertisement
Heat Exchanger
Heat Exchanger
& Keel Cooled
& Keel Cooled
Small Diesel Engine Range: Beta 10,
Small Diesel Engine Range: Beta 10,
Beta 14, Beta 16, Beta 20 & Beta 25
Beta 14, Beta 16, Beta 20 & Beta 25
CALIFORNIA –
Proposition 65 Warning: Diesel engine exhaust and some of its constituents are known
to the state of California to cause cancer, birth defects and other reproductive harm.
Operator's
Operator's
Maintenance
Maintenance
Manual
Manual
Advertisement
Table of Contents

Related Manuals for Beta Marine Beta 10


Summary of Contents for Beta Marine Beta 10
- Page 1 Heat Exchanger Heat Exchanger & Keel Cooled & Keel Cooled Small Diesel Engine Range: Beta 10, Small Diesel Engine Range: Beta 10, Beta 14, Beta 16, Beta 20 & Beta 25 Beta 14, Beta 16, Beta 20 & Beta 25 CALIFORNIA –...
- Page 2 Engine Details IMPORTANT - Please fill in details at moment of purchase - it really will help you! (and it will really help us specify the correct spare parts for you). Engine Type: Power: Speed: BETA WOC NO: Gearbox Type: Purchased From: Invoice No.: Date Commissioned:...
-
Page 3: Table Of Contents
Contents My engine details (to be completed now) Inside front cover Introduction Engine identification Initial receipt of the engine Engine storage Safety precautions Technical specifications Section 1: Installation guidelines Engine mounting Engine alignment - drives, flanges, flexible couplings Exhausts and mounting exhausts 7 &... -
Page 4: Engine Identification
We wish to help you, so if you do not fully understand any phrase or terminology or require any explanations please contact Beta Marine Limited or its distributors and we will be pleased to provide further advice or technical assistance. -
Page 5: Safety Precautions
D Fuel J A Growcoot, C.E.O, Beta Marine Limited i) Fuel Lines Diesel engines are equipped with high pressure fuel injection pumps, if leakages occur, or if pipes fracture, NOTE: Recreational Craft fuel at a high pressure can harm personnel. -
Page 6: Technical Specifications
Technical Specifications Standard Engines Beta 10 Beta 14 Beta 16 Beta 20 Beta 25 Cylinder Bore (mm) Stroke (mm) 68.0 68.0 73.6 68.0 73.6 Displacement (cc) Combustion 3 Vortex Cooling Water Starter voltage (V) Starter output (kW) Starter alternator output (Amps) -
Page 7: Engine Mounting
The installation details are basic guidelines to assist installation, however due to the great diversity of marine craft it is impossible to give definitive instructions. Therefore Beta Marine can accept no responsibility for any damage or injury incurred during the installation of a Beta Marine Engine whilst following these guidelines. -
Page 8: Engine Alignment - Drives, Flanges, Flexible Couplings
Engine Installation at an Angle It is probably better to totally drain the lubricating oil from the Beta Marine propulsion engines can be installed at angles up sump, replacing the oil filter with a new one; then add the to a maximum of 15° flywheel up or flywheel down when recommended amount of lubricating oil –... -
Page 9: Exhausts And Mounting Exhausts 7
(c) We recommend that you always create a ‘gooseneck’ with the exhaust hose (or purchase a propriety one) by Beta 10 to Beta 60 is 50 mm internal diameter; raising the exhaust hose 40 cms above the waterline and Beta 75 & Beta 90 is 60 mm internal diameter. - Page 10 If required - a cooling water feed (approx BSP) must be taken from the engine side of the anti-syphon valve for water lubrication of the cutlass bearing *measured on the centre line of the boat Standard Exhaust Anti syphon valve or T piece fitted here High Rise Exhaust Maximum...
-
Page 11: Fuel Supply And "Leak Off
When connecting the engine to the fuel supply and (ask your dealer or Beta Marine). return lines, flexible fuel hoses must be used (next to the engine) and must meet the requirements set in standard... -
Page 12: Cooling - Sea Water Inlet System
Canal Boats with Keel Cooling Narrowboats: With keel cooling the coolant (same fresh The Beta 10 to Beta 25 propulsion engines are available water / antifreeze solution as heat exchanger cooling) with keel cooling if required. The keel cooling supply flows around the engine and also the keel cooling tanks, and return pipes are 22mm diameter;... - Page 13 The keel cooling tank size should have a surface area exposed to the canal or sea water of: 0.25 x the bhp of the engine = the square feet of cooling area required (for steel hulls) Important: If you boat has a hydraulic drive, you will need to increase the surface area by approximately 30% percent.
-
Page 14: Calorifier Connections (If Fitted)
Calorifier System All Beta ‘Green Line’ engines are fitted with ‘Calorifier Connections’ to allow the hot coolant from the closed cooling system to circulate through a calorifier tank, which in turn heats up domestic water. Photos are shown below. 1. The big problem with a Calorifier is removing all the air from the piping /system. -
Page 15: Electrical Installation
Beta Marine has 6 control panels: A, AB, ABV, ABVW B or C. A cable tie is then put around to hold the two halves in The Beta 10 to Beta 25 use the A, ABV, ABVW, B and C position and help prevent any ingress of water. -
Page 16: Important Checks Prior To Initial Use
Section 2 Guidelines for Operation of Engine Important Checks Prior to Initial Use 1. Generally, a new engine has the oil and anti-freeze removed after the works test. Fill the engine with the correct oil and antifreeze (see sections on Engine oil and Cooling). -
Page 17: Starting And Stopping 15
Normal Starting Beta Control Panels - A, AB, ABV, B and C Deluxe - with keyswitch. To operate the engine: with the engine out of gear, set speed control lever to 1/3 throttle. 1) Turn key anti-clockwise to ‘HEAT’ position and hold for ten seconds. - Page 18 Stopping Every propulsion engine is fitted with a stop solenoid. When leaving the boat for an extended period: To stop the engine simply press stop push button, hold in • Turn off sea-cock (heat exchanger cooled engines). until engine stops, then turn key from ‘RUN’ to ‘OFF’ position. •...
-
Page 19: Maintenance Schedule
Section 3 Maintenance Schedule Every 150 hours Daily or every 8 hours running • If shallow sump (option) is fitted, change engine • Check engine oil level. lubricating oil and filter. • Check gearbox oil level. • Check coolant level. •... -
Page 20: Maintenance Schedule 17
Maintenance Schedule Daily or After After Every Every Year Every every 8hrs first first 150hrs with or 250hrs 750hrs running 25hrs 50hrs shallow sump if sooner Check engine oil level Check gearbox oil level Check engine coolant level Check battery fluid Check drive belt tension Ensure raw water inlet strainer is clear... -
Page 21: Lubrication - Checking And Changing Oil 19
Oil goes in here Dipstick Changing Engine Oil Note: On Beta 10 / engines not fitted with sump drain pump, the engine oil must be drained off by unscrewing (1) Run the engine for 10 minutes to warm up the oil. - Page 22 Note: It is best to have a plastic bag wrapped round the (4) Fill the engine with new oil as described in the previous filter to catch any oil left in the system (Always keep your paragraph. bilges clean!) Before screwing in the new filter spread a (5) Run the engine and check for oil leaks.
-
Page 23: Fuel System - Fuel/Water Separator, Fuel Lift Pump, Fuel Filter
Fuel System Important • Always fit a fuel / water separator in the fuel supply The recent changes to fuel specifications allow the system. Water in the fuel can seriously damage the addition of FAME (fatty acid methyl ester) biodiesel injection system and a replacement fuel injection pump EN14214:2009, to diesel fuel, but please be aware that is expensive. -
Page 24: Cooling - Fresh Water System, Heat Exchanger
Filling the Freshwater System d) Fill header tank to the top of the filler neck and replace New engines are supplied with the fresh water ‘coolant’ cap. Press down firmly on filler cap and hand tighten in drained off. The following instructions must be followed to fill a clockwise direction. - Page 25 Heat Exchanger Cooled Fresh water ‘coolant’ circulates through the engine and then the heat exchanger body where the engine heat is transferred to the sea water that is pumped through the heat exchanger cooling tubes (tube stack). The heated sea water is then injected into the exhaust system (see diagram).
-
Page 26: Sea Water Pump, Heat Exchanger
Tube stack Alignment marks Alignment marks Horizontal line Rubber seal Horizontal line (4) Drain off coolant into a bucket. around but must be aligned correctly with the horizontal line and rubber seal between the alignment marks at the (5) Unscrew the 6 end cap retaining bolts using a 5 mm exhaust end of the heat exchanger. -
Page 27: Belt Tensioning Adjustment
Belt Tension (3) Push alternator outboard by hand to tension the belt, then Warning: Belt tension must only be checked with the engine tighten link bolt. Check that the depression of the belt (at switched off. position shown) is approximately ”... -
Page 28: Electrical Maintenance
Maintenance - Electrical Warning: Under no circumstances should the battery be disconnected or switched off when the engine is running. This will seriously damage the alternator. Panels and Wiring See installation notes, page 30. General Maintenance (2) Check batteries for acid level and top up if required. (1) The panel must be protected from rain and sea water, For low maintenance and ‘gel’... - Page 29 Laying up Ashore d) If the engine will not be used or run for periods longer a) Change the engine oil before the boat is taken out of the than 6 months we recommend that the engine is water. Remember that warm engine oil is much easier to ‘inhibited’...
-
Page 30: Troubleshooting
Trouble Shooting Beta diesels are very reliable if installed and serviced correctly, but problems can occur and the following list gives the most common ones and their solution. Problem: Engine does not start but starter motor turns over OK Possible Cause Solution No fuel: Turn fuel cock on and fill tank. - Page 31 Fit electric fuel lift pump. Problem: Hunting at idle Possible Cause Solution Idle adjustment screw may need adjusting: speak to Beta Marine for advice with idle adjustment - discuss problem. Problem: Hunting at higher speeds Possible Cause Solution Fuel supply problem: Change fuel filters and check fuel supply.
- Page 32 Problem: Low oil pressure warning light on when underway Possible Cause Solution Oil frothing due to high installation angle or too high oil level: Refer to Beta Marine for advice Problem: Low oil pressure warning light on when engine speed is reduced to tick over Possible Cause Solution Faulty switch sender: Replace.
- Page 33 Insufficient restrictions in pipe to calorifier: Clamp off pipe to confirm. High exhaust back pressure: Beta 10 to Beta 25 maximum 70 mmHg; Beta 30 to Beta 60 maximum 80 mmHg, and Beta 75 to Beta 105 maximum 90 mmHg.
- Page 34 Problem: Battery quickly discharges Possible Cause Solution High load and insufficient running: Reduce load or increase charging time. Large domestic battery banks subject to high electrical loads will take a considerable time to recharge from a single alternator. Low electrolyte level: Top up.
- Page 35 Problem: Vibrations Possible Cause Solution Poor alignment to shaft: The alignment must be accurate even if a flexible coupling is used (see section 1, Alignment). Flexible mounts not adjusted correctly to take even weight: Check relative compression of each mount. Flexible mount rubber perished: Replace.
- Page 36 The following chart is compiled to aid diagnosis of electrical Standard Keyswitch Control Panels are faults, based on the Beta 10 - 90hp range of engines. If your supplied with four or five lamps. engine was built before July 2005, contact Beta Marine for the relevant electrical trouble shooting guide.
- Page 37 Electrical Fault Finding & Trouble Shooting - Engines built after July 2005 only ABVW - Keyless four lamp panel 2) Press ‘START’ button and hold in position until engine (without keyswitch) fires (see initial start-up section for maximum time starter can be operated). Release button (when This panel controls the engine with three water resistant engine has started).
- Page 38 Electrical Fault Finding - All Lamp Panels Problem Possible Cause and Solution No warning lamps or • Battery isolation switch in off position - switch on buzzer functioning, engine • Starter battery discharged - charge will not start or stop •...
- Page 39 Electrical Fault Finding - C Deluxe and Water Temperature Function on B Panels In addition to the fault finding detailed on the previous table, the following is specific for the deluxe panel (Also applicable for the B panel with Murphy water temperature gauge) Problem Possible Cause and Solution Oil pressure warning lamp not functioning,...
- Page 40 Electrical Fault Finding – Non-Beta Panels Engines can be supplied wired up to suit VDO switch Note: Water temperature switch/sender senders, usually fitted to a non-Beta control panel. If so refer (Part number 200-01133) to our wiring diagram 200-60971/01 (also part number for Large spade is sender connection (green/blue) replacement harness)
-
Page 41: Torque Settings
Spanner Torque Settings Tightening Torques for general use bolts and nuts ITEM Size x Pitch kgf m lbf ft (ft lbs) M6 (7T) : 6mm (0.24in) 1.0~1.15 7.2~8.3 9.8~11.3 M8 (7T) : 8mm (0.31) 2.4~2.8 17.4~20.3 23.5~27.5 M10 (7T) : 10mm (0.39in) 5.0~5.7 36.2~41.2 49.0~55.9... -
Page 42: Wiring Diagrams And General Arrangement Drawings Index
200-06520 & 200-06303 Page 52 & 53 12. Diagram of Deluxe panel ‘C’ & cut-out 200-06518 & 200-06306 Page 54 & 55 13. GA of Beta 10 H/E TMC 40 100-00030 Page 56 14. GA of Beta 14 H/E TMC 40 100-06019 Page 57 15. -
Page 75: Exhaust Emission - Durability
Emission Durability In respect to the Recreational Craft Directive 94/25/EC and amendment 2003/44/EC Annex 1, B3. The engine must be installed, maintained and operated within the parameters detailed in the Operator’s Maintenance Manual. Maintenance must use approved materials, parts and consumables. Should the engine lie unused for a period in excess of 6 months it must be inhibited otherwise it will deteriorate with resulting decrease in performance. - Page 76 Fast Moving Parts Listings H/E & K/C: Beta 10, 14, 16, 20 & 25. In all cases please quote Beta Marine WOC “K” number and Engine type. Description Part Number Qty per Engine 5” High Rise 50mm Water Injection Exhaust Bend...
-
Page 77: Fast Moving Parts Listing 76, 75
Fast Moving Parts Listings H/E & K/C: Beta 10, 14, 16, 20 & 25. In all cases please quote Beta Marine WOC “K” number and Engine type. Description Part Number Qty per Engine Panel ‘A’ Standard AK/2AS/KS01 Panel ‘ABV’ with tachometer AK/2ABV/KS01 Panel ‘ABVW’... - Page 78 Fast Moving Parts Listings H/E & K/C: Beta 10, 14, 16, 20 & 25. In all cases please quote Beta Marine WOC “K” number and Engine type. Description Part Number Qty per Engine Wasting Zinc Anode 209-61840 Heat Exchanger "O" Ring (with single bolt endcap) 209-80110 Heat Exchanger "O"...
-
Page 79: Service Record
Service Record Service Date Responsible Commissioned First 25 hours First 50 hours Every 150 hours with shallow sump Every Year / Every 250 hours if sooner Every 750 hours... - Page 80 Heat Exchanger Cooled Keel Cooled 10 to 150bhp 10 to 150bhp Marine Generating Sets 4 to 40kVA Sail Drives 13.5 to 56bhp Beta Marine Limited Tel: 01452 723492 Davy Way, Waterwells Fax: 01452 883742 Quedgeley, Gloucester Email: sales@betamarine.co.uk GL2 2AD, UK. www.betamarine.co.uk...